Showing posts with label protein. Show all posts

Saturday, July 6, 2013

Espresso Pudding Coffee Jelly Surprise


SURPRISE...!?

IT'S ONLY 75 CALORIES
it's fat free
IT'S FULL O' PROTEIN
with a caffeine kick in the pants.


fabulous PROTEIN-PICK-ME-UP...

much more fun than an energy drink or a calorie/carb filled protein bar.
a pretty little guilt free dessert or a satisfying late night sweet snack attack.


ESPRESSO PUDDING COFFEE JELLY SURPRISE

COFFEE JELLY...jello

3/4 cup cold coffee
1 cup hot  coffee
2 packet plain gelatin
sweeten or flavor coffee to your liking
NOTE...these measurements (1 3/4 cups liquid) make a wiggly jello texture, but DOES cut into cubes.  if you want it just a bit more firm, cut the liquid to 1 1/2 cups total.

ESPRESSO GREEK YOGURT PROTEIN PUDDING

2 cups plain greek yogurt, i use Fage
1 small box sugar/fat free Jello Pudding mix(4 serving size)
1/2 scoop vanilla whey protein powder
2 big shots of espresso(4 oz), cooled
1/2 tsp vanilla bean paste1/4-1/2 tsp cinnamon, optional
approx. 1/2 tsp espresso powder.
the espresso powder is optional, but i wanted a stronger espresso flavor.
1/2 cup vanilla protein shake...or milk of choice
put the shake in last as needed to thin to your desired consistency... sometimes i use about 1/4 cup shake.
put the dry ingredients in a small bowl and combine, set aside.  put the yogurt and espresso in a stand mixer and combine on slow then medium.  i used the whisk attachment.  slowly add the dry ingredients.  as noted, add a little protein shake or milk of choice if it seems too thick...don't forget IT WILL THICKEN MORE in the fridge.  TASTE TEST...does it need more espresso flavor...more sweetener? a splash of vanilla?  a sprinkle of cinnamon?

layer the jello cubes and yogurt mixture into cups of choice.  chill in fridge for a few hours.  serve with whipped topping and a few chocolate covered espresso beans.

if you have an Asian market near you, you can save the trouble and buy the "Coffee Jelly" (shown above).  i was unaware that this box was about 9 DOLLARS...my bad...but it was good and i wanted to see what texture and density was in the authentic Japanese style "jelly".  this is what i used in the photos, but i tested out the recipe i have given here on the second batch.

approx. NUTRITION...6 servings
(without whipped cream)
note...coffee should be ZERO calories
75 calories
11 grams protein
7.4 gram carbs
3.1 gram sugar

Tuesday, December 4, 2012

Forbidden Black Rice Egg Custard


SUPER GOOD...SUPER FOOD

rich with antioxidants, omega-3's and extra protein for great kick-start to all the busy holiday preparations.

forbidden rice ?...often eaten for breakfast in Asian countries.
egg custard ?...often eaten for dessert in the US.

put the two together and you have
dessert for breakfast.


a delicious custard with slight hint of coconut and a nutty black rice texture.  it's healthy, filling and fun.  use real sugar if you're not into sugar substitutes.  you could even try coconut milk if you want to.  i'm not sure how it would set.  i chose to keep the custard American style.  check out the nutritional facts below...quite good for such a decadent looking healthy treat.

note...just got a report from my co-worker and trustworthy friend Nancy.  she LOVED it!
so, i guess it passed the test.  i'm not the only one...whew


FORBIDDEN BLACK RICE EGG CUSTARD

2 cups cooked forbidden black rice
4 eggs
1 cup non fat milk
1 cup 2% milk
1/2 cup low fat cottage cheese
1 1/3 scoop vanilla protein powder...i use Jay Robb Vanilla Whey
1/2 cup sugar or sugar substitute...i like Zsweet
1/4 tsp ginger
1 1/4 tsp cinnamon
3/4 tsp coconut extract
1 tsp vanilla bean paste

an immersion/stick blender is preferred, but a regular blender will work.
preheat oven to 350 F.
 and prepare a 2 qt. 8x8 glass or ceramic dish with non stick spray.
you will cook in a bain marie, so start a pot of water to boil and choose a vessel for your bain marie and put in the oven while preheating.

cook black rice and let come to room temperature, set aside.
 in a small bowl combine the dry ingredients, ie. the ginger, cinnamon, sugar sub. or real sugar and protein powder...set aside.
with an immersion blender, blend eggs, cottage cheese, 1 cup of milk.  blend until you can not see any cottage cheese bits.  add remaining cup of milk,coconut  extract and vanilla paste.
add dry to wet slowly so you don't get clumps or lumps.  blend and blend until thoroughly combined and smooth.
NOTE...i use an immersion/stick blender, but i think a normal blender will work  i don't think a stand mixer will do the job.

add the rice to the custard mixture and stir with a spoon or i gently used a hand whisk to separate the rice...it's a little sticky.
pour into prepared dish.  try to make sure the rice is even on the bottom.
bake in bain marie/water bath for 40-45 minutes.
NOTE...some rice custard recipes call for you to stir the mixture 1/2 way through the cooking to keep the rice from settling in one solid layer on the bottom...so i did just that...at 20 minutes i gently stirred.  i think it helped.
when custard looks just set, remove from oven and water bath and let come to room temp.
NOTE...this is a thicker custard because of the cottage cheese and protein powder so it should look set in the middle.

enjoy warm or refrigerate and enjoy throughout the week for a healthy breakfast or guilt-free treat anytime.


nutrition facts 
approx. for 9 servings (with sugar sub.)
calories...128
protein...11
carbs...13
fat...3

Tuesday, November 20, 2012

Chocolate Pumpkin Pie...Gluten and Guilt Free


chocolate and pumpkin...a delicious pair


GLUTEN AND GUILT FREE 

super easy to make, no crust to deal with, diet friendly, can, should, be made ahead of time and leftovers are fabulous for breakfast or healthy treat with a little vanilla greek yogurt and fresh berries.
a chocolate dessert that's low calorie, full of protein and low-fat...a healthy end to a over stuffed Thanksgiving throw-down or for a great early start to a big "Black-Friday" shopping day.

would you rather have this or some dumb ol' protein bar...?

here are the nutrition facts 
10 pie slices and 2 small ramekins...12 servings total
(made with sugar substitute and 3 scoops pro. powder)

protein...11g
carbs...6g
fat...2g
calories... 83


CHOCOLATE PUMPKIN PIE...gluten and guilt free
ORIGINAL "Protein Pumpkin Pie" recipe found at Habits of Contradiction.
and my recent version of Protein Pumpkin Pie seen HERE

preheat oven to 350 F.
prepare LARGE pyrex pie dish and 2 small ramekins or an 11 x 7 glass pyrex with non stick spray.

2 cups pumpkin puree...(not pumpkin pie filling)
1 cup non fat or low fat cottage cheese
1/2 cup non fat milk
1/2 cup whole milk
2 eggs
1/2 cup sugar substitute.(plus a little more to taste.
don't be afraid to taste the batter for sweetness when done mixing. add more if needed
i use Zsweet.   real sugar would probably be fine.  i have not tried it. 
2-3 scoops protein powder.....you might want to start with 2. 
i use 2 choc. scoops and 1 vanilla scoop Jay Robb Whey Protein Powder
1/2 tsp salt
1 1/2 tsp cinnamon
1/4 - 1/2 tsp pumpkin pie spice
1/4 tsp espresso powder
4 Tbsp good cocoa powder...generous tablespoons, but not heaping

combine dry ingredients in a small bowl, set aside.
blend cottage cheese, eggs and 1/2 cup milk until smooth.  add remaining milk and 1 cup pumpkin...blend until very smooth. 
add remaining  pumpkin and blend until very smooth.  add dry ingredients slowly to prevent clumps.  i use an immersion blender and work it through the batter very well.   you do not want to see any lumps of pumpkin, clumps of dry ingredients or bits of cottage cheese.  there is no gluten or flour so this can be well mixed.
NOTE...i don't think a regular stand mixer will do the job.  maybe a blender, but as i said...i use a stick blender.

pour into prepared cooking vessel of choice.  gently knock a few times on a surface to release any air pockets.  decorate with a few pecans as you see fit.  bake for 40-45 minutes or until the center looks firm.  the whole thing should rise a little and puff up.  the edges will brown a bit.  do not be alarmed.  it will deflate and fall into a normal looking pie.  let the pie rest to room temperature and then refrigerate.

  serve chilled or room temperature with a drizzle of chocolate and whipped cream,...or as noted above, i like it for breakfast or snack with vanilla greek yogurt and fresh berries.


can be made in individual ramekins.  this happened out of necessity so i don't know the exact cooking time.  i had over-flow from the LARGE pie dish.  these are probably 7-8 oz ramekins shown here.


Wednesday, November 14, 2012

Protein Pumpkin Pie. Low carb and gluten free


yes, you are correct...

it IS topped with Brown Sugar Bacon Candy
and spicy pecans.
but...it IS a Protein Pumpkin Pie

and bacon IS protein...right ?...

i bet this is the best low carb, low fat, GLUTEN FREE, protein packed Pumpkin Pie you will ever taste.  i've been making it for 3-4 years and eat it for breakfast all the time...
and who doesn't love a little BACON CANDY...

GLUTEN FREE DOESN'T MEAN GLUTTON FREE


it's Fall...it's cold and it's pie time.
AND it's pumpkin time.
if you're anything like me...maybe not, but...
 after the big Thanksgiving throw down, i just can't fathom eating one more thing...i like a huge piece of MOM's pumpkin pie the next morning, chilled with a little vanilla greek yogurt and fresh berries.
i'll hide a piece in the back of the fridge just to insure i get my breakfast pie.
my mother does make a mean pumpkin pie and i do indulge in the real thing, crust and all...once a year,

BUT...i have this delicious protein packed pumpkin pie all year 'round.  i stock up on pumpkin around this time and make it just about once a month.


i usually bake it in this 11x7 glass pyrex dish and get 12 servings.  it's easier to store in the fridge.  it keeps for a week and i can usually polish it off by then with a little help from eager friends.
for presentation purposes i used a LARGE pyrex glass pie dish with 2 small ramekins for overflow.  (both versions are shown in photos)


nutrition facts look like this...12 servings
88 cals...11g protein...6.5g carbs...2.4g fat...2g fiber...

can you believe it !!!???


PROTEIN PUMPKIN PIE...GLUTEN FREE
(check your protein powder for gluten)
i found the recipe four years ago at Habits of Contradiction and have been making it ever since.
please check out the original and start from there if you'd like...i have tweaked it just a little bit.

2 cups pumpkin puree
1 cup low fat or non fat cottage cheese
1/2 cup non fat milk
1/2 cup regular milk
2 large eggs (i have used egg-beaters, but like real eggs better)
1/2 cup sugar substitute (or real sugar)...i like Zsweet.  much better than Splenda
2-3 scoops vanilla whey protein powder.
note... you might want to start with 2, but i use 3 scoops Jay Rob Vanilla Whey Protein Powder
1/2 tsp salt
1 teaspoon cinnamon
1 1/4 tsp pumpkin pie spice
1/2 tsp vanilla extract
1/2 tsp maple extract...optional
12 pecans for the top

preheat oven to 350F.
spray LARGE pie dish and 2 small ramekins  or rectangular 11x7 glass pyrex dish.

blend cottage cheese, eggs and 1/2 of the milk until smooth...until you can not detect any cottage cheese specks (SEE IMPORTANT NOTE BELOW).  add remaining ingredients and blend until smooth...VERY SMOOTH.  there is NO FLOUR so you don't have to worry about over mixing.
pour into sprayed cooking dish of choice, decorate with pecans and bake for 40-45 minutes or until middle is set and solid.  it should not jiggle at all
NOTE...(photo below) do not worry if the sides brown a little and the whole thing PUFFS UP.  it will deflate and settle.  this is a hard pie to "over-bake".
above is an example of extreme puff-age...not to worry, it will deflate if this happens
IMPORTANT NOTE...blending is key with this recipe.  i use an immersion blender (above photo).  i don't think i've tried a blender.  i bet it would work, but it might get to aerated...like mousse.  who knows...maybe something else delicious.  i will say that a regular mixer will not work.  you want smooth as silk texture.

BY THE WAY...this pie can definitely be made ahead of time.
please ENJOY some PIE !!!


Saturday, October 6, 2012

OATMEAL CUSTARD


GREAT START TO A GREAT DAY...

warm creamy custardy 4 grain oats with vanilla greek yogurt and fresh berries.
my idea of dessert for breakfast.


i'm up at the crack of dawn...
mornings are getting cold and i want comfort food.
well...that's a big fat lie.
we're having an unexplained heat wave here in California, but i still want something delicious, healthy and satisfying for breakfast.  i don't want a protein bar.  i don't want a bowl of granola.  i don't have time for eggs Benedict.  i surely can't get through the day on my Mexican pastries alone.  i need something with a little substance that will keep me going and i need something i can put together and get out the door.

this is a great recipe for those no-brainer, i'm too tired weekday mornings when you need some good healthy fuel to get going. make it for a Sunday breakfast and have the leftovers warmed up throughout the week.  dress it up with greek yogurt, syrups, berries, brown sugar and cinnamon, candied pecans...i'm sure everyone has there own ideas for oatmeal extras.

it's not a throw together recipe because you need cooked oatmeal, but it IS an easy recipe if you have that ready.  the cottage cheese might seem a bit odd, but trust me...it really adds to the creaminess and you don't even know it there.  spice it up as you wish.  i always like to add a touch of cardamom, fresh ground nutmeg, cinnamon and vanilla with a touch of almond extract.
i've tried a chocolate version, but haven't perfected it yet.  it was good, but not great, so i'll wait on posting about that.  meanwhile i'll continue on with this one and some different spice combinations.  since i'm so hot about rosemary lately, maybe i'l try that in there some how...hmmmmm.  i think rosemary and maple syrup might work well together...hmmm 


OATMEAL CUSTARD
adapted from Inn Cuisine

2 cups COOKED oatmeal...i use 4 grain hot cereal by Arrowhead Mills
1 1/2 cups low fat cottage cheese
2 large eggs-real eggs work better than substitute
1 cup low fat or skim milk
6 tbsp sugar or sugar substitute...i use 1/2 cup Z Sweet
1/2 tsp cinnamon
1/8 tsp cardamom
1/2 tsp vanilla extract
1/2 tsp almond extract
1 scoop vanilla whey protein powder...optional

preheat oven to 325 F degrees
coat 2 Qt baking dish with non stick spray
in a large mixing bowl, blend oatmeal, cottage cheese, eggs, milk, sugar, cinnamon, cardamom, and extracts in an electric mixer until smooth.
pour batter into prepared dish and bake for approx.1 hour...mine takes about 1 hr 5-10 minutes in a square glass pyrex in a regular oven.

serve warm, room temp or even cold for on the go...

NOTE...ovens are different and so are baking dishes, so i suggest you check it after 45 minutes and keep an eye on the first one.

nutritional info (approx.)
9 servings made with protein powder and Zsweet

cal...95
protein...6
carbs...16
fiber...5
fat...1

Monday, July 11, 2011

Vanilla Berry Chai Jello Treat


Stained Glass Jello Dessert made healthy...

i know, i know...we've all seen this one before.  commonly known as stained glass jello, but i bet you haven't tried this version.

it's lo-cal, lo-carb...no fat...NO GUILT...

it's FULL OF PROTEIN...and IT'S FUN !!! 


you see this type of jello dessert a lot in the Mexican markets, but it's usually made with sweetened condensed milk and sugary jello......and i've seen many recipes on the Internet all cute and colorful.  here's an example that i found at Mexicanfoodsandmore.com... BUT all the fun colors and flavors of jello are the pre-sugared ones and i don't see myself eating sweetened condensed milk in solid form anytime soon.

so i had a "light bulb moment"

why not use my vanilla protein drink as the milky base and use sugar-free jellos...
better yet...infuse different tea flavors into the colored jellos.
i dug out the Knox gelatin packets i had in the back of the pantry, put my lab-coat on and went to work.

the results have been delicious.  friends love the cute little squares i dole out and it's always a great conversation piece....
"where'd you get that?...what is that?...how'd you make that?...can i have some?..."
always followed by a big smile and a few giggles


this post is not so much a recipe as it is an idea,...
but i have put the ingredients for the treat i made shown in the photos.  you can see how flavors can easily be changed to suit what you have available.  i found that Worldwide Vanilla Pure Protein 21g or 35g protein (found at Trader Joe's) works well for the base and the Isopure (looks like this) Blue berry flavor worked well with it's icy blue color AND it added 40 more grams of protein to the batch.  look for Isopure at a nutrition store.  you could also try Gatorade G2 Icy Blue Berry or something else colorful.  i DID find that Gatorade wasn't as flavorful...Crystal light has some great flavors...cherry pomegranate is great


EASY PROTEIN JELLO TREAT

8 x 8 glass pyrex dish for finished product
2 cups vanilla protein drink
1 lrg box black cherry sugar free Jello (makes 8  1/2 cup servings)
16 oz of ice blue G2 Gatorade
OR 16 oz of Isopure Blueberry Protein drink
OR another flavor sugar free jello, 1 box
1 - 2 Chai tea sachet
dash cinnamon, cardamom and nutmeg, ginger

let me suggest a link to a GREAT blog post here at The food Librarian.  Mary has some fabulous photos and perfect instructions on making stained (broken) glass jello.  for an easy protein version, just substitute the condensed milk with the vanilla protein drink...NOTE...DON'T USE WATER...bloom your gelatin in 1 cup cold protein drink then heat in the microwave until completely dissolved then add the other cup protein drink and proceed.
use sugar free jello for the colors.
if you want to get creative or expand your flavors see below...

use chai ice tea for the water when making your colored boxed jello

also i like to add a small (small!) dash of cinnamon, cardamom, ginger and nutmeg to the vanilla protein drink.

if you are using another liquid, such as the Isopure Protein juice, Gatorade or what ever...use 2 gelatin packets for 2 cups of liquid....bloom your gelatin in 1 cup cold liquid for 5 minutes, give it a stir then heat in microwave until dissolved.  no need to boil, but don't walk away 'cuz it can over flow...not good.  stir...when completely dissolved add the other cup liquid and stir...pour into flat dish then refrigerate until completely firm.  cut into cubes....

 and again, refer to this great post/link, The Food Librarian, for finishing the project...i would write it all out, but Mary explains it so well and this would just get too long.

i'm sure you get the drift...it's not rocket science....
although you should win a prize for making it to the end of this post.

go wild with some fabulous flavor combos

i think i'll try something with chocolate protein drink?... next week when i'm done with this one.

Sunday, April 24, 2011

Mocha 'spresso On-The-Go Jello


forget those 5 hour energy drinks that cost a fortune.  make yourself some Espresso jello cups for those inconvenient times you need a pick-me-up.


i love these things...my friends love these things...you will love these things.  i think i've already made about 5 batches and i'll make more tomorrow.


i got this idea from Nicole at The Galley Gourmet.  in the post titled "Sunday Dinner" she had this fabulous photo of Chocolate-layered Espresso Jellies.  her recipe sounds absolutely delicious and a perfect end to a fabulous Sunday Dinner.


i, on the other hand, don't throw too many lavish dinner parties...none, if truth be known, so i came up with this easy Mocha 'spresso On-The-Go idea.  how much fun would it be to whip an espresso shot out of your brown bag lunch?...or pass these out at your next tailgate party?  try this for an afternoon pick-me-up or an after dinner guilt-free treat.  these are pretty guilt-free...just a little shaved dark chocolate never hurt anyone.


MOCHA'SPRESSO JELLO TO GO

below are the instructions for the way i have been making it, but of course, there are many many variations.  have fun with it...

makes 4 1/2 cup servings
1 packet of plain gelatin (7g per packet)
1/4 cup cool water
3-4 shots of espresso (equal to 3/4 cup)...HOT-reheat if you have to
1 cup vanilla protein drink (milk would probably work, but the protein drink is creamier, extra flavor, less calorie and low carb...Muscle Milk or Pure Protein are good)
sweetener to taste
(a splash of no sugar Hazelnut or Irish Cream sweetener is great.  i use Davinci's)
dark chocolate bar for shavings

NOTE...whatever espresso/protein drink/milk/water combo you use your goal is to end up with 2 cups of liquid. this can be like a straight up espresso shot or a flavored latte.  you want the liquid to taste as you would a favorite coffee/espresso drink, but a little more rich.  most friends liked the one with a little more latte flavor, but the straight up espresso was brilliant, if ya ask me...

pour 1/4 cup cool liquid (milk, protein drink, water) into a 2 cup pyrex measure.  add the gelatin packet and let the gelatin bloom for about 5-10 minutes.  stir it so that it doesn't clump up.  if it clumps, use a fork or spoon to mash clumps...a few little clumps are okay.  
pour your hot espresso into this gelatin mixture and stir until the gelatin has completely dissolved.  do a taste test...is it sweet enough?...remember this is a treat.

shave a little chocolate into the vessel of choice.  i got these little toss aways at Smart and Final.  reusable tupperware would be more green of me, but i never get them back and people tend to throw those away. i reuse these as much as possible.

pour the mixture in the cups and refrigerate until firm...takes a few hours

shave some more chocolate on top and you're ready to go...ANYWHERE

A POWERFUL LITTLE PICK-ME-UP TREAT !


Sunday, April 10, 2011

SKYR...Homemade Icelandic Yogurt


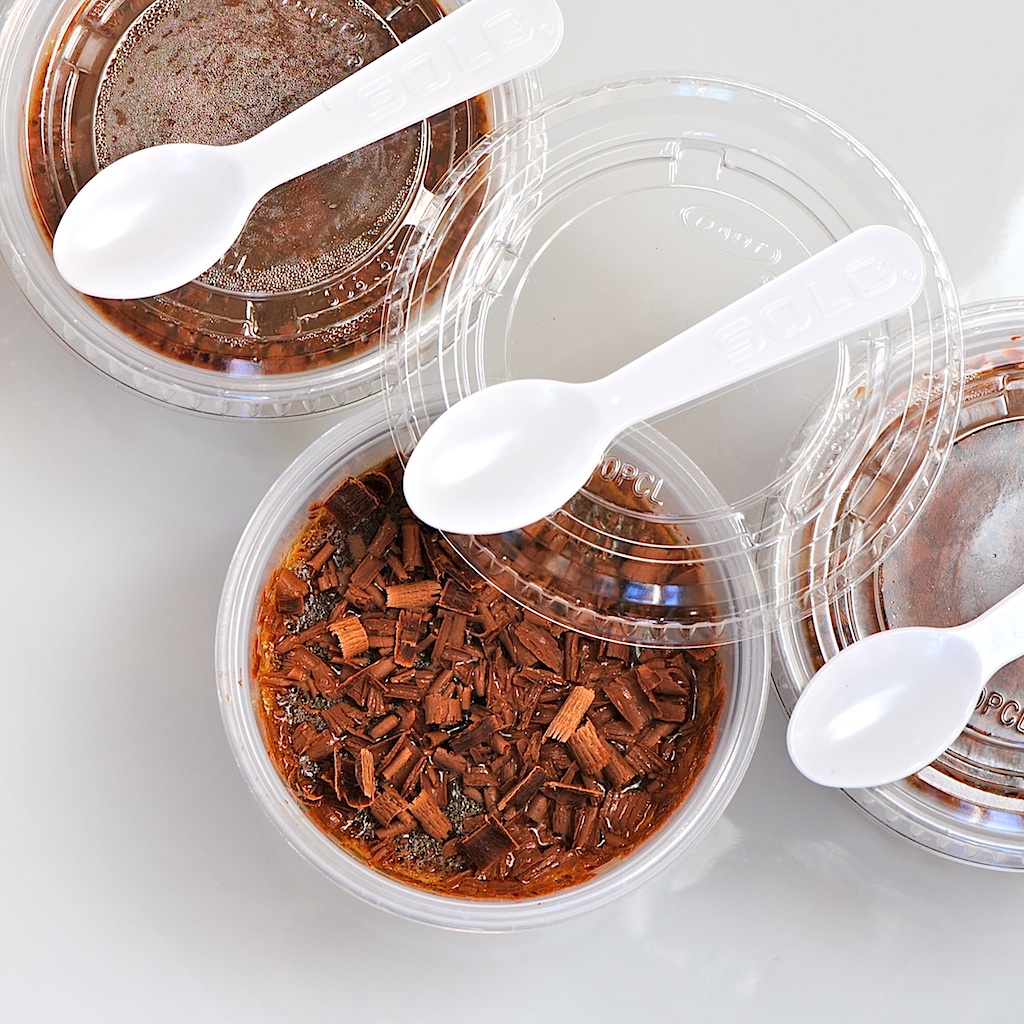
just look at those curds!
SKYR CURDS...
i love making yogurts and cheeses.  for some reason it's like baking bread.  i don't know why, but the smell of fresh yogurt right when you open the pot or while it's hanging in the fridge... gets me every time.  even when i'm having a bad day yogurt makes me happy.  if i've accomplished NOTHING in the day, at least i know i'm making yogurt...and it's gonna be good!
well, as promised, here is the SKYR recipe i use.  i should first state that i have not ever had "REAL" Skyr.  you have to go to Iceland to have "REAL" Skyr and i have no immanent plans to rush off to Iceland in the near future so i can only liken mine to the store bought here in America.  in any case if you haven't heard of SKYR...it is an Icelandic dairy product resembling Greek yogurt, but thicker and with a very slight cheese tang.  some say it's not a yogurt at all.  it actually IS a cheese.  the process of making it is like yogurt, but it calls for Rennet, a cheese making ingredient and the incubation doesn't seem to be as temperamental.


the important thing is you have to have skyr to make skyr.  luckily it seems to be growing in popularity.  like Greek yogurt, it is high in protein, low or NON fat and low in carbohydrates.  also a great way to get in some calcium.  the only brand i have seen around the markets is called Siggi's Skyr
if you can't get ahold of some Siggi's i read some other recipes that say buttermilk or other  live active culture yogurt will do, but there is something in real skyr that these don't have.  try high end markets or health food stores to find Siggi's


i've got this skyr thing down...you can too.  as i mentioned, it seems to be a lot easier than plain yogurt and the incubation is not as precise.  i get these beautiful curds every time.  i just can't help myself from taking a picture or calling someone into the kitchen to admire my curds... don't they just glisten in the sunlight?...okay...okay...enough already !!!


so you've seen the pictures of how the curds look after you cut them...above is a photo of the pot all wrapped up in 3 towels.  tightly wrapped and cozy.  i leave it this way for about 12 - 16 hours.  i didn't notice a difference in the end product if it sat 10 hours or once i left it for 18 hours...woops...still turned out great. i should mention i live in Southern California where the weather is not too extreme.  my house doesn't really get higher than 75 or lower than 55 degrees.

just below is a photo of the skyr before cutting the curds.  it should look like a solid mass with a little visible whey.


the photo below is a beautiful shot of the bottom of the heavy stainless steal pot after removing the Skyr for straining.  i wanted to add this photo in to show that this scalded looking bottom is OKAY !...
just a reminder...DO NOT scrape or stir down to the bottom of your pot.  it will not hurt your batch unless you scrape it into your finished product.

again...DO NOT be alarmed if you have a little scalding at the bottom.  of course you CAN prevent this by standing there and continuously stir while it comes to temp.  i prefer to set the pot on the LOWEST heat and walk away for an hour, hence the little bit of scalding.  this works for me, but i can't guarantee it will work with your equipment.
FYI...this should clean out very easily with a little soaking


just above is a beautiful photo of the professional straining method i have come up with for the fridge.
IMPORTANT...make sure you have a big enough container underneath to catch the whey dripping...could get ugly  


RECIPE and INSTRUCTIONS TO MAKE SKYR
i found 2 good, easy recipes for skyr.   one is at Recipezaar by Charlotte J and another was in a forum called The Icelandic Weather Report by a poster named Bigbearok.
below is kind of a combo of the two.  this works every time for me.  check the links to see if you would like to follow one of their recipes and instructions by the book.

MUST HAVES...
4 quarts (1 gallon) non fat milk...NOT ultra pasteurized
 Siggi's Skyr, or another brand if you can find it
Rennet...i use liquid rennet (vegetable base)
or...1/2 Rennet tablet dissolved in a little cold water
good thermometer
good quality stock pot, stainless steel
towels for wrapping up pot
cheese cloth or a big square of muslin works better
a large strainer

make sure all of your utensils are CLEAN.  heat the milk slowly up to 195 F degrees.  be careful not to burn the bottom.  slow heating, a heavy stainless pot and stirring will prevent this.  when it reaches 190-195 degrees, turn off and cool to 110 F degrees.  mix about 3-4 Tbsps of your starter (Siggi's or other live active culture yogurt) with a couple of Tbsp of the warm milk (one at a time) in a small cup until it seems combined and pourable.  add this mixture to the warm milk and stir being careful not to scrape up any milk solids that may have formed at the bottom of the pot.  now add the Rennet...i use 7-8 drops for 1 gallon if milk..again...stir carefully.
cover your pot and wrap it in 2-3 towels all cozy and leave it on the counter.  one recipe says to let it sit for 24 hours...another says 12 hours...and another says 5 hours...i let mine sit for 12-16 hours.  i have seen no difference in a few hours here or there.
uncover and take a peek.  it should be a pretty solid mass and there should be some visible whey (yellowish liquid).  if it still looks and acts like a pot of milk...something has gone wrong.

if all has gone well it is now time to cut the curds...
as shown in numerous photos above and obviously my favorite skyr step.  i don't know if this is completely necessary, but some recipes call for it AND i like the way it looks.  i think it helps the curds separate from the whey while straining. next, line a large strainer with a couple of pieces of cheesecloth OR i like to use a piece of thin washed muslin.
slowly spoon the curds into the lined strainer until all is in.  let this sit for an hour or two while most of the whey drains from the curds.
TIP !...i use the inside of my salad spinner for the strainer.  a regular pasta colander doesn't seem to work as well.  you need a strainer that will really allow the whey to drip otherwise it will take forever.
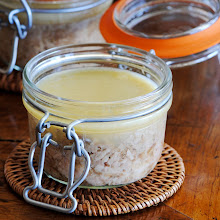
when it looks as though the dripping has slowed...gather the four corners, tie and hang from a wooden spoon (or something) over a sauce pan to catch the whey.  i like to move this to the fridge, but i suppose it can be done on the counter if it's not too hot.  a cool, well ventilated room is fine.  this should take a few hours.  your end result should be firm and a bit dry around the edges of the cloth...kind of cheese-like..i like mine a little thicker than commercial Greek yogurt, but not as thick as cream cheese.
remove from the cloth into a large bowl and stir or whisk until smooth.  one time mine was so thick i had to use the Kitchenaid mixer and whisk it up to creamy goodness...again...it was  delicious.
flavoring is up to you.  stir in a little honey and vanilla extract...i use a few packets of splenda and one vanilla bean...or i stir in some vanilla whey protein powder to taste....a couple of times i added some honey, vanilla bean AND fresh finely chopped ROSEMARY...YUM !
NOTE...the consistency should NOT be grainy like cottage cheese...stir or whisk until smooth.  if it is too thick you can stir in some of the whey or beat in a little cream and sugar for a richer, sweeter treat.

i hope my long instructions don't turn you away from trying to make your own skyr.  it really IS EASIER than it sounds.  once you get it down i bet you'll enjoy it more than regular or Greek yogurt. here are a few more links that i found helpful.

Jo's Icelandic Recipes
European Cuisines
Recipezaar...Icelandic curds
Wikipedia-Skyr
Icecook...Icelandic Cooking Recipes and Food


Related Posts Plugin for WordPress, Blogger...