Showing posts with label appetizer. Show all posts

Sunday, December 23, 2012

Velvety Cream of Asparagus Soup...non dairy


simple, elegant, healthy, satisfying, rich and velvety smooth.
a perfect soup for a chilly night after you've had a big lunch out with the relatives.
soup is always a great make-ahead meal to have on hand for a quick comfort food dinner when you're just too tired to lift a finger...
to whip up an easy pureed soup with just about any favorite vegetable, all you need are a few staples in the kitchen


a few staples for a simple easy pureed soup...

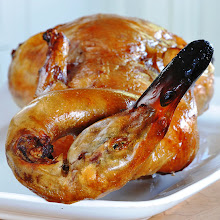
HOMEMADE ROASTED CHICKEN STOCK
in the freezer at all times...
never throw away a good roasted chicken carcass.  break the carcass down and save in the freezer.  when you have a few throw them in a big pot with water to cover and make up a batch of homemade stock.  just the carcass, skin and bones with some water.  cook it down for a few hours.  the viscosity you get from all those roasted bones and cartilage is the best, hands down.
A BULB OF ROASTED GARLIC
always tucked in the back of the fridge...
cut the top off, pour some olive oil on cut sides and wrap in foil.  throw it in the toaster oven for 40 minutes on 370 F.  remove cloves from skins and refrigerate in a small container covered with olive oil.  use a few cloves when ever you need that extra "took me all day" flavor.
SHITAKI MUSHROOM POWDER
hiding in the cool dark pantry...
i buy the big container of dried shitaki mushrooms from Costco.  put a good handful in the toaster oven on low for a few minutes to insure they are good and dry.  then put them in a spice grinder and pulverise until it is powder.  store in an airtight container in the pantry.
A HIGH POWERED BLENDER...
proudly displayed on the counter top...
not to sound like an infomercial or anything, but i highly recommend the VITAMIX.  i used to use my immersion stick blender for purees, but for this Asparagus Puree i thought i'd try the Vitamix.  i was truly amazed at the difference.  absolutely velvety smooth.  so much creamier than my others.  creamy...with no added cream...BIG difference.


NON DAIRY CREAM OF ASPARAGUS  SOUP

1 pound of blanched asparagus (salted water)
1/2 yellow onion, sauteed in olive oil
2 cloves roasted garlic
2 Tbsp shitaki mushroom powder...see note above
1 tsp fresh tarragon, minced 
1 tsp fresh thyme leaves
3 1/2 - 4 1/2 cups homemade chicken broth, depending on how thick you like your soup.

blanch asparagus, saute 1/2 onion, roast garlic, bring broth to a boil.
cut tips off asparagus and save for garnish.
add everything to the Vitamix/blender...or you can use an immersion blender (see note about blender vs. immersion/stick blender above).
puree until very smooth and creamy.  add more stock if too thick.
salt and pepper to taste.
serve with asparagus tips and a sprinkle of very fine chiffonade of tarragon.
after thought...maybe a tiny zest of lemon would work well...

Saturday, November 17, 2012

Forbidden Rice Risotto


comfort food.  that's what cold weather is all about...
but with a HEALTHY TWIST

let's just say that this is NOT your typical "risotto".
i would call it "risotto-like"...but it definitely fits the comfort-food category

all the deep rich flavors from the slow cooking and reducing are there, but the black rice has a different texture...almost "al dente-like" to regular rice.  it maintains it's shape no matter how long you cook it.  i cooked this for a good 1 hour and 20 minutes!  the black rice does not act like the Arborio used in classic risotto, but it does make an interesting twist on a popular comfort food dish.  
the end result was delicious and worth the effort, but i think i'll leave the risotto up to the professionals.
on the other hand....
for a fabulous easy recipe using this super-food rice...one on the sweet comfort food list, check out my post on "Black Rice Pudding".  i'm not sure i will make the risotto again (due to the time and effort), but i will surely be making the rice pudding for a healthy dessert alternative or breakfast treat..


Forbidden Rice...once revered for Emperor's only...is now considered one of the new "super-foods".
not only is it full of antioxidants, it is packed with a load of health benefits and more are being discovered.  for more information you might want to click HERE  and  HERE.


FORBIDDEN RICE RISOTTO

1 cup dried forbidden rice
2 1/2 - 3 cup vegetable or chicken broth
NOTE...i ended up using 4 cups homemade broth AND almost 1 can of low sodium broth (see more notes)
1 tbsp butter
1/2 medium shallot chopped fine
1/2 tsp dried thyme
1 big Tbsp shiitake mushroom powder
1/3 cup white wine
1/8 cup grated parmesan cheese
fresh thyme, basil or Italian parsley for topping
8-10 crimini mushrooms, sauteed and browned for additional topping

in a saute pan, melt the butter over medium heat and saute shallots until translucent.  do not brown.  add the forbidden rice and cook for a minute, stirring well so that the rice is well coated with butter and shallots.  deglaze the pan with the white wine and stir to incorporate.  when the wine reduces turn the heat to medium-low and add warm chicken stock...1/2 cup at a time.  add the dried thyme and shiitake mushroom powder.  when 1/2 cup has absorbed, add another...then do this again and again until all stock has been used and risotto looks creamy, done and delicious.  i guess this is "risotto 101".  i have never made risotto, but this is what i was told to do.  i'm sure it takes practice for a perfect risotto.
when you feel it is done, check for seasoning, stir in some grated parmesan and top with fresh thyme, basil OR Italian parsley...and sauteed crimini mushrooms.

A FEW NOTES...if i were to cook this again...i would probably pre-cook the black rice.  then go on with the risotto-like instructions.  i bet it would shorten the overall cooking time, make for a softer bite and it would take less stock.  the recipe called for 2.5 cups of stock and i went through about 5-6 cups of liquid AND it was on the stove for about 1 1/2 hours before it was done..
also when reheating (i had left-overs) just add a little more stock.


Sunday, August 5, 2012

Easy Hock Terrine


what to do with big beautiful UGLY ham hock...?

break it down, tear it apart, smash it in to a loaf tin...

call it charcuterie !...


hi peoples...
sorry, "writers block"...
ha...how apropos.  a block for a block.

maybe that's why i have 23 drafts with photos and recipes waiting for some fabulous intelligent description...hmmm...intelligent just ain't gonna happen.

SO...this is a "WHAT YOU SEE IS WHAT YOU GET" kind of post.
hence, this is more of an idea rather than a recipe.

while shopping at one of my favorite Asian markets, H Mart, i came across a beautiful fresh already cooked ham hock...displayed much like a supermarket might display it's fresh roasted chickens. it was still warm and pliable so i snatched the best looking one up and brought it home.  with a fridge over flowing with food ready to eat i thought what am i gonna do with this big hunk o' hock ?!

i know...i'll make a terrine.

HOW EASY IS THAT !?


of course you can cook your own ham hock and do the same thing, but that takes hours....and ingredients.

ham hocks, much like trotters (aka pig feet) have a lot of good sticky collagen.  this is what makes for good glue in a terrine.  no gelatin needed.

INSTRUCTIONS
all of the following should be done with a warm pliable cooked hock...cool enough to touch and work with.
remove the skin in one piece, if possible.  this makes a nice outer layer and helps hold everything together.  tear apart the meat and tendons.  remove any bones and cartilage.  chunks can be large, but better long and thin instead of fat chunks.  add a little hot water (broth if you have some) maybe start with 1/2 cup to get some of the juices flowing.  SEASONING IS KEY...taste your filling.  maybe add some chopped scallions, chinese five spice, garlic or onion powder, cumin?...salt and pepper!  terrines are something that need extra flavor.
find a vessel that will work well.  i use a small loaf pan.  spray the inside lightly then line with plastic wrap.  leave over hang on all sides.  cut the skin in strips and layer the bottom.  then start packing the goods in...evenly dispersing the meat, fat, tendons and odd bits and pieces.  everything must go in so that it will hold together, but you can discard any unwanted dark ugly veins.
pour what juices you have left over the top and let it sink in.cover with hang over plastic wrap and press down hard with something flat that fits the top of the meat.  you don't want any air pockets.  place in fridge with a weights on top.  your terrine should be ready in a few hours.

voila...you have made a terrine.
pretty enough for any charcuterie platter.
serve chilled, sliced thin.

Saturday, July 14, 2012

Kalamata Fig and Shallot BACON Jam


BACON JAM...i know you've seen it.  you say, "so what?!"

i'll tell you what...IT'S DELICIOUS.  that's what!

i love it so much that it has become a staple in our house...a guaranteed little jar of sweet bacony goo will be in the fridge at all times.  it goes with just about EVERYTHING!


i have made Spicy Chipotle Bacon Jam a couple of times and the newest combo with dried apricots and Garam Masal...not posted yet...but this version with dried Kalamata (light skin) figs seems to be a crowd favorite.
something about the snappy little fig seeds and the sticky spreadable texture.

serve with a nice tangy goat cheese on a seeded baguette and you've got a fabulous appetizer.
how about a waffle with maple syrup and a fried egg?
a huge spoonful on a grilled burger with Havarti cheese?
peanut butter, bacon jam and a bagel?....

the jars will disappear before you know it and you'll soon make this a staple in your fridge as well.  it's pretty darn easy, it makes the house smell delicious and you'll be a smash at the next dinner party if you bring a jar of this along....so go on...give it a try.


KALAMATA FIG AND SHALLOT BACON JAM

1 1/2 lbs sliced smoked bacon, cooked NOT CRISPY.
i prefer to do this in the oven on a rimmed cookie sheet lined with tin foil.  reserve 1-2 Tbsp fat for recipe and the rest for something else delicious...like Bacon Fat cookies perhaps.
1 medium onion, diced
1 large shallot, diced
7 oz. dried Kalamata figs, diced (remove hard stem)
1/2 cup cider vinegar
1/2 cup brown sugar
1/4 cup maple syrup
3/4 cup brewed coffee, i like strong
1/2 rounded tsp to 1 tsp garam masala(depending on strength)
1/2 tsp Mexican dried chili powder, optional
1/8 - 1/4 tsp smoked salt

cook the bacon in the oven or a saute pan, until it is browned and most of the fat is rendered.  reserve 1-2 Tbsp and try to get some of the yummy scrapings.
cook onions and shallot in a saute pan with bacon fat until translucent.
add vinegar, brown sugar, maple syrup, coffee, garam masala.  bring to a boil and scrape up the bacon bits off the bottom if you have used that pan to cook the bacon.  not too long...just until sugar has dissolved and everything is incorporated.
add bacon (that has been cut or torn into 1 inch pieces) and diced apricots...stir to combine.


transfer this mixture to a 5-6 qt. slow cooker and cook on HIGH, UNCOVERED for about 3 1/2 - 4 hours, until liquid is syrupy.

transfer to a food processor and pulse until coarsely chopped...or to desired consistency.  fill sterilized jars, let cool open to room temp, cover jars tight and refrigerate.

this should keep in the fridge for at least 4 weeks.  i have been known to open a fresh jar 5 weeks later and i'm not dead yet...as a matter of fact i'm working on one right now.


Friday, May 4, 2012

Queso de Puerco...Pig's Head Cheese


QUESO de PUERCO...or...QUESOS de CABEZA
sounds a lot better than the translation...HEAD CHEESE

but wait...don't go...come back...
all this talk about nose to tail eating, waste not want not, being green and everything...you can't tell me you're gonna shy away from a little head cheese.
come on...be the adventurous foodie that you think you are...it's delicious!


i know the picture is a little alarming...
but you DO have to get over the shock factor that it IS all ingredients from a pig's head.  part by part it can be a little daunting...maybe disturbing for first timers, but nowhere near as disturbing as  tackling the whole head.
authentic Queso de Puerco is made from the WHOLE pig's head boiled and broken down...
I COULDN'T DO IT.  i'm not there yet...baby steps...besides it's a well known fact that a whole pig's head would not be allowed into this house.  i've snuck ears, tails and trotters in before, but i think the head with a face...eyes and teeth might just sign my walking papers.
SO...i had a better idea...
i simply bought all the parts.  a few ears, a couple of snouts, some trotters and a Pozole meat mixture (grab bag) which includes tongue, cheek, ears, lips, and various other bits of fatty meats that work well for this thing called head cheese.  i'll bet you didn't know that delicious authentic Pozole you love so much from your favorite Mexican restaurant actually had all those parts in it.  well, consider yourself christened.  
now come on...try the Queso de Puerco

this is nothing like the head cheese you're afraid of.  if you consider yourself an adventurous foodie this is a fabulous challenge to take "head on".
when presenting it to unsuspecting guests and those less adventurous, slip a few slices onto your next meat/charcuterie platter...call it a fancy "terrine"  or "Pate de Tete" if you have to..., but this one really is good ol' head cheese with some spicy Mexican flavors
...it will surely be the conversation at the table.


the left overs...i'm sure there will be some...make a delicious sandwich...or sear a slice or two in a hot skillet.  it renders into crispy little unctuous fatty bits that are delicious on top of a cold crisp salad.


QUESO de PUERCO...or HEAD CHEESE with Mexican flavors

things like this always change in flavors, size and shape...it depends on what parts of the pig you can get your hands on...AND are you willing to handle the said parts?... 
this is what i started with....

2-3 full pig ears
2 full trotters, sliced in half by the butcher
2 lbs. (or a little less) of Pozole mix...various pieces of pig including tongue, cheek, ear, snout, butt.
2 pig snouts...i found cooked, roasted snouts at the hot food area in my favorite Mexican market..Northgate, Santa Ana, CA
1 1/2 tsp cumin
1 big Tbsp dried oregano
1 tsp chipotle powder
1/2 tsp cayenne, optional
8-10 peppercorns
 1 large onion, quartered
3-4 bay leaves
6 smashed garlic cloves
2 Tbsp apple cider vinegar
salt and fresh ground pepper

before you begin to cook, you need to take care of a couple things...
#1  you must look for any stray hairs that have made it past the first cut, so to speak.  check the ears, snout and trotters.  i find the easiest way is to burn them off with a lighter or even better, and more fun, use a kitchen torch...yes the one you use for creme brulee.
#2  i like to boil a big pot of water, big enough to hold everything and put all the meat in and boil the parts for about 5 minutes.  then remove, discard the water and clean the pot before using for the actual cooking.  this will take care of any lurking exterior impurities.

now...i could go on and on and get really involved with instructions, but really it "boils" down to this...

EVERYBODY IN THE POOL
all meats, veggies, herbs and spices into a pot big enough to hold it all.  cover with water,  water should just cover meats throughout the cooking process.
bring it to a boil, then to a nice simmer.  cook until all is fork tender.  approximately 3-4 hours.

again...trying to keep it simple...
remove meat and let cool to the touch.  remove bones, large fat and any unwanted parts...NO don't toss it all...that was a joke!
strain broth through cheesecloth.  taste broth.  it should taste quite over seasoned, so add more salt and spice if necessary.
pack meats into a large loaf pan lined with Saran wrap.  i like it well packed.  pour warm broth over and weigh some sort of lid down on top so as to press everything together packed tightly.  you will be pressing out most of the liquid so do this in the sink.  the more packed it is...the less gelatinous your block of head cheese will be.
refrigerate for a few hours.  it's ready when it is solid.

slice and enjoy with pride.
now you are a true nose to tail-er
or...snout to trotter...er


PS...if you truly want to attempt this and need more instruction, i would be more than happy to answer any questions.
here are a few other terrines i have posted about that pretty much use the same method.
once you have made one terrine you can make anything into a terrine.

Sunday, April 15, 2012

Chawanmushi. Japanese Steamed Egg Custard


Chawanmushi might sound exotic and look complex, but it's so simple to make.
it's really just a delicate egg custard filled with delicious little savory nuggets.
i'll be the first to admit that i DO NOT know Asian cooking techniques and terms as well as i would like to, so bear with me.  if you happen to be Asian or just know more about Asian cuisine...by all means drop me a note.  

BUT...for now i will keep it simple.

as i understand a classic Chawanmushi is egg mixed with dashi, a touch of soy, a splash of mirin...then poured over a few ingredients like diced chicken, shrimp, ginko nuts...and steamed to a delicious silky egg custard.
typically served as an appetizer, this dish can be transformed with just about anything you want to put into it...add udon noodles and you've got a main dish called Odamaki Mushi.
i've made this quite a few times...for a light dinner i added diced roasted chicken and sauteed crimini mushrooms in the custard and topped it with carrot, chive and a slice of octopus sashimi (shown in white bowl).   for a simple version (blue bowl) i added a few mushrooms i had already sauteed from the fridge...done...so simple...so delicious.  


NOTE...don't be scared off by the classic ingredients DASHI,  Mirin, Ginko Nuts...

this can also be made with good ol' chicken broth.
turns out this is an absolute "feel better" comfort food for any nationality.

BUT...i must say...making your own Dashi is too easy.  once you make it, you will recognize that distinct flavor.  Japanese cuisine uses it as a background stock in a lot of cooking. you'll find the Konbu Seaweed and the Bonita Flakes at most health food stores.  i really suggest going out and finding an Asian market near you.  they are a lot of fun with all kinds of goodies you've never seen.  i go just about every weekend and always find something new.  if you're in So. California, look for 99 Ranch Market...it's like a big Asian Ralph's.  they will have whatever you are looking for...and MORE.


CHAWANMUSHI
check link for other's comments and original recipe

2 large eggs
3/4 cup dashi (see below) or broth of choice
NOTE...some recipes call for more broth.  i like this amount of broth, but you can experiment with the ratio of eggs to broth.
1 dash mirin or sake
1/2 tsp soy
1/2 cup cooked diced chicken
chives
shredded carrots
a few Ginko nuts if you can get them
just a few sauteed crimini or shitaki mushrooms, diced or left sliced for topping.
your choice for more toppings.

set up a steamer that your bowls of choice will fit in.  start the steamer...you will want it hot and ready to steam when filled bowls go in.
in a medium bowl, whisk eggs gently with broth, mirin and soy.  divide diced chicken and diced mushroom into 2 - 3 small bowls.  pour egg mixture through strainer into bowls, slowly as to not disturb the diced items.  you don't want to have them floating about.
cover each bowl.  i used double saran wrap a few times and it works well.  just take care removing wrap when done so as not get condensation into finished chawanmushi

set covered bowls into flat surface steamer (steamer that is good and ready).
cover steamer and turn heat to a simmer.  
steam for 12-15 minutes (depending on size of bowls) or until egg is set...firm, but soft like silken tofu.

top with chives, green onion, shrimp, seared scallop. mushrooms, etc.....

DASHI
2 1/2 cups water
1 square dried konbu (kelp)
15g dried bonito flakes
1/4 tsp salt
1/2 tsp soy

briefly rinse konbu, put in sauce pan with water and bring to a boil over medium heat.  just before boil, remove from heat and add bonito flakes and soy.
let this steep and come to room temp...strain

NOTES...i added a heaping Tbsp of fresh diced ginger  when i added the bonito.  then strain.

store in the fridge as you would a simple stock.  i think it would freeze well so you can have some ready for chawanmushi on the fly.

you never know...this could be your new comfort food.

(woops...custard with chopsticks?...quite often my head is not using the right utensil)

Sunday, April 1, 2012

CAVIAR and EGGS IN A PERFECT EGG SHELL CUP


creamy eggs topped with Russian caviar tucked into a perfect little egg cup...
one of my all time favorite savory treats.  
so simple, so delicious, so delicate and SOOOO EASY !...

if you have the right tool !

i spotted this little uni-tasker egg gadget about 6 years ago, but i couldn't justify paying the whopping $55.00 for something that does one thing.  well, now that Rosle is making one and it only costs $20.00 bucks...i finally snatched one up.  now I can make the fancy looking froo froo caviar egg cup that i fell in love with years ago at L'Orangerie Restaurant.  piled high with caviar... my eyes would light up as it was brought to the table by the waiter wearing white gloves.  although it's doors are closed now, i'll never forget the wonderful dinners i had there and ordering this decadent first course every time.   
i missed my delicious little caviar egg cup...until now.


the Rosle Egg Topper...a must buy.  as far as gadgets go?  this one is worth it.  it does it's job and it does it well.  i purchased mine at Sur la Table, but i'm sure you can get one on line HERE or at the Sur la Table website...HERE.


this post isn't so much about the recipe, i'm sure you can all figure it out, but here is how i make caviar eggs.  these are not your every day scrambled eggs...they have way to much cream and butter, but they work well for the presentation in the shell and the rich creamy eggs compliment the savory dollop of caviar.


RECIPE FOR CREAMY EGGS
(if you want concrete Martha Stewart instructions click HERE, but this is how i roll...pretty much the same idea.)
first...top your eggs with your new topper...snap the topper once on the egg, then when you see a slight crack carefully slip a thin knife in and ever so carefully pry the top off.  you'll get the hang of it quickly.
remove egg from shell and clean inside well.  carefully dunk them into a pot of boiling water for a min or two to remove any impurities and set them upside down to dry while cooking eggs.
you'll need...about 1 per egg cup
heavy cream
butter
salt, but remember the caviar is salty
pepper (white is best)
chives
 and your choice of topping
and toast, of course.

if filling egg cups you'll need to add one or two more eggs than you need.  the pan and the pastry bag will catch a bit...besides you might have an accident with one of your shells.
use about 1/2 Tbsp heavy cream per egg (might need a little more.  i don't measure)
dash salt and pepper
whisk well, but not fluffy
start your pan on low and add a healthy (more than usual) pat of butter to coat.
add the eggs and let them get started...these need to be cooked low and slow, stirring all along to prevent large curds from forming.
the key is to take them off the heat before you think they are done.  you can always cook them more, but you can't undo something that has been over cooked.
use your judgement...remember these need to be soft enough to go into a piping bag, but firm enough to hold shape and support your topping.

fill a pastry bag with eggs and start to assemble.  caviar isn't necessary, but it sure elevates the dish to something special.  small diced smoked salmon with a dollop of creme fraiche is delicious as well.
the toast?...i think the best way is to saute with butter in a pan...for some reason it tastes better than out of the toaster.

Tuesday, November 15, 2011

Trotter Terrrine with Roasted Chicken


not your basic head cheese, but visually something very similar.  

maybe it's just the fact that it's meat held together by gelatinous broth..or maybe it's just that i used pig parts that are out of the norm,  but this was far more palatable than the sliced head cheese you've been afraid of since childhood AND a little more pleasing than snout, tongue  and jowls...
quite tasty i must say.  of course, i did run out and buy me some REAL head cheese.  not bad, but i wanted something a little more friendly...AND i didn't want to mess with all those various head parts.  i wanted easy...i wanted to enjoy the whole thing...lord knows no one else was going to have any...
what a bunch of pansy palates!

(above is store bought head cheese...not so scary at all)

TROTTER n' ROASTED CHICKEN TERRINE

recipe?...there really isn't much of a recipe to convey, BUT here goes...

cut to the chase...you're going to make stock from the trotters.  the trotters are necessary for the stock because that is the glue or gelatin that holds the terrine together.
you may make your stock any way, flavor, you please, but this is my usual method...

...photo above is purely inserted to let you know what you will be dealing with...

GOOD BROTH FOR TERRINES AND SOUPS

you'll need 2 full TROTTERS, cut in half to make 4 pieces...they are usually sold cut in half
1 yellow or white onion
couple stocks of cut celery
couple cut up carrots
5 -6 smashed cloves of garlic
1 bigTbsp Mexican oregano
2 tsp cumin
1 tsp Mexican chili powder
1 tsp coriander
fresh pepper
salt when you're almost done reducing
water, or water and chicken stock, to cover...go ahead and use a can or 2 of chicken stock with the water if you have it...i might have used 1/2 and 1/2.
don't over fill.

bring to a boil and then to a slow simmer.  simmer for at least 3 hours.  the pig's feet skin should be falling off the bone and very fork tender.
check water level during cooking to make sure feet are still covered.
remove trotters and strain broth through very fine strainer...i suggest cheese cloth as well.  you want this broth to be very clean.  let broth cool and then refrigerate so that the fat will rise to the top for easy removal.
let your trotters cool to the touch...now you need to go through every bit and remove any small bones.
put all the trotter meat (skin) into a container with a little broth and refrigerate until ready to use.

ASSEMBLY
roasted chicken...just go out and buy one...(can you spell "COSTCO")
cut or torn into big bite size pieces...i think i used about 1/2 a chicken
remove fat from broth container while it's cold...should pop right off the top.
warm the broth until it is liquid...TASTE TEST your broth...add a little more salt and pepper.  terrines always need a little extra flavor.
warm the trotter meat to loosen it up and cut into large pieces (or small if you don't want to really see them)
lightly spray a medium glass loaf pan
add meats to the loaf pan...you can layer if you'd like, but i just put it all in evenly dispersed.  you want to get a little something in every bite...pack it quite full.
then pour in your trotter broth.
i wanted my terrine to look packed so i pressed the meat down with another loaf pan and some soup cans.  you might find that more meat will fit in.  don't press too hard or you will have an over-flowing mess on your hands, but hard enough as to close the gaps between the meats.
put in fridge to cool and completely set.  this shouldn't take long...a couple of hours.
remove from loaf pan by slipping a knife around the edges and inverting onto plate.

slice and enjoy...this will keep for at least 5-7 days.

as far as any kind of serving suggestions?...i don't really know what you would pair this with.  i gobbled it up mostly by the slice, but served along with other cut meats and or some charcuterie type faire i think would be nice.  maybe some cornichons and a little Dijon or slap it between some bread and call it a "soup sandwich"...
any way you serve it you will enjoy it with a sense of pride knowing
you tackled the TROTTER


Monday, August 1, 2011

CHEVRE...Real Goat Cheese


CHEVRE...aka Goat Cheese

finally, i have mastered the real deal.

i received the best compliment i could imagine...

"this tastes just like the cheese we had in Paris"


my obsession with cheese and yogurts has not subsided...yet.
there is something sooooo satisfying about making your own dairy products.  i'm asked all the time,
"why don't you just buy it?"...
 i love the whole science of it and the smell of cheese and yogurt hanging in the fridge, but most of all it's the anticipation...
"is it ready yet?...when do i get to eat it !?"


goat cheese is one of my favorites of the cheese family...it's such a versatile product that can be eaten as is or as a star ingredient.
recently i came across what i am now calling my favorite dessert of the season...the year...probably in my all-time top ten.
it's a Lemon Goat Cheese Cake found at Foodbabbles.com  i was able to use some of my homemade goat cheese and, of course, it sent it to the top of the list.
i'll be posting about it soon...it is a MUST TRY !!!  please visit Kate's blog and see for yourself this wonder-treat.  she has great photos and step by step instructions for a no-fail winner.


back to the goat cheese...
there are a few ways to make your own goat cheese and i have tried these easy methods (as seen in this post) using lemon or vinegar...this is  before i knew any better..
but this method and recipe is FAR SUPERIOR !
one very important ingredient you will need is the right culture.  i found mine at a home brewing company out in Mission Viejo, CA.  there are also places to get this over the Internet...buy your rennet at a big health food store.
i've just ran out of my little packets of Mesophilic culture so i might want to try the packets available HERE at the Cheese making Company.com.  their packets contain the culture and the rennet all in one so there is no mixing and no room for error.  the beginner kit looks good, but not really necessary to get all the extras.  i was wondering how different culture will effect the out come...i'll have to get back to you on this.

there are many many many blogs and sites on how to make homemade goat cheese and some of the instructions get too involved...this is a really easy process...even i got it right the first time.


i thought who better to go-to than a woman who owns her own goats...Martha Stewart!...and she probably has some prize winning goats at that.
honestly...does she really make her own goat cheese?...or does she have someone do it for her...

HOMEMADE CHEVRE...GOAT CHEESE
this is for 1/2 the original recipe found at link above

1/2 gallon (2qts) pasteurized goat milk...NOT ultra pasteurized

1/8 tsp powdered Mesophilic DVI culture..1 used 1 packet Mesophilic MW3 from Mad Millie

1-2 drops liquid rennet

1 tsp kosher salt (or to your taste)

1. add goat milk to a large non reactive sauce pan or stock pot.  use low-medium heat until the milk reaches exactly 75 F degrees on an instant read thermometer.
2.  add the powdered culture and the liquid rennet to a small bowl.  add 2 Tbsp of the warm milk and stir until well combined (no lumps of culture).  add this small mixture to the large pot of warm goat milk.  cover and leave at room temperature overnight.  i have left it for 15-20 hours.
3.  cut the set curds across the pot and again the other way.  same as seen here in my Skyr post for Icelandic Yogurt.
set a large colander over a large pot/bowl and line with double layer cheese cloth or i prefer a nice clean square of reusable muslin.  the bowl underneath the colander must be big enough to catch quite a bit of whey that will drain.  carefully transfer the mixture into the colander.  Martha says to cover this with cheesecloth, i just covered it with a lid that fit on top of the colander.
let this set at room temperature overnight...mine sat about 15 hours.
remove from cheesecloth,  discard liquid and transfer cheese to bowl and mix in salt (and, or other flavors)...don't forget to taste test.  it's a lot easier to flavor the cheese before it is chilled and you want it to incorporate if using fresh herbs.
store in refrigerator in airtight container, ramekin or shape into log wrapping in plastic wrap.

i took 1/2 the cheese and shaped it into a log for a more spreadable cheese and the other 1/2 i kept in the muslin and let hang in the fridge for another 8 hours.  this created a more crumbly cheese.


served on crisp seeded baguette with fresh fruit and your favorite preserves makes a tasty snack or a fabulous brunch side.

Friday, July 1, 2011

BACON JAM with a little kick


BACON JAM...are you kidding me?
was someone keeping this a secret?
how did i not know about this WONDER SPREAD?!

move over candied bacon...there's a new kid in town


good morning...good afternoon and good night !
i could eat this with every meal...and i think i have.

if you are a bacon fanatic, like myself, i suggest...demand you to try this fabulous easy slow cooker recipe for the sweet savory ride of your life.  it goes with just about anything and everything...wonderful with the apple-peanut butter combo...fabulous with a ripe camembert cheese and a crisp cracker...just the right topping for some toast soldiers and a 3 minute egg...

and on a burger ?  fagetaboutit !


SLOW COOKER BACON JAM
w/chipotle peppers
adapted from Martha Stewart

1 1/2 pound sliced bacon (apple wood smoked is great), cut lengthwise into 1-2 inch pieces
NOTE...if doing it on the stove top i find it much easier to keep the pieces large or whole for easier flipping and even browning.
2 medium yellow onions, diced small
3-4 garlic cloves, smashed peeled
1/2 cup cider vinegar
1/2 cup packed brown sugar
1/4 cup pure maple syrup
3/4 cup brewed coffee
1/2 tsp Mexican chili powder
2-3 chipotle chilies, diced...out of the can with a little of the adobo sauce

1.  cook your bacon until it is browned and the fat is rendered...OVEN or SKILLET...?

NOTE...the 1st time i cooked my bacon, in strips, all at once in the oven...much easier...BUT i lost out on the crispy bacon burnt scrapings that you get from cooking it in the skillet.    the finished product didn't miss the scrapings at all...it was fabulous.  i did a second batch on the stove top to see if there would be a big flavor  difference and i cut the bacon into small pieces...had to do it in 2 batches, took twice as long, kind of messy and kind of a big hassle.  this batch is in the slow cooker RIGHT NOW, so we'll see....i'm leaning towards the oven method and cutting it all into pieces before adding to the pot.

NOTE...i just tried the second batch...the one that i cooked the bacon on the stove top and used all the scrapings.  i did not see any noticeable flavor difference.  i will definitely use the oven method for my bacon from here on out.  i think i could still get some of the delicious scrapings off the jelly roll pan and add them, but like i said, i didn't notice anything worth going through all the trouble of stove top cooking.  i suggest cooking your bacon in whole strips all at once in the oven.

transfer the bacon to paper towels to drain.  pour off all but 1 tablespoon of the fat.  save the rest for future use...like these Bacon Fat Oatmeal Chocolate Chip Cookies perhaps.

Add onions and garlic, and cook until onions are translucent, about 6 minutes.

add vinegar, brown sugar, maple syrup, coffee, chili powder and chipotle chilies and bring to a boil, stirring and scraping the browned bits off the bottom of the skillet (or not if used oven method) with a wooden spoon.
add bacon and stir to combine.

transfer mixture to a 6 Qt slow cooker and cook on high, UNCOVERED, for 3 1/2 - 4 hours, until liquid is syrupy.

transfer to a food processor and pulse until coarsely chopped.  let cool, then refrigerate in airtight containers, up to 4 weeks


NOTE...i, obviously, put mine in airtight clip-top jars...try to make sure there are no air bubbles when loading into jars...that's where the spoilage can form first if you are storing a jar for a few weeks. this is very rich, but UNBELIEVABLY FABULOUS so you might use it sparingly...

or YOU MIGHT WANT TO SLATHER IT ON EVERYTHING !!!

i have a new favorite breakfast now that i have discovered this wonder spread...a bacon jam, peanut butter and fresh raspberry quesadilla.  spread the jam on one side, the p-nut better on the other, add the raspberries to one side and flap over like a quesadilla...talk about a delicious out-of-the-ordinary on the go breakfast...YUM !!!


Related Posts Plugin for WordPress, Blogger...