Showing posts with label meats. Show all posts

Saturday, June 21, 2014

Chipotle Braised Short Ribs


THE SHORT RIB IS KING !!!

BUT...this recipe is great for a lot of slow cooked meats....
i've cooked beef cheeks, pork necks and soon will test some pork belly and trotters.

AN ABSOLUTE MUST TRY !
go BIG or go home...
i mean...make EXTRA.
you will thank me later.

OH...and as the original recipe states...if you can wait a day after cooking, it gets even BETTER !


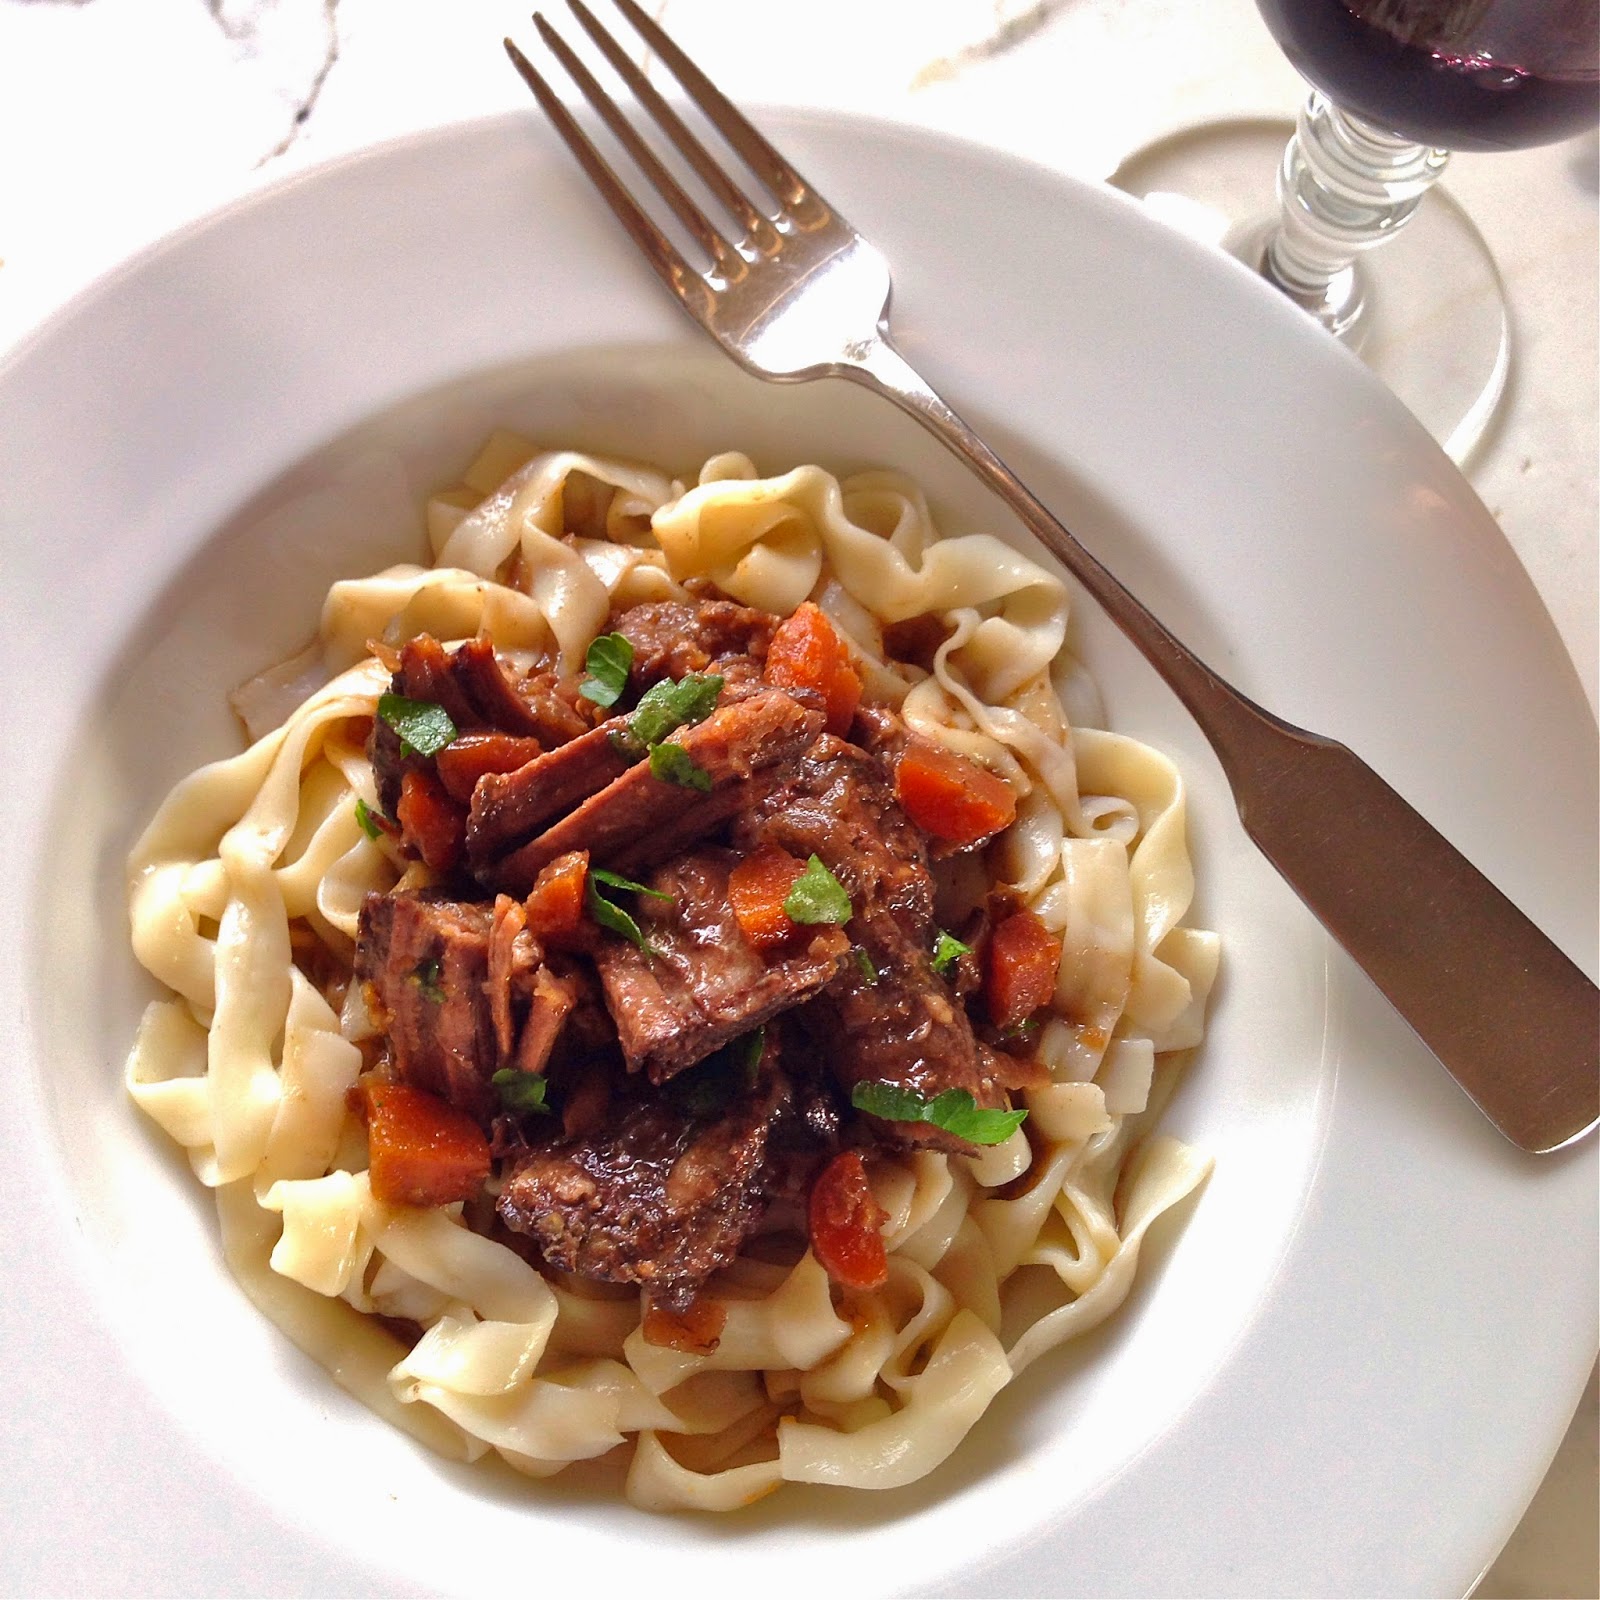
serve over rice, pasta, mashed potatoes, polenta steamed veg. etc....
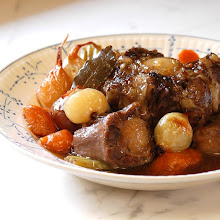
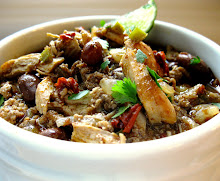
shown above with braising gravy/sauce and KONJAC Noodles for a gluten free Paleo-friendly hearty meal.


CHIPOTLE BRAISED SHORT RIBS
original found HERE

2 Tbsp olive oil
6-8 pieces short ribs
Kosher salt
fresh ground pepper
4 small carrots, diced
4 stalks celery, diced
i medium onion, diced
6 cloves garlic, smashed
2 Tbsp flour
4 chipotle peppers in adobo sauce...(or 2-3 if you can't handle the heat.)
2 tsp adobo sauce...(from canned chipotles)
note...i put 2 TABLEspoons.
2 cups red wine.  a syrah or zinfandel works.
1 cup beef stock (homemade is best. canned is a bit salty)
2 bay leaves

you can do this in a slow cooker, BUT...it is much better braised in a dutch oven.
preheat oven to 275F.
season the ribs all over with salt and pepper.  add a little olive oil to the dutch oven.  get your pot at med/hot and brown the meat on all sides.  do not crowd the pot.  you might have to do this in batches....set browned meat aside.
add carrots, celery, onion and garlic to the oil in the casserole pot.  cook on medium heat until vegetables are softened and golden.  about 10 minutes.  season with salt and pepper.
NOW...add flour, chipotle peppers and adobo sauce to the casserole with veg.  stir to combine.  deglaze the pot with red wine.  stir up ALL the good brown bits.  bring to a simmer and add the beef stock.
return the ribs to the pot and add bay leaves.  bring this to a slow simmer.  cover the pot and place in oven.  cook until the ribs are very fork tender.  about 3 hours.
IMPORTANT to check seasoning.  i tend to "under-salt".  you might want to add a little

PS...as Liren says...if you can wait or save some for the next day...they get EVEN BETTER

ENJOY !!!

get the biggest meatiest ribs you can find
dice your veg.  i think it looks good in the gravy/sauce.

Friday, March 8, 2013

Country Pate with Gluten and Dairy Free Panade


PATE de CAMPAGNE

COUNTRY PATE

aka ULTRA FANCY MEATLOAF


one of the most satisfying foods i love/hate to make.  every time i make it, i curse at myself for the time and detail i go into and how i can make this one even better than the last one, BUT when it's time to unveil and i get that first perfect slice.  OR hear someone say, "did you really make this?"  oh, there's nothing like it....
pure satisfaction of the beautiful specimen set in front of me...and "I" made it.

i must say, when it comes right down to it, there is no exact recipe.....like your Mom's meatloaf probably doesn't have an exact recipe...she just knows how to throw it together and it always comes out right.  every pate is just a little bit different, but the general ingredients and instructions tend to stay the same.


for this pate i will give you my measurements that fit perfectly in a "Pullman's"loaf tin.  these measurements are not set in stone.  you can work them a little bit to suit your taste.  as for the size?  you want to properly fill one loaf tin and if you have a little left over?...so what.   make little patties and enjoy right away because you will be waiting for the pate for a few days.

PATE de CAMPAGNE
fits in 9"x4"x4" pullman's loaf tin.

879g pork shoulder, cut into i-2 inch pieces (3 to 3.25 lb.)
232g ground pork (1/2lb.)
62g raw chicken liver trimmed (2 1/4 oz)
50g shallot, finely diced
3 cloves garlic, finely diced
2 1/2 tsp sea salt
1 tsp quatre epices (recipe below)
1 lrg. tsp dried rosemary, crushed or chopped fine
approx 1/8-1/4 cup minced parsley

ADD-INS...5 cooked, sauteed chicken livers chopped into small pieces
1/3-1/2 cup shelled pistachios
2-3 oz of smoked ham steak cut into long thick slices

FOR THE GLUTEN DAIRY FREE PANADE
3 TBSP OAT FLOUR
2 EGGS, slightly beaten
1/4 CUP COCONUT MILK
3 TBSP COGNAC OR BRANDY

CAUL FAT or BACON SLICES for the exterior
i have done the bacon wrap many times and it makes for a great presentation, although the bacon does not crisp...just to let you know.  Bacon wrapped Pate shown HERE
BUT...this time i found "caul fat" and had so much fun.  it was a bit difficult hunting it down, but when i finally got to work with it i fell in love with it's weirdness.  i like the presentation and flavor better than the bacon...can you believe i just said "better than bacon"?


instructions...
put the pork shoulder, the ground pork and the raw liver in a bowl.  take 2/3 and process it in a food processor until chunky.  remove from processor and put in the other 1/3 mixture.  process this a little more than the first batch.  mix the two batches of meat with the shallot, garlic, salt, quatre epices and dried rosemary.
saute your chicken livers and set aside.  when cool give them a little chop and set aside.
in separate bowl, mix together your gluten free panade.
now mix the panade into the meat.
add in the cooked chopped chicken liver and minced parsley.
now comes the IMPORTANT part...TASTE TEST.  cook a small amount in a skillet and check for seasoning.  pates need a little extra salt so if the test is "well" seasoned your good to go.

preheat the oven to 325F.  place a few bay leaves on the bottom of a slightly buttered loaf tin or pate mold of choice.  line the bottom and sides with caul fat or bacon slices or you can just use heavy plastic wrap.   make sure you have enough over-hang to cover the top.
note...put some water on the stove to heat for a bain marie.
pack the mixture into your desired vessel.  put the meat in, pressing down so there are no air pockets.  don't forget to put the long thin slices of ham and the pistachios intermittently throughout the pate mixture...don't over do it.  you just want it to be seen.  smooth the top and tap it on the counter to solidify and get rid of air pockets.  cover top with "over-hang" of caul fat, bacon or plastic wrap.  put a small piece of parchment on the top and cover tightly with aluminum foil.
place the pate loaf tin/dish into a larger heatproof baking dish and add enough hot water to come 1/2 way up the sides of the pate. put in preheated 325F oven for approx. 1 1/2 - 2 hours, or until the pate reaches an internal temperature of 160F degrees.  juices should be clear.
remove from oven and water bath.  let rest for about 30 minutes, then place some weights on top.  i keep a tinfoil covered brick on hand or 2 heavy cans of something will work with a flat piece of aluminum covered cardboard to fit on top of the meat.  when it is room temp. place in fridge (with weights) overnight or another day is even better.  the weights can come off after a few hours when the pate is good and cold and set.

serve room temperature or chilled with baguette, cornichons and dijon.
OR my favorite...slice and sear in skillet to add to a burger, serve with a poached egg for a decadent brunch or make Pate Paninis with melted brie and sliced pear or apple...YUM !


QUATRE EPICES SEASONING
1/2 tsp pepper, 1/2 tsp ground cloves, 1/2 tsp ground nutmeg, and 1/4 tsp ground ginger.

Wednesday, July 4, 2012

BEST BURGER EVER...Hands down


YES...hands down
THE BEST BURGER I HAVE EVER EATEN

TEN SIMPLE STEPS TO THE BEST BURGER

1.  buy some good rib eye.
2.  grind the meat yourself.
3.  don't pack the patty.
4.  cast iron skillet, searing hot
5.  medium rare is the way to go...
6.  remove from skillet before you think it's done.
7.  rest the meat!
8.  top with Saint Agur cheese while resting
9.  keep additions and condiments to a bare minimum.
10.  enjoy!

now go in for another before they're gone.


start with good rib eye.  look for nice marbling.  fat is a must.  you will be slicing the meat in strips, as shown, and feeding it into the hopper so a big huge plump rib eye is not necessary.
sprinkle the strips with a little onion powder and garlic powder (i prefer powder to salt) before feeding into hopper.


make sure all of your utensils and grinder parts are clean...clean...clean


feed the meat strips through the large hole cutter plate once...then change to the smaller holes and send it through again.  make sure you have a "stomper".  do not push through with your fingers.  ya never know...


when the meat has stopped flowing through, send a slice or two of bread through the grinder to help push the last of the meat through...you don't want to waste an ounce...trust me.


handle the ground meat as little as possible.
as mentioned, DO NOT PACK YOUR PATTIES.  with all the trouble you've gone to extruding the meat, you don't want to wad this beautiful tender meat into a hard ball.
i used a biscuit cutter for a mold...lightly filled it and pressed it just enough for it to hold together.
salt and pepper the patties.


i am now a true believer in CAST IRON SKILLETS.
get it searing hot.  do not move the burger.  flip once.
again, as mentioned...remove from skillet before you think it's perfect.  it will cook considerably while resting.


i highly suggest topping with a square of SAINT AGUR CHEESE.  if you're not into bluesy cheeses, then a nice pat of butter will always suffice for that extra little unctuous trick.
let the burger rest at least 5 minutes.


choose your condiments wisely...
you do not want to interfere with the flavor and texture of this burger 
i feel like i created a burger from scratch...you will too.
i never even made it to the table

now say it with me...
"i will never buy pre-ground meat again !!!

Thursday, June 7, 2012

Spicy Sausage Marinara (low carb Pasta)


i'll bet most home cooks have their own version of an Italian Marinara Sauce in their back pocket.

OR...know someone with the best red sauce recipe...OR you have your in-laws' Italian Grandma's hand written "gravy" recipe framed on the kitchen wall..well, i do know someone, but i usually just wait for her to have a big family dinner and hope for leftovers.  i just never turned out a good sauce for myself.  i must admit i've had a few batches of "just okay" or what i call "so-so sauces", but this one was tasty and good enough to share and post so i wouldn't forget.  i think it had a lot to do with the San Marzano Tomatoes, good spicy sausage and definitely the extra long cooking.  i'm not claiming any authentic Italian marinara here...just some good red meat sauce.  
it's pretty simple and comes together fairly quickly, but it really should cook for a few hours.  

so...i've finally learned the basics...set the day aside, buy the right ingredients, channel the Italian Grandma Gravy Gods...AND have my best friend Kim, whose a solid New York Italian known for her sauce, on speed dial...i think i called her 5 times.  maybe 6...


everyone's tastes are different so you might want to add a dash of something here and a smidgen of whatever there.  the key is to cook, stir, taste...cook some more and taste some more and so on.  i like my sauce thick and a little chunky with a bit of a kick.  too thick?...add stock or add some pasta water.  too chunky?...get out the immersion blender...to spicy?...add the pepper flakes toward the end or let the diners control the heat.  works well with any shape pasta, poured over steamed vegetables or this new "almost" spinach fettuccine i recently came across.


 let's talk a minute about this pasta...
it's NOT PASTA by any means,
BUT it is only 5 calories per serving!
believe it or not...this whole bowl with meat sauce has about 200 calories.


visually Pasta Slim does the trick.  we eat with our eyes and this truly looks like the real thing.
taste?...really has no flavor at all, but it does take on what ever you serve it with.
texture?... they are a little slippery right out of the bag and must be washed and dried as much as possible...and...some of the strands can be a bit long...like 4 feet long!... so they might need cutting.
other than that, they are a great diet, WHEAT FREE, carb conscious pasta substitute.
they definitely serve as a great vehicle for "sauce to mouth"


on with the recipe...

SPICY SAUSAGE MARINARA
makes about 6 - 7 cups.  use what you need then freeze the rest

1 med. yellow onion, diced
4 cloves garlic, diced small
2-3 Tbsp olive oil
3 spicy Italian pork sausage
1 sweet Italian turkey sausage
(sausage equaling about 1 1/4 lbs.)
1 28oz can San Marzano peeled plum tomatoes
(cut up as they go in the pot.  don't lose juices)
1 15oz can San Marzano diced tomatoes
1 15 oz can San Marzano tomato sauce
2 big Tbsp San Marzano tomato paste
1 big tsp dried oregano
2 tsp dried basil
1 - 2 tsp dried red chili flakes (more or less)
5-7 fresh basil leaves, torn or chopped
3 big Tbsp grated parmigiano reggiano
2-3 cups water

in a large stock pot...
start with olive oil and onions (med. heat), then add garlic.  remove casing from sausage and add meat to the pot. lightly brown the meat until it's cooked through.  separate the sausage lumps while cooking...it should resemble hamburger meat. 
add all tomato ingredients (with all juices), dried herbs, chili flakes and 2 cups water.
bring to a boil and reduce to a simmer.  stir occasionally.
after about an hour...add parmigiano and fresh basil.  if it looks to thick add a little more water.
simmer for 1 more hour. 
 taste for seasoning.
it should be ready to serve at this point...BUT...it will get better and better if you cook it for at least another hour.
NOTE...my best friend Kim (New York-Italian) cooks hers alllll day long, but she makes a HUGE pot with pork chops instead of sausage...so it cooks until the meat is just falling apart.  it's enough to feed an army of hungry Italians.  i had her on the hot line as i was cooking and she said leave it on...let it cook.

Friday, May 4, 2012

Queso de Puerco...Pig's Head Cheese


QUESO de PUERCO...or...QUESOS de CABEZA
sounds a lot better than the translation...HEAD CHEESE

but wait...don't go...come back...
all this talk about nose to tail eating, waste not want not, being green and everything...you can't tell me you're gonna shy away from a little head cheese.
come on...be the adventurous foodie that you think you are...it's delicious!


i know the picture is a little alarming...
but you DO have to get over the shock factor that it IS all ingredients from a pig's head.  part by part it can be a little daunting...maybe disturbing for first timers, but nowhere near as disturbing as  tackling the whole head.
authentic Queso de Puerco is made from the WHOLE pig's head boiled and broken down...
I COULDN'T DO IT.  i'm not there yet...baby steps...besides it's a well known fact that a whole pig's head would not be allowed into this house.  i've snuck ears, tails and trotters in before, but i think the head with a face...eyes and teeth might just sign my walking papers.
SO...i had a better idea...
i simply bought all the parts.  a few ears, a couple of snouts, some trotters and a Pozole meat mixture (grab bag) which includes tongue, cheek, ears, lips, and various other bits of fatty meats that work well for this thing called head cheese.  i'll bet you didn't know that delicious authentic Pozole you love so much from your favorite Mexican restaurant actually had all those parts in it.  well, consider yourself christened.  
now come on...try the Queso de Puerco

this is nothing like the head cheese you're afraid of.  if you consider yourself an adventurous foodie this is a fabulous challenge to take "head on".
when presenting it to unsuspecting guests and those less adventurous, slip a few slices onto your next meat/charcuterie platter...call it a fancy "terrine"  or "Pate de Tete" if you have to..., but this one really is good ol' head cheese with some spicy Mexican flavors
...it will surely be the conversation at the table.


the left overs...i'm sure there will be some...make a delicious sandwich...or sear a slice or two in a hot skillet.  it renders into crispy little unctuous fatty bits that are delicious on top of a cold crisp salad.


QUESO de PUERCO...or HEAD CHEESE with Mexican flavors

things like this always change in flavors, size and shape...it depends on what parts of the pig you can get your hands on...AND are you willing to handle the said parts?... 
this is what i started with....

2-3 full pig ears
2 full trotters, sliced in half by the butcher
2 lbs. (or a little less) of Pozole mix...various pieces of pig including tongue, cheek, ear, snout, butt.
2 pig snouts...i found cooked, roasted snouts at the hot food area in my favorite Mexican market..Northgate, Santa Ana, CA
1 1/2 tsp cumin
1 big Tbsp dried oregano
1 tsp chipotle powder
1/2 tsp cayenne, optional
8-10 peppercorns
 1 large onion, quartered
3-4 bay leaves
6 smashed garlic cloves
2 Tbsp apple cider vinegar
salt and fresh ground pepper

before you begin to cook, you need to take care of a couple things...
#1  you must look for any stray hairs that have made it past the first cut, so to speak.  check the ears, snout and trotters.  i find the easiest way is to burn them off with a lighter or even better, and more fun, use a kitchen torch...yes the one you use for creme brulee.
#2  i like to boil a big pot of water, big enough to hold everything and put all the meat in and boil the parts for about 5 minutes.  then remove, discard the water and clean the pot before using for the actual cooking.  this will take care of any lurking exterior impurities.

now...i could go on and on and get really involved with instructions, but really it "boils" down to this...

EVERYBODY IN THE POOL
all meats, veggies, herbs and spices into a pot big enough to hold it all.  cover with water,  water should just cover meats throughout the cooking process.
bring it to a boil, then to a nice simmer.  cook until all is fork tender.  approximately 3-4 hours.

again...trying to keep it simple...
remove meat and let cool to the touch.  remove bones, large fat and any unwanted parts...NO don't toss it all...that was a joke!
strain broth through cheesecloth.  taste broth.  it should taste quite over seasoned, so add more salt and spice if necessary.
pack meats into a large loaf pan lined with Saran wrap.  i like it well packed.  pour warm broth over and weigh some sort of lid down on top so as to press everything together packed tightly.  you will be pressing out most of the liquid so do this in the sink.  the more packed it is...the less gelatinous your block of head cheese will be.
refrigerate for a few hours.  it's ready when it is solid.

slice and enjoy with pride.
now you are a true nose to tail-er
or...snout to trotter...er


PS...if you truly want to attempt this and need more instruction, i would be more than happy to answer any questions.
here are a few other terrines i have posted about that pretty much use the same method.
once you have made one terrine you can make anything into a terrine.

Tuesday, November 15, 2011

Trotter Terrrine with Roasted Chicken


not your basic head cheese, but visually something very similar.  

maybe it's just the fact that it's meat held together by gelatinous broth..or maybe it's just that i used pig parts that are out of the norm,  but this was far more palatable than the sliced head cheese you've been afraid of since childhood AND a little more pleasing than snout, tongue  and jowls...
quite tasty i must say.  of course, i did run out and buy me some REAL head cheese.  not bad, but i wanted something a little more friendly...AND i didn't want to mess with all those various head parts.  i wanted easy...i wanted to enjoy the whole thing...lord knows no one else was going to have any...
what a bunch of pansy palates!

(above is store bought head cheese...not so scary at all)

TROTTER n' ROASTED CHICKEN TERRINE

recipe?...there really isn't much of a recipe to convey, BUT here goes...

cut to the chase...you're going to make stock from the trotters.  the trotters are necessary for the stock because that is the glue or gelatin that holds the terrine together.
you may make your stock any way, flavor, you please, but this is my usual method...

...photo above is purely inserted to let you know what you will be dealing with...

GOOD BROTH FOR TERRINES AND SOUPS

you'll need 2 full TROTTERS, cut in half to make 4 pieces...they are usually sold cut in half
1 yellow or white onion
couple stocks of cut celery
couple cut up carrots
5 -6 smashed cloves of garlic
1 bigTbsp Mexican oregano
2 tsp cumin
1 tsp Mexican chili powder
1 tsp coriander
fresh pepper
salt when you're almost done reducing
water, or water and chicken stock, to cover...go ahead and use a can or 2 of chicken stock with the water if you have it...i might have used 1/2 and 1/2.
don't over fill.

bring to a boil and then to a slow simmer.  simmer for at least 3 hours.  the pig's feet skin should be falling off the bone and very fork tender.
check water level during cooking to make sure feet are still covered.
remove trotters and strain broth through very fine strainer...i suggest cheese cloth as well.  you want this broth to be very clean.  let broth cool and then refrigerate so that the fat will rise to the top for easy removal.
let your trotters cool to the touch...now you need to go through every bit and remove any small bones.
put all the trotter meat (skin) into a container with a little broth and refrigerate until ready to use.

ASSEMBLY
roasted chicken...just go out and buy one...(can you spell "COSTCO")
cut or torn into big bite size pieces...i think i used about 1/2 a chicken
remove fat from broth container while it's cold...should pop right off the top.
warm the broth until it is liquid...TASTE TEST your broth...add a little more salt and pepper.  terrines always need a little extra flavor.
warm the trotter meat to loosen it up and cut into large pieces (or small if you don't want to really see them)
lightly spray a medium glass loaf pan
add meats to the loaf pan...you can layer if you'd like, but i just put it all in evenly dispersed.  you want to get a little something in every bite...pack it quite full.
then pour in your trotter broth.
i wanted my terrine to look packed so i pressed the meat down with another loaf pan and some soup cans.  you might find that more meat will fit in.  don't press too hard or you will have an over-flowing mess on your hands, but hard enough as to close the gaps between the meats.
put in fridge to cool and completely set.  this shouldn't take long...a couple of hours.
remove from loaf pan by slipping a knife around the edges and inverting onto plate.

slice and enjoy...this will keep for at least 5-7 days.

as far as any kind of serving suggestions?...i don't really know what you would pair this with.  i gobbled it up mostly by the slice, but served along with other cut meats and or some charcuterie type faire i think would be nice.  maybe some cornichons and a little Dijon or slap it between some bread and call it a "soup sandwich"...
any way you serve it you will enjoy it with a sense of pride knowing
you tackled the TROTTER


Monday, July 18, 2011

Crispy Skin Roasted Pork Belly with "EXTRA BITS"

EXTRA BITS !!!

DID I PAY EXTRA FOR EXTRA BITS ???

a little lesson in the reality of NOSE TO TAIL

(before i go on...Jamie Oliver's recipe for Crispy Skin Oven Roasted Pork Belly is FABULOUS.
i've cooked it many times and posted about it HERE)


well, this was my reality check...

that delicious unctuous Pork Belly actually comes from a PIG'S BELLY........ i know... DUH !


AND, like most animals, pigs have boobs...breasts, mammary glands...nipples...a bunch of them in fact...

on their bellies...


but...have you EVER encountered this (these) before?  
i have bought many a pork belly in the last few years, in all shapes and sizes, but i have not come across an actual "nipple" on the belly....until NOW.

am i just a naive beach city girl, buying her nice clean bellies from the "Super Market"?...
do country folk get the "extra bits" all the time?...
maybe this is a sign of good luck and wealth in some country?

does this not seem odd to anyone else?


the butcher showed me a beautiful slab.  i thought it looked small, but nice and fatty...i said, "i'll take that one".  i took it home, rinsed it and dried it thoroughly.  i started slicing at one end with my trusty sharp blade making sure the cuts in the skin were even...

i get to the other end and...EEK, what the heck is that?!
two larger than life piggy nipples !

well, at that point i was laughing out loud...grabbed the camera and thought no one is gonna believe this unless i get a good shot.

long story short...i cooked it up as usual ala Jamie Oliver's recipe and it came out fabulous looking as usual...except i knew there were two extra crispy nipples on one end...(as seen in photo).....as you might already know, the end bits are the best bites.
i'm all about the nose to tail deal, as you might have guessed by some of my other posts, but i'll have to admit...i didn't have the guts to eat the crispy nipples.  something about seeing the cross cut of an actual mammary gland just didn't sit right with me...maybe because i just can't eat parts i can so closely identify with...or maybe because i just plain chickened out, but i am a little embarrassed to say i did not partake in the crispy nipple bites...my loss...?

so, maybe i am just a naive beach city girl...maybe i did miss out on the good luck and fortunes, but i must say, if  put to the task...

next time i WILL eat the crispy bits in question.


and my post for Crispy Skin Pork Belly is here with my notes and others comments.

Friday, July 1, 2011

BACON JAM with a little kick


BACON JAM...are you kidding me?
was someone keeping this a secret?
how did i not know about this WONDER SPREAD?!

move over candied bacon...there's a new kid in town


good morning...good afternoon and good night !
i could eat this with every meal...and i think i have.

if you are a bacon fanatic, like myself, i suggest...demand you to try this fabulous easy slow cooker recipe for the sweet savory ride of your life.  it goes with just about anything and everything...wonderful with the apple-peanut butter combo...fabulous with a ripe camembert cheese and a crisp cracker...just the right topping for some toast soldiers and a 3 minute egg...

and on a burger ?  fagetaboutit !


SLOW COOKER BACON JAM
w/chipotle peppers
adapted from Martha Stewart

1 1/2 pound sliced bacon (apple wood smoked is great), cut lengthwise into 1-2 inch pieces
NOTE...if doing it on the stove top i find it much easier to keep the pieces large or whole for easier flipping and even browning.
2 medium yellow onions, diced small
3-4 garlic cloves, smashed peeled
1/2 cup cider vinegar
1/2 cup packed brown sugar
1/4 cup pure maple syrup
3/4 cup brewed coffee
1/2 tsp Mexican chili powder
2-3 chipotle chilies, diced...out of the can with a little of the adobo sauce

1.  cook your bacon until it is browned and the fat is rendered...OVEN or SKILLET...?

NOTE...the 1st time i cooked my bacon, in strips, all at once in the oven...much easier...BUT i lost out on the crispy bacon burnt scrapings that you get from cooking it in the skillet.    the finished product didn't miss the scrapings at all...it was fabulous.  i did a second batch on the stove top to see if there would be a big flavor  difference and i cut the bacon into small pieces...had to do it in 2 batches, took twice as long, kind of messy and kind of a big hassle.  this batch is in the slow cooker RIGHT NOW, so we'll see....i'm leaning towards the oven method and cutting it all into pieces before adding to the pot.

NOTE...i just tried the second batch...the one that i cooked the bacon on the stove top and used all the scrapings.  i did not see any noticeable flavor difference.  i will definitely use the oven method for my bacon from here on out.  i think i could still get some of the delicious scrapings off the jelly roll pan and add them, but like i said, i didn't notice anything worth going through all the trouble of stove top cooking.  i suggest cooking your bacon in whole strips all at once in the oven.

transfer the bacon to paper towels to drain.  pour off all but 1 tablespoon of the fat.  save the rest for future use...like these Bacon Fat Oatmeal Chocolate Chip Cookies perhaps.

Add onions and garlic, and cook until onions are translucent, about 6 minutes.

add vinegar, brown sugar, maple syrup, coffee, chili powder and chipotle chilies and bring to a boil, stirring and scraping the browned bits off the bottom of the skillet (or not if used oven method) with a wooden spoon.
add bacon and stir to combine.

transfer mixture to a 6 Qt slow cooker and cook on high, UNCOVERED, for 3 1/2 - 4 hours, until liquid is syrupy.

transfer to a food processor and pulse until coarsely chopped.  let cool, then refrigerate in airtight containers, up to 4 weeks


NOTE...i, obviously, put mine in airtight clip-top jars...try to make sure there are no air bubbles when loading into jars...that's where the spoilage can form first if you are storing a jar for a few weeks. this is very rich, but UNBELIEVABLY FABULOUS so you might use it sparingly...

or YOU MIGHT WANT TO SLATHER IT ON EVERYTHING !!!

i have a new favorite breakfast now that i have discovered this wonder spread...a bacon jam, peanut butter and fresh raspberry quesadilla.  spread the jam on one side, the p-nut better on the other, add the raspberries to one side and flap over like a quesadilla...talk about a delicious out-of-the-ordinary on the go breakfast...YUM !!!


Friday, May 6, 2011

Asian Style Pig Ear and Pork Terrine


PIG EARS ?!
yes, they're in there...that pretty  little unassuming stripe is EAR.

 introduce yourself slowly...bit by bit... to the "Nose to Tail" concept.  take the easier softer route and disguise your pig parts in a fancy terrine...sneak it in to your next charcuterie platter...or present as a creative hors d'oeuvre that will amaze your guests.

OR, if you're already gung-ho for "tip to toe"...simply enjoy this delicious Asian style terrine with some pickled ginger,  garlic chili sauce or a pinch of wasabi...yummm 


PIG EAR and PORK TERRINE
i sort of made this up, so if i've left something out please let me know and i'll fix it asap

FOR THE EARS

basically the most important part is the ear...cooking the ears.  i've posted about cooking pig ears in the past as seen ear...woops i mean HERE ...sorry, there's too many jokes readily available when talking ears.  there are a few details like removing any hairs and the pre-boil that can't be missed, please check the link.

(i know it looks scary, but i thought i better show you a photo of what you'll be dealing with...)

in a nut shell you need to cook 3 - 4 pig ears in an Asian flavored stock found HERE (without the Duck, of course).  simmer for about 3 hours or until they are very fork tender.  carefully pull out the ears and strain the broth through some cheese cloth.  let the ears (lay flat) and broth cool (separately) and get to room temp while you are preparing the ground pork.

FOR THE GROUND PORK

1 1/2 lbs of lean ground pork
2 - 3 cloves garlic, chopped
2 - 3 Tbsp fresh ginger, diced small
1/2  onion, diced
1 tbsp soy sauce
1 - 2 tsp sesame chili oil...or just sesame oil
a dash of cayenne
salt and pepper to taste

in a skillet with olive oil, saute the onions garlic and ginger until fragrant.  add ground pork...while pork is cooking separate so it is not in chunks and add the soy sauce and sesame oil...cook completely...salt and pepper to taste.  flavor and seasoning are very important in every part of a terrine.
let this cool a bit for easier handling.  process the pork mixture until it gets to a fine spreadable texture...not as far as a smooth pate, but you don't want any lumps or chunks.  you will want to add a little of the stock in to make a spreadable mixture...again, taste for seasoning when done.

FOR THE TERRINE

line a medium loaf pan with plastic wrap.  i used a glass pyrex loaf dish.  use enough wrap to over hang the sides.  i suggest you lightly oil the dish before trying to get the plastic wrap all the way in.
lay a few long chives down on the bottom for decoration.  
put about an inch of the ground pork mixture evenly on the bottom...then press lightly a layer of ears cut to fit as one layer.  then spread another layer of ground pork...another layer of ears, again, cut to fit for a whole layer.  end with a layer of pork mixture.  note...sprinkle a few small bits of chives in the layers for a little color.
now this next step is terrine 101, but if you don't know it can get messy so be prepared for overflow...
pour a little of the stock over the filled terrine.  a little at a time until it looks well moistened, but not saturated.  cut a rectangle out of cardboard that will fit the inside of the terrine...cover the cardboard with plastic. use the cardboard to press down and release any extra liquid (stock) and air pockets.  this will most likely overflow a little.  i like my terrines tight and well set with no air bubbles or gelatinous areas so i let set with some weight on the terrine...a foil covered brick works well...or some heavy cans.  then refrigerate for a few hours until completely chilled.
to unmold you might need to run a little warm water over the outside...if all turns out well, you should be able to flip the terrine out on a platter and peel off the plastic wrap to reveal a beautiful Pig Ear and Pork Terrine.  cut with a VERY sharp knife and serve with pickled ginger, chinese mustard, garlic chili sauce or maybe some wasabi.


Related Posts Plugin for WordPress, Blogger...