Showing posts with label nuts. Show all posts

Friday, January 25, 2013

Flourless Chocolate Espresso Pecan Cookies w/Fleur de Sel. Method #2, FAVORITE !


i know you've all seen this cookie before...but
THIS ONE IS A LITTLE DIFFERENT...
i've done them before, BUT i used Franscois Payard's Recipe and method.  they are similar in taste, but i hate to say this recipe received better reviews.  i'm not saying Franscois weren't absolutely delicious...i'm just saying these are DIFFERENT and to each his own.
these are more dense and thicker than the "Payard Cookie"...
and, as usual... i've added a touch of espresso and a little kick of cayenne.

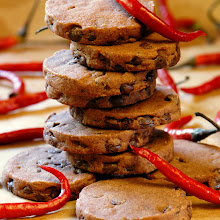
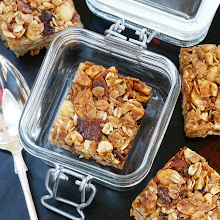
these are more like intense little chewy crunchy lumps of chocolate coal.
they seem to hold up better and will package well for for your chocolate loving friends.


these are too easy to pass up...
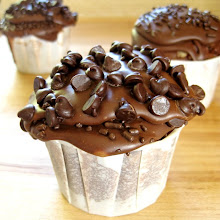
the flourless chocolate fudge cookie is a must for that intense chocolate fix.  it's definitely the chocolate lover's cookie.  i know you have some gluten-free friends or there's always a gluten free person in the room and you don't want to leave them out.  more and more people are going gluten free just for health's sake, so you better throw some of these delicious lumps of chocolaty goodness in your repertoire.


FLOURLESS CHOCOLATE ESPRESSO PECAN FUDGE COOKIES W/ fleur de sel

3 cups powdered sugar
1/2 cup plus 2 Tbsp unsweetened cocoa powder
1/2 tsp fluer de sel or smoked salt.....plus more for sprinkles
3 large egg whites
1 Tbsp plus 1 tsp pure vanilla
2 cups toasted pecans
1/2 tsp espresso powder
1/4 tsp cayenne...optional
1/2 cup chopped dark chocolate

preheat oven to 350F degrees.  line two baking sheets with parchment paper.  give the parchment a LIGHT spray of non-stick spray or a quick swipe of the butter stick.
in a bowl of a stand mixer, mix powdered sugar, cocoa powder, espresso powder, cayenne and salt.
mixer on LOW, add egg whites one at a time.  add vanilla.

HERE ARE THE 3 MAIN DIFFERENCES...
#1...mix on medium speed for 10-12 minutes until the mixture becomes slightly thick.
now...stir in the toasted pecans by hand.  i went ahead and threw them in the mixer for a minute, then finished by hand.  let the batter sit in the bowl for about 15-20 minutes...it will thicken.
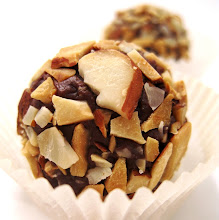
#2...place on prepared sheet and let sit for another 15-20 minutes.  i wanted to shoot the delicious dough so they sat for 25-30 minutes...this is how i got the "lumps of coal look" as seen in the 2 photos directly below.
#3...you've already done this, but there are only 3 egg whites not 4 like Payard's Recipe.  this makes for a thicker dough.
sprinkle with smoked salt while they sit in waiting.

put sheets in the oven and immediately lower the oven to 320F.  bake for 16-18 minutes, until outside looks cracked and shiny.  cool on cookie sheets on wire racks for 10 minutes then move cookies to wire rack and cool completely.
IMPORTANT NOTE about removing cookies from parchment...as noted in post about the "Payard Cookie", these cookies stick to the parchment even if you give it a light spray.  i do not recommend more spray.
when cookies are completely cool you need to carefully peel the cookie from the sheet.  do not use even a "thin" spatula.  it will mess up the bottom.  just peel the paper slowly from the cookie.

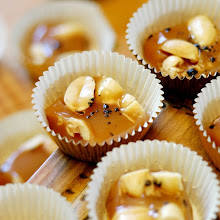
raw dough (above) after sitting out 25-30 minutes.  below is from same batch.

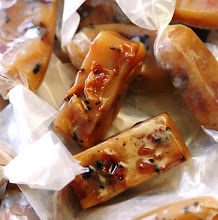
above is an example of the "Franscois Payard Flourless Chocolate Cookie".  as you can see it is a much thinner, but still fabulous, cookie.

Sunday, December 11, 2011

Giada's Parma Carrot Cake


this unassuming simple looking cake is...

SIMPLY DELICIOUS !

a new favorite carrot cake is on your horizon...trust me


this is a carrot cake like i have never tasted...not too too sweet like a lot of carrot cakes.  you can actually taste the sweetness from the carrots.  the pine nuts give it a buttery texture, you get a hint of fennel and the lemon just wakes everything up.  all those flavors combined create this very unique dessert.


i caught this on the Food Network show, "the Perfect 3".  Ina Garten and her perfect Classic Chocolate Cake, Paula Dean with her Red Velvet Cake and then there was Giada De Laurentiis with this interesting Parma Carrot Cake that caught my attention.


i DO love carrot cakes but sometimes they can just be over powered by spices, stringy carrots and cloyingly sweet with cream cheese frosting.  when i saw her adding fennel seeds and pine nuts i immediately pushed the record button and googled the recipe.

this is a definite winner and a "must-try" recipe.  the cake is versatile...can be baked in different vessels and served any way you choose.  serve as a star quality dessert or a simple tea cake...enjoy for breakfast brunch or snack...a warm frothy cappuccino or just a spot of tea...
IT'S DELICIOUS ON IT"S OWN !


PARMA-STYLE CARROT CAKE
recipe courtesy Giada De Laurentiis
i have copied it for you below with my slight changes in italics

2 1/2 cups all purpose flour...i substituted 1 1/4 white whole wheat flour
1 Tablespoon baking powder
1/2 tsp ground cinnamon
1/2 tsp salt
1 cup pine nuts (about 6 oz.)
1/2 cups sugar, plus 1/2 cup sugar...
NOTE...i mixed 1/2 cup splenda with 1/2 cup sugar and separated that.
also...on the show Giada did not separate the sugar.  she creamed the butter and the 1 cup sugar.  i did as the written recipe, so either way will work.  no need to separate...
1 tsp fennel seeds
1 lemon zested and juiced
2 cups peeled, shredded carrots (about 6 carrots)
1/2 cup mascarpone cheese
1/2 cup (1 stick) butter, softened
5 eggs
powdered sugar for garnish

preheat oven to 375 F
in a medium bowl stir together the flour, baking powder, cinnamon and salt.  set aside

place the pine nuts, 1/2 cup sugar and fennel seeds in a food processor and pulse to mince the nuts.  add lemon zest, lemon juice and the shredded carrots.  pulse to mince the carrots.  add the mascarpone cheese and pulse until cheese is incorporated

in a large bowl, using a stand mixer, cream together the butter and remaining 1/2 cup sugar.  add the eggs one at a time, until well combined.

add the carrot mixture to the butter mixture and stir until combined.  add the reserved DRY ingredients in 3 intervals and stir until just incorporated.

place the mixture in a slightly greased and floured 8 x 10 by 2 dish
NOTE...i used a 9" springform pan.  2 loaf pans might work well for serving as a sliced tea cake.  on the show Giada used some star shaped baking paper molds.

bake for 55 - 60 minutes...golden brown on top and toothpick comes out with a slight crumb.
let the cake cool for 1 hour, then lightly dust with powdered sugar.

i let the remaining cake sit out over night, then refrigerated it.  this cake keeps well for at least a few days.  bring to room temp before serving.  (great treat for breakfast).


Friday, December 2, 2011

Francois Payard's Flourless Chocolate Walnut Cookies


few words to say about these cookies except...

WOW...CHOCOLATE WHAM !

the best compliment in the world came from my ever so  fabulous chocoholic mother, who just so happens to be my greatest 'constructive' criticizer...

at first i hear nothing...silence.  then...

"hmmmm...this tastes like one of those $5.00 cookies"


these little, or rather large, gems have been around the block a few times and i have made something similar a while back, BUT i have never used this recipe and exact method...and i made sure i used grade A fabulous Dutch cocoa powder.  well worth the trip to the culinary store (SLT) to get the good stuff.


like i said...few words.  not only do i implore you to add these to your holiday treat list, BUT these are so easy to make, they are a huge chocolate lovers dream AND a big hit for those GLUTEN-FREE peeps that often have to miss out on a good thing.

a few quick notes...
do not over beat.  this should be a little runny, gooey and sticky.
when taking them off the parchment...peel them as though you are peeling an annoying sticky price tag off.  these DO stick to the parchment a bit...so don't be in a rush with the spatula. 
these keep well if completely cooled and stored in an airtight container.  do not stack.  i put a double piece of parchment in between the layers and was very careful not to put one directly over the other.
they get chewier the second day, but still have a crisp to them.


FRANCOIS PAYARD'S FLOURLESS CHOCOLATE- WALNUT COOKIES
recipe found here and copied for your convenience below

2 3/4 cups walnut halves...i only had about 2 cups
3 cups confectioner's sugar (powdered sugar)
1/2 cup plus 3 Tbsp. unsweetened Dutch-process cocoa powder
1/4 tsp salt
4 large egg whites, room temp.
1 Tbsp (TABLESPOON) pure vanilla extract
i also added 1/3 cup chopped dark chocolate...GOOD for extra WHAM factor.

preheat oven to 350 F. to toast your walnuts.
lay your walnuts out on a sheet pan and toast your walnuts, approx. 9 minutes.
(i did them in my Breville Smart Oven on # 2)...watch them closely.
let the walnuts cool and coarsely chop.  set aside.
position racks in the upper and lower thirds of the oven and...
LOWER THE TEMP. to 320 F.
in a large bowl, or on low in a stand mixer,  whisk the powdered sugar, cocoa and salt followed by the chopped walnuts.  while whisking, turn your speed to medium and add the egg whites and vanilla extract.  beat until just combined.  DO NOT OVER BEAT OR THE BATTER WILL STIFFEN.  
spoon the batter onto parchment lined cookie sheets.  Francois says 12 evenly spaced mounds...i got 8 per tray (2 trays) and did a second baking with 4, making 20 total.  as you can see mine were fairly large.  
bake them for 14 - 16 minutes until the tops are glossy and lightly cracked.  shift the pans bottom to top and front to back halfway through to ensure even baking.
slide the parchment paper with the cookies onto 2 wire racks and cool cookies completely before attempting to remove. 
as stated above...don't rush to use a spatula.  these will be semi stuck to the parchment.  peel the parchment slowly from the bottom of the cookie.
store in airtight container.  do not stack without parchment or something in between.
i know they will disappear quickly, but i kept a couple aside and the 3rd day they were still outstanding.


Wednesday, August 17, 2011

Indian Spiced Nuts


i've gone NUTS !!!

sometimes you feel like a nut...
and sometimes you feel like A LOT OF NUTS !!!
 i'm addicted.  i have loads of them every day.  i even put these and the Mexican Spicy flavored ones on my yogurt and fruit in the morning.
i eat them with chocolate...i eat them with cheese...
i give them away in nice little jars...just so i can make MORE NUTS !

why nut?(not)...they're good for ya !

i've made these about 5 times so far, tweeking it as i go, and i think i've come up with a good flavor mix.  it might be a bit spicy for some, so i suggest you use your judgment...maybe leave out the cayenne and or tone down the chili powder.  by the way, as i mentioned in the recipe please don't use regular chili powder that you would add in chili.   it will over power the garam masala.  read the label and see that it is only ground chilies...i get mine at the Mexican market, Northgate in Santa Ana or the Persian market, Wholesome Foods in Irvine.

this method for glazed nuts using just 1 egg white (plus sugar and spices) seems to work really well.  as you can see, the nuts have a nice glazed look, but without the stickiness that can happen with heated sugars, syrup and/or honey.
it is so easy, i make up a few batches at a time and change up the flavors.  i've posted about the Mexican Spiced Nuts and will probably post about the Snickerdoodle Nuts soon...they get eaten up quickly.


INDIAN SPICED NUTS

3 - 3 1/2 cups raw mixed nuts...your choice
(i use pecans, almonds, walnuts, cashews, pistachio, pumpkin and sunflower seeds)
6-8 dried apricots, small diced...OPTIONAL...see note
1/2 cup white granulated sugar
1 extra large egg white beaten until white and fluffy
1 Tbsp garam masala
1 Tbsp chili powder...(you might use your discretion...it can get HOT)
REAL chili powder, not the kind you put IN chili...i use Mexican ground chili
1/2 tsp cinnamon
1/2 tsp cumin
1/4 tsp ground ginger
a dash or two of yellow curry
a dash of coriander
1/2 tsp cayenne...OPTIONAL
2 full sprigs oven dried rosemary, crushed into pieces...see notes
fine sea salt to sprinkle before oven

preheat oven to 350 F degrees...throw your fresh rosemary sprigs in for a few minutes
lightly spray a baking sheet (with sides like a 1/2 sheet jelly roll pan) with non stick spray.  in a small bowl combine all the spices and sugar.  in a large bowl whisk the egg white until white and foamy.  add nuts to the egg white and about a 1/3 of the spice mixture...sir well to coat.  add another 1/3...stir to coat. finish with that last 1/3 and stir until it looks as though everything is evenly coated.  sprinkle in your crushed rosemary as you are stirring...you don't want this to clump into one spot.

spread evenly onto baking sheet and sprinkle with sea salt.  bake for 20 minutes.  take them out and stir them up and separate them a little.  let them rest for a few minutes...then back in the oven for another 10-15 minutes....but watch them carefully so they don't burn.
i find that this second baking keeps them crisp and fresh longer and it dries out the moisture from the apricots.

TIP...do not store them until they are COMPLETELY cooled, but do not let them sit out too long either...they might get sticky.  if they do get a little tacky, just put them back in the oven for a few minutes, let them cool then store again.

NOTES...if using dried APRICOTS you must check them after baking to see that they have sufficiently dried up.  they will prevent the nuts from staying extra crisp and fresh if storing in jars...if you are consuming fairly quickly then they will be fine and they are a tasty addition.
OVEN DRIED ROSEMARY...this tastes much better than store bought dried rosemary  i like to use fresh rosemary and dry it out in the oven...a few sprigs on a sheet pan at 300-320 degrees for about 7 - 10 minutes...or throw it in as you are preheating.

store in airtight jars or containers.
i like to throw in one of those "stay-fresh" packets that come in some store bought snack items...you know, that annoying little packet that looks like sugar, but says DO NOT EAT.
not necessary, but my nutty brain thinks it helps.


Tuesday, August 9, 2011

Turkish Coffee Truffles


TRUFFLES...
pretty easy, a little messy...
fun to make and people are always AMAZED that you made such a "decadent candy".

truffles are definitely a great gift item and are sure to impress everyone.  something about them screams decadence...why?...i don't know.  it's just a ball of rich creamy expensive dark chocolate lightly coated in another layer of rich dark chocolate, lightly roasted nuts or something else wonderfully delicious...what could be so good about that ?...!

EVERYTHING IS GOOD ABOUT THAT !

everything is good about truffles...period!


this flavor combo reminds me of Turkish Coffee...i love Turkish Coffee...powerful stuff.  thick dark coffee, a hint of cardamom and sweetened with a big spoonful of raw sugar...YUM !  you have to know just the right moment to stop sipping or you get a mouthful of sludge.  did you know that there are people who know how to read your coffee (sludge) grounds?  it's just like the Chinese read tea leaves.  you turn your cup upside down on a napkin and your future could be discovered...  ive never had it done, but maybe i'll come across the opportunity sometime...i hope.


once you get the hang of it the flavor combinations are endless.
just a few weeks ago i made some i found from Giada De Larentiis for Dark Chocolate Balsamic Truffles...
for  a healthy version try Chocolate Coconut Healthy Truffles

there IS a Truffle out there for everyone...


TURKISH COFFEE TRUFFLES

250 grams GOOD chocolate...i used 1 large bar of Valorona 61% 
1/2 cup heavy cream
10 smashed cardamom pods
1 star anise
1/2 rounded tsp instant espresso
1/2 tsp vanilla


put the cream into a small saucepan with the smashed cardamom pods and star anise over med heat and bring to almost boil...do not let boil. let this sit and steep to room temperature.
chop the chocolate in even small pieces
strain the pods from the cream,  add infused cream to chocolate and melt together in a double boiler, stirring until incorporated...no visible lumps
take off the heat and add vanilla extract, instant espresso and stir until incorporated.  taste test...i added just a small dash of ground cardamom because i didn't taste the cardamom enough(i only used 5 cardamom pods...it was my first time using pods)
pour this mixture into a smaller bowl and let cool just a bit before moving to fridge.
**most recipes say to chill in fridge for 1 hour, then remove and let sit out for 2 hours...
**NOTE...this did NOT work for me.  
i suggest you give this a try...let the chocolate cool to room temp, stir it up a bit (i recently saw a show where the chef beat the chocolate with a hand mixer for a minute or so before chilling in the fridge) then cover and chill in fridge for a few hours, or until completely firm.  then remove and let sit out over night..(it might be too hot during the day to set)

when it is easy to scoop...should be about like ice cream...make little balls and drop them in a dish filled with cocoa powder, chopped pistachios, toasted almonds or what ever you like.  gently roll them around to coat.  place them on a parchment or wax paper lined tray.  best to put them back into the fridge for a bit.  i like to do about 4-5 then put them in the fridge so they don't get a flat bottom while sitting out.   just remember to take them out and bring to room temperature before serving.


Tuesday, June 28, 2011

Spicy Mexican Glazed Nuts


Oooh...these unassuming little nuggets are...whew!...spicy 
and oh so addicting.


if you want a quick spicy sweet nut recipe, this is a great one.  they turn out really crunchy, slightly glazed and you don't have to do anything on the stove with molten sugar or syrups...a simple egg white along with your spices and a little sugar... in the oven, and the magic spicy glazed coating happens without fail.  these were such a hit with my spice lovin' friends.  i tend to make things a bit spicier than most can handle, and these were just right.  i must say...i used REAL MEXICAN CHILI POWDER.  not the wimpy stuff you buy at a regular market so mine came out extra spicy...AND i used the cayenne.  i suggest you use your judgement on the spices, but if you have a Mexican market near you do yourself a favor and buy the real stuff.  it's cheap and always adds a nice blend of spicy chilies to what ever you're making.


SPICY MEXICAN GLAZED NUTS
adapted from Big World-Small Kitchen and Epicurious

3 cups raw mixed nuts
(i used almonds, pecans, macadamia and walnut)
1/3 cup sugar
1 egg white beaten until white and fluffy
1 Tbsp chili powder
(i used REAL Mexican chili powder...whew!...spicy!)
1 tsp cinnamon
1/2 - 3/4 tsp salt
1/4 tsp ground cumin
1/4 tsp cayenne pepper

preheat oven to 350 F...place rack in the middle

spray baking sheet with non stick spray.  in a small bowl combine sugar and spices.  in a large bowl whisk egg until white and frothy.  add nuts into egg white then add the sugar/spice mixture and stir until everything looks evenly coated

spread nuts evenly onto prepared baking sheet and bake until golden, about 20 minutes.

TIP... i took them out after 15-20 minutes and stirred and separated the nuts...then returned to the oven for approx. 10-15 more minutes.  keep your eye on them.  i think this second baking time helps to keep them crunchy.

TIP... do not store them until they are completely cooled, but do not wait over night to store them.  if they get a little sticky (they shouldn't because of the second bake) you can stick them back in the oven for a few minutes, let them cool, then store again.

TIP... store in a clip top glass jar with a rubber seal


TIP... also i saved some of those little stay-fresh packets you find at the bottom of other snack foods....you know that annoying little plastic pouch that says DO NOT EAT...DO NOT OPEN.  they look like sugar packets...i put one of those in the bottom of the jar if i have one available.  don't know if it does anything, but i made some nuts 2 weeks ago that are still good and crunchy.

trust me these won't last that long...you'll eat them all up, but i made a sweet glazed version for Dad and he doesn't eat them as quickly as i do


Friday, March 11, 2011

Apricot Almond Oat Bars


since my last post about the "Turkey Tails" was sooo long, i'll get through this one quickly.

i found this recipe while watching some Giada De Laurentiis show in the wee hours of the morning.  while half asleep i heard "healthy" and i heard "oatmeal".  two things i'm always looking for in a good morning snack.  well, i would NOT really consider this a "HEALTHY" recipe with a cup of butter and a cup of brown sugar, but they DO have a good amount of oats, almonds and i used whole wheat white flour...so all is not too too bad...some people would actually call this a "health bar".

the photo above was taken about an hour after baking...yummy, sweet jam gooey-ness with the crunch from the almonds, but kind of squish when you cut them into bars...even with a very sharp knife.

the photo below was taken after refrigerating to set.  i find this makes for cleaner cutting when they are chilled

APRICOT ALMOND OAT BARS
for original check the link.  i made just a few changes that worked quite well.

FILLING
1 13 oz jar apricot jam...i used Bonne Maman Apricot Preserves
8 10 dried apricots diced into 1/4 inch pieces (about 1/3 cup)

CRUST
1 3/4 cup whole wheat white flour
1 cup packed brown sugar
1 tsp cinnamon
1/4 tsp cardamon
a few grates of fresh nutmeg.  maybe a little less than 1/4 tsp
3/4 tsp sea salt
3/4 tsp baking soda
1 3/4 cups old fashioned oats
1 cup coarsely chopped almonds
1 cup unsalted butter...melted
1 egg room temperature...beaten
1 tsp vanilla extract

preheat oven to 350 F.  spray or lightly butter a 9 x 13 inch metal baking pan and line the bottom and sides with parchment so it over hangs on 2 sides for easy removal

in a small bowl mix together the jam and the diced apricots.  set aside.

for the crust...in a large bowl (i did this in my electric mixer.  whisk or paddle works well) mix  together the flour, sugar, cinnamon, cardamom, nutmeg, salt and baking soda.  stir in the oats and the almonds.  add melted butter, egg, and vanilla.  mix until incorporated.

using a fork or clean fingers, lightly press 1/2 dough mixture into the bottom of prepared pan.  try to make it so there are no holes.  using a spatula, spread the filling over the crust, leaving 1/2 inch border around the edge of the pan.  cover the filling with the other 1/2 dough mixture and gently press to flatten.

bake until light golden brown, about 30-35 minutes.  cool for about 1 hour.  cut into bars and store in airtight container or refrigerate.
NOTE...as i stated above, i like to refrigerate to set them a little before cutting.  this makes for a nice clean cut and they don't squish down and get all messy.


OH...WOOPS!  did i forget to say these are DELICIOUS !!!


Friday, February 18, 2011

Hazelnut Sugar Cookies


don't ya just hate it when something comes out of the oven you think it's all gone wrong?
well, that was the case with these...BUT...

THEY TURNED OUT FABULOUS!

my intention was a cookie with the look and texture of a snickerdoodle and the yummy taste of roasted hazelnuts. (i needed to use up some of the boatload of roasted hazelnuts i had from some other recipe i was working on.)  as you can see in the photos, the snickerdoodle effect did not take place.  they did not rise and fall with that fabulous earthquake looking crack on the top.  

i thought they were all wrong!  until first bite...YUM!
so this one turned out great...BUT all cookies are great right when they come out of the oven... 

will they stand the test of time?...YES...they were still delicious even a few days later.
sometimes, most of the time, i don't get to hand out my goodies until a day or two later.  they have to cool...get some sort of icing or decor...then off to the photo shoot...then they get packaged up and passed out.  quite often this does not all happen in a day.  i get side-tracked with something savory...things are flyin' all over my kitchen sometimes...you know how it is...


the photo below is from the first  tray that went in.  i did not flatten the cookie.  like a snickerdoodle i thought it would flatten and spread during cooking...when it didn't, i thought i had a failure on my hands.    this one was actually the funnest one to eat. 
 i dubbed it "THE HAZELNUT BOMB"
the very top photo is from the second tray that i flattened with the bottom of a glass.  this made for a larger looking cookie with a little more crunch.  both were fabulous and loved by all.  i think i still have some hazelnuts to use up so maybe anther batch will be in store for this weekend.

something is always a winner in this house when it gets made more than once.


ok...on with the recipe...

HAZELNUT SUGAR COOKIES...

1/2 cup butter, softened
1/2 cup shortening
1 1/2 cup sugar
2 eggs
2 tsp vanilla extract
2 3/4 cups white whole wheat flour
2 tsp cream of tartar
1 tsp baking soda
1/4 tsp salt
optional...1/4-1/2 tsp cinnamon and 1/4 tsp fresh grated nutmeg
(i like to put a sprinkle of spice into most everything)
3/4 cup roasted lightly salted hazelnuts, chopped fine
2 Tbsp white sugar
3-4 Tbsp raw sugar (or something like in photo)

preheat oven to 400 F
cream together butter, shortening and 1 1/2 cup sugar.  then add the eggs one at a time and the vanilla.  mix well.
in a separate bowl mix the flour, salt, baking soda and cream of tartar
add dry ingredients to wet.  mix until just combined
add hazelnuts 'til just combined

in a small bowl mix the white sugar and the raw...set aside
shape dough by rounded spoonfuls into rounded walnut size balls
roll in sugar mixture and place on parchment lined cookie sheet
NOTE...you can choose to flatten them or not.  i suggest trying both.  i have photos of flattened and not flattened.  they are both fabulous
bake for 8-10 minutes depending on how large you make them.  bake until set, but not hard.  remove from baking sheet immediately.  i like to slide the parchment right onto my counter top, but that's me.

FOR THE ICING
mix this all together well in a small bowl.  a spoon works fine.  put it in a thick baggie and cut off the tip for an easy quick piping bag.  PS...don't cut your tip too big.

1 cup powdered sugar
1 Tbsp milk
2 tsp corn syrup
1/4-1/2 tsp vanilla extract
a sprinkle of cinnamon
a few grates of fresh nutmeg


Thursday, May 13, 2010

CHOCOLATE TOFFEE PECAN BARS ...sooo easy

these little squares are a must. SOOOooo GOOD ! so easy, so quick, no mess, not even a mixing bowl. you must try them at least once. i must warn you now...if you are one of those who refuses to use ready-made helpers...then look away now. if you are one of those "I NEVER !... " type people...then look away now. if, on the other hand, you are ...way too busy cooking real food...in a hurry...or just plain lazy...you must try this recipe. personally, i'm up for anything that tastes good and makes people love you.

made with only a few ingredients that you probably already have...well...maybe not the scary cookie dough sausage...you might have to run out with a disguise to a market where no one knows you and purchase the... shhhhh....ready-made dough. oh, come on...i'm proud to call the Pillsbury Dough Boy my friend and you will be to after trying this EASY bar recipe. so many different possibilities. change it up with some different flavor combos. i haven't had time to get back to the many ideas i have. i know peanuts and peanut butter has to be worked in somewhere...and i have a big bag of macadamias waiting for something with a little white chocolate...maybe tomorrow.


let's get on with the recipe
many many thanks to Amy at VERYCULINARY.com
Amy's original recipe is found here. i have copied it below for convenience and added notes in bold italics...just a few additions.

PRALINE CRUNCH BARS
makes approx. 20 bars (depending on who's cutting them)
prep-5 min.
total time 1 hour-ish


INGREDIENTS

1 (18 oz) roll refrigerated sugar cookie dough

1/2 cup toffee pieces

1/2 cup finely chopped pecans

1 (12 oz.) bag of miniature semi-sweet chocolate chips. i used milk choc. chips

1/3 cup toffee pieces..i must have used 1/2 cup total on top

1/2 cup rough copped pecans on top as well.


DIRECTIONS

preheat oven to 350 degrees

place cookie dough, 1/2 cup toffee pieces and 1/2 cup finely chopped pecans in a large resealable bag. knead well to combine. press dough evenly into the bottom of an ungreased 9 x 13 baking pan

bake for 12 to 15 minutes or until golden brown. sprinkle with chocolate pieces immediately after removing from oven...let stand for about 5 minutes or until chocolate has softened and melted...spread over bars and sprinkle with the 1/3-1/2 cup toffee pieces and 1/2 cup chopped nuts.

chill in freezer or fridge until the chocolate sets. cut into bars.

Friday, January 29, 2010

WALNUT Brown Sugar Chewy Bars

ooooh the mighty WALNUT...

thank goodness i finally woke up and found the beauty of walnuts. they're buttery, rich, soft, but crunchy and, of course, full of those good omegas. #1 nut on the omega scale i do believe.

if you're like i was and have a slight aversion to these wonderful nuggets, i suggest you give this little bar a try. this quick easy recipe could change your perspective and you might find yourself seeking more ways to get walnuts into your life.
these little treats are nearly guilt free as well. i know they DO have a good amount of sugar, but there's NO BUTTER!...doesn't that count for something? the only fats are from the omega man...the mighty walnut...my new friend.


i came across this recipe from Sprinkle bakes. Heather has some great photos and tasty treats that i can't wait to try and you should check out. She found this recipe in The American Woman's Cookbook and i'm so so happy she passed it on. i can't wait to try using this as a base and using Trader Joe's sweet and spicy pecans, or throw in some miny chocolate chips, or get some coconut in there somewhere?....and you know i always love to throw in a bit of heat...cayenne and salted peanuts perhaps?...hmmm. i'll think about it. these are so easy to whip up there's really no excuse not to try them at least once. you won't regret it. maybe you'll even fall in love with walnuts...it could happen.

CHEWY WALNUT BARS
The American Woman's Cookbook

1 1/2 cup walnuts
1 cup brown sugar
1/2 cup flour sifted
1/4 tsp salt
2 eggs, well beaten
1 tsp vanilla

preheat oven to 375. grease 9 x 12 jellyroll pan and set aside.
mix brown sugar, flour and salt...set aside.
combine eggs and vanilla and beat well.
add egg mixture to flour mixture and blend well. mix until smooth.
fold in walnuts.
pour onto prepared pan and bake for 20-25 minutes.
cut into bars while still a bit warm.
store in airtight container.

my notes...i added about 1/2 plus more walnuts in the dough and i pressed some on top.
i also added approx 1/2 tsp cinnamon.
my pan was a 9 x 13 metal cake pan.
Related Posts Plugin for WordPress, Blogger...