Showing posts with label cheese. Show all posts

Thursday, February 27, 2014

Homemade CHEVRE...Goat Cheese..Easiest Way


goat cheese is good ANY time of the day...

ESPECIALLY WHEN IT'S HOMEMADE !


FRESH HOMEMADE CHEVRE

has to be the easiest cheese to make!

1 gallon of goat milk
make sure your milk is NOT "ultra" pasteurized

these are the instructions and cultures i use.  
from the NEW ENGLAND CHEESEMAKING SUPPLY Co.

it works perfect EVERY time !

BIG shout out to my pals at New England Cheesemaking Supply


(please read instructions included with cultures)
slowly heat goat milk to 86 F degrees
add cultures, let re-hydrate 2 min.... stir.
cover let sit overnight at 72 F degrees for 12-14 hours and you should have beautiful curds like these.


MY FAVORITE PART...THE CURDS


strain in thin muslin cloth or a few layers of cheesecloth.  this should take a few hours.  i prefer muslin.  it's a lot easier to work with.  i like to go in and stir this away from the sides so it strains quicker and you can see what your consistency is.


OR...you can hang it.


at this point you add the salt and mix it around.
TASTE TEST!
i use 1 to 1 1/4 tsp fine sea salt.  careful with the salt...if it strains more it will intensify.  you can always ADD, but you can not take away.  sometimes i add fresh dried rosemary to all or half.
let it strain until you like the consistency.
NOTE...don't toss ALL the whey (liquid).  you might need to add some back in if your finished product is too dry or chalky...ie.  if it strained too long
REMEMBER...it will thicken when chilled


yield is almost 2 pounds.
i think for this last one i got 11.15 oz.  i like mine to be spreadable so it yields a bit more, but you don't want it too mushy.  if it strains too long and gets chalky, you can mix in some of the "whey" that has strained out.


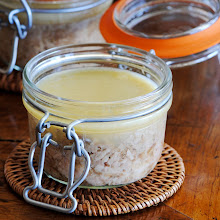
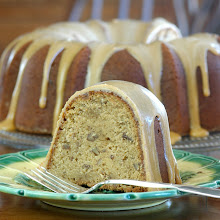
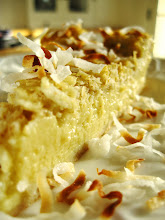
you can make this fabulous Lemon Rosemary Goat Cheese Cake
you will be so proud telling friends that YOU made the 11 oz of fresh goat cheese that went into this beautiful light tangy Goat Cheese.

Thursday, May 30, 2013

Dark Chocolate Goat Cheese Pink Peppercorn Truffles


sounds like an unlikely pair...

GOAT CHEESE and CHOCOLATE ?

beware...
this is not your typical truffle...

THAT'S WHY IT'S SO GOOD !


it totally works.
i don't know what brought this combo to mind, but here's another  example of a bright idea that came to me in the middle of the night...
i get out of bed to google the ingredients in the dark and WHAM !

there it is, plain as day...

IT'S BEEN DONE

so i figured i'd give them a try anyway, but i had to change it up.
dried apricots?...nectarine preserves?...rosemary?

how about PINK PEPPERCORNS ?
thanks to pal, Chef Lisa

perfect...quite delicious, out of the ordinary and i bet you've never had anything like it.


the chocolate hits first, then there's just a slight tang from the goat cheese.  the pink peppercorns really brighten it up with a spicy floral taste and aroma.  this might be a great addition to a first course?...who says all appetizers need to be savory?
served with after dinner cheese ?
i know you could find a great wine pairing.
oh...just eat them...

there's really no need to worry about what to do with them, 
they'll be gone before you figure it out.

NOTE...i will say again...
this truffle is NOT for "the pansy palate" Hershey's milk chocolate eaters.  these are for one who is a bit more adventurous with chocolate and also adores the sweet tang of a fresh goat cheese.


GOAT CHEESE PINK PEPPERCORN TRUFFLES

6 oz. bittersweet chocolate, chopped
6 oz. fresh goat cheese, at room temperature
1/4 cup powdered sugar
1/2 tsp vanilla extract
1/4 cup cocoa powder
pink peppercorns, crushed... at least 1 tsp, but more will be needed for the pink skins

NOTE...about pink peppercorns...i did not get a final measurement because i kept adding a bit in.  i crushed about 1 tsp.  some of the corns were too big so i sifted them through a mesh strainer.  i added quite a it more of the pink skin than the pepper itself.  if you want more pepper flavor i suggest using a pepper mill and adding to taste...as i did.

in a double boiler, melt the chocolate until smooth, no lumps.  this can be done with careful attention in the microwave.  use short 30 second, then 20 second increments and stir in between until just melted...then stir to incorporate smaller lumps.
set the melted chocolate aside and deal with other ingredients.
in a bowl...i used my Kitchenaid, whisk together the goat cheese, sugar and vanilla until it is light and fluffy.  now whisk in the melted chocolate until it is well combined.  chill in the fridge.  original says to cover this, but you don't want to get ANY condensation on the chocolate.  chill until firm, about 1 hour or until ready to use.
when ready, put on some thin rubber gloves and start rolling.  i find it easy to spoon out a few clumps and mold it into a ball then roll it between your palms.  drop into cocoa powder and coat.

NOTE...since i used my Kitchenaid mixer for the job, my truffle mixture came out quite light.  had i gone any further i could have made a lovely frosting...not a bad idea for a lovely deep dark chocolate layered cake...?
my truffle mixture was quite stiff.  even at room temp.  so they DO HOLD UP WELL.  the texture is not as creamy as my regular truffles.  BUT...they do melt in your mouth with a very smooth texture.  a chocolatier friend of mine says it could be due to the texture of the goat cheese.
keep in mind this is unlike any other truffle,

BUT, as always...
it's a darn good ball o' chocolate !


Friday, November 9, 2012

Parmasen Pound Cake #3-Light Crumb and Texture


Parmesan Pound Cake #3

yes...#3.   i admit...i border on obsession in the pound cake department.  i hope you all saw Parmesan Pound Cake #1 and Parmesan Pound cake #2.  go ahead and check them out...they were also a big hit around here.
this one has a beautiful crumb with a light and airy texture.  folding in the sweet meringue really sets this one apart from the others.  it might not be as parmesan-ie, but it sure is a fabulous way to create a lovely light pound cake worthy of any dessert, breakfast or maybe an afternoon snack with a warm cuppa tea.
all three are different, but all three are fabulous.  i would say Parmesan Pound Cake #1 IS #1 in my books, but it is a lot different than what would normally be considered a "pound cake".
this one, as you can see in the photos, resembles a good classic pound cake...tight crumb and buttery smooth.


crisp edges, warm and fluffy inside...like regular cake with pound cake texture.
with a hint of Parmesan, a little cream cheese, a splash of vanilla and the pillowy meringue folded into the batter...this makes a delicious anytime cake.


PARMESAN POUND CAKE
adapted from Cookingetcetera.com
i changed a few things so definitely check out the original and the beautiful blog from Dhi in Pudong, Shanghai

makes 3 med. loaf pans...8x4
NOTE...the original was in grams so i weighed and measured everything out.  i thought it might help a little in case you do not go by weight.

cake flour...400g or 3 cups and 3 Tbsp
salt...6g or 3/4-1 tsp
cream cheese...20g or 2 Tbsp...i used 1/4 cup
unsalted butter...250g or 2 sticks plus 1 1/2 Tbsp
sugar...160g or 3/4 cup plus 2 tsp
egg yolks...170g or i used 7 yolks from large eggs
vanilla extract 1 Tbsp
Parmesan cheese 20g...equals 3 Tbsp, but i used 1/2 cup

for the meringue to be folded in...
egg whites...250g or 7 whites
sugar ...250g or approx. 1 cup and 2 1/2 Tbsp

preheat oven to 350F and prepare loaf tins with butter and parchment
sift flour and salt in mixing bowl and set aside.
beat cream cheese, butter and sugar until fluffy.  gradually add in yolks, vanilla and Parmesan cheese.
fold in flour mixture and set aside.
prepare meringue.  mix egg whites until foamy, add sugar and continue whisking until fluffy with medium peaks.
put 1/3 meringue mixture into the batter and gently mix until well incorporated...then fold in the next 1/3 with a little more delicate touch and again the last 1/3 until it is well mixed, but still fluffy.
bake for 25-30 minutes...i tented the cakes after 15 minutes to prevent browning too much.
my cakes took 37-38 minutes.
remove cakes from oven and let cool completely.

i am a true believer that pound cakes are best after a good night's rest, but you'll have 3 cakes so go ahead and break into one of them...then let the other 2 rest.

i also find that if kept in the fridge, not only will they keep for over a week, but they also cut very well for a nice clean slice.


Saturday, July 28, 2012

Parmesan Vanilla Bean Pound Cake


i love pound cakes...

i think i'll be on a never ending search for the perfect pound cake...
never ending because there is not ONE perfect pound cake.
there are too many perfect pound cakes.

THIS IS ONE OF THOSE POUND CAKES.
perfect in it's own way.


a whole cup of Parmesan cheese sets this one apart from the norm.  the parmesan hits your senses first with the fabulous aroma, then the vanilla sets in with a bit of warmth and familiar flavor...the texture is not like your basic pound cake.  at first it is just a tad "cakie"...on the verge of crumbly, but not crumbly like cornbread...hard to describe, but holds together nicely.  as you'll see in the ingredients is 1 cup of corn starch.  i might think about changing this next time.  maybe more flour less cornstarch might make a difference.  if you let it rest for a day it seems to gather it's senses and acts more like a pound cake.
 results ?...rave reviews from all of my foodie friends and guinea pigs.  at first they thought it sounded odd, but after the first bite one remark was..."this might be the best thing you've ever given me."
i served it like little sandwiches shown in last photo...sandwiched with some Cherry Balsamic Jam...i will post the jam recipe soon.


i love pound cake for breakfast.  one of my favorite ways to eat pound cake is to give it a light saute in a hot skillet.  this one lends itself to this method because it wakes up the parmesan flavors.
warm toasty cake and cold smooth ice cream  (or vanilla greek yogurt in my case) is never turned down in this house.  throw on a few fresh seasonal cherries and you have quite the dessert.


PARMESAN VANILLA BEAN POUND CAKE
slightly adapted from Food Samba

1 stick (1/2 cup) unsalted butter
1/4 cup shortening
1 1/2 cups sugar...i used 3/4 cups regular sugar and 3/4 cup Z sweet sugar sub.
3 large eggs
1 1/2 tsp vanilla bean paste
1 1/2 cups AP flour
1 cup corn starch
1/4 tsp salt
1/4 tsp baking powder
1 cup good parmesan, grated fine
1/2 cup milk

preheat oven to 350 F degrees
butter and flour a tube pan...i used an angle food cake pan

cream together the butter and shortening in a mixer.
add sugar and mix until light and fluffy.
add eggs one at a time...beating after each one.  add vanilla.  mix well.
stir together dry ingredients in another bowl.
add dry to wet alternating with the milk.  mix until just incorporated.
pour into prepared pan and bake for 30-40 minutes...until golden on top and toothpick inserted comes out clean...mine took 47 minutes.
you do not want this to overcook...i think it could tend to dry out very easily, so keep a close eye towards the end and use your toothpick or long skewer as i did.

NOTE...i like to let my pound cakes rest for a day.  they tend to develop flavors and less "cakie"texture when they sit.  go ahead and try it the first day out of the oven,  but save some wrapped in saran and try it 2-3 days later and see if you can tell the difference.


below is a fun way to serve a jam sandwich when you're faced with a pound cake cooked in a tube or bundt pan.  i usually like to cook in loaf pans for easy storage, but the tube or bundt pan makes a better presentation as a whole.


Sunday, July 22, 2012

Homemade Creamy Goat Ricotta


i must admit i have never had much interest in ricotta cheese...until NOW!  i don't cook lasagna, cannoli, ravioli, blinis, blintzes, or too many cheesy things.  i'd rather partake in cheeses with a bit more flavor, like Saint Agur or Saint Andre, Cambazola...or a Triple Cream Goat Brie...just to name a few.  BUT i was watching Alex Guarneschelli's show about one of her favorite decadent breakfast ideas.  the show about homemade sausage, warm pop-overs, fresh peach preserves AND this homemade fresh ricotta.  she made it all look sooooo good and soooo easy i had to give it a try.

you know me...always with a twist....
I'LL USE GOAT MILK


i love making cheese and yogurts...
 there's something so fabulous about a fresh cheese hanging in the kitchen.
even when the day isn't going as planned i know i'm doing something right when cheese is hanging or yogurt is in the corner nestling under a bundle of towels.


i've made quite a few dairy products in my day...  goat cheese and Skyr (Icelandic yogurt) are my favorites... mozzarella is my downfall...just can't get it right,
BUT i have redeemed my Italian cheese making with this ricotta.  it is so easy and it's really soooo creamy and delicious.  it goes with just about any breakfast bread you can think of...muffins, pancakes, waffles, bagels, etc.... now i'll put ricotta on anything.   i DO, however,  have the slightest feeling it IS quite fattening, but i give myself a hall pass when it comes to calcium and protein rich foods...
who am i kidding...? 

NOW I'M IN LOVE WITH THIS RICOTTA !!!
I'VE BEEN EATING IT PLAIN WITH A BIG SPOON!


i'm not the slightest bit ashamed to admit i went out and bought these carrot muffins at my favorite Mexican bakery just to slather this dreamy creamy goat ricotta on each bite.
i might not have baked the muffins, but i sure did make the ricotta and proud of it...you will be to.


HOMEMADE CREAMIEST GOAT RICOTTA
adapted from Alex Guarnaschelli.  i changed it slightly because i had 4 cups of goat milk.  check original for comments from other happy ricotta makers.

1 cup heavy cream
4 cups goat milk
2 cups buttermilk
1/2 tsp salt...to your taste

in a sauce pan, bring cream, milk, buttermilk to a simmer over medium heat.  start slow so as not to scald the milk on the bottom.  stir lightly.  when it starts to reach 175 F try not to stir.   as it heats to a full simmer you will see solids start to rise and the top begin to form a "raft".  do not stir in.  the "raft" happened at 210 F degrees for me.  turn off the heat and allow to sit for 20 minutes.

line a strainer with 4-5 layers of cheese cloth.  use a large spoon to scoop the solids from the surface into the strainer.  slowly pour the remainder, very gently, over the solids in the strainer, allowing the liquid to flow through  the strainer.   if the strainer gets too full, just wait for a few minutes to finish pouring.  if it doesn't seem to be draining very much at all, carefully run a spoon along the bottom of the cheese cloth to allow liquid to drain.  when all is in the strainer, let sit this way for 30-45 minutes or until you think you can pick up the corners and tie up as shown in photos.  i let mine drain in tied up pouch for about 1 1/2 to 2 hours.  my end result is so delicious and creamy kind of like a whipped cream cheese.  you can let it hang for as long as you want to get the consistency you are looking for.  remember it will thicken in the cold fridge and it's better to err on the side of moist rather than dry and stiff.  you can always strain it more later by setting it in a bowl with paper towels and more moisture will be drawn out.  i don't cook lasagna, but i think you might want it a little on the thicker side for that and other recipes.
when done, transfer to a clean bowl and stir in some salt.  i usually get about 1 1/4 - 1 1/2 cups creamy moist ricotta and i use about 1/2 tsp salt.  taste test before putting the whole 1/2 tsp in.

NOTE...i forgot to add that this makes about 1 1/4 - 1 1/2 cup depending on how long you hang the cheese and how thick you like it.

OR...flavor with fresh herbs like chives, dill, rosemary, thyme...
serve with a drizzle of olive oil or i've seen it with honey...
this stuff is fabulous on anything!


Sunday, September 25, 2011

Parmesan Pound Cake

i know i've said this more than a few times lately..but...

this is another one of my new favorites


PARMESAN POUND CAKE !!!


i agree, this does sound a bit odd, but it totally works...it more than works
it's moist, it's dense...very surprisingly light in flavor and...

IT'S DELICIOUS !!!


this fabulous recipe was impressively obtained by a fellow blogger after she tried it at the restaurant Metrovino in Portland Oregon.  many kudos out to Susan S. Bradley at lunacafe.com...AND the chef that handed over the recipe.  sometimes we just get to enjoy the food at a restaurant never  to have it again, but she loved it so much she begged the owner for the recipe.  i was so happy she did. ..AND so kind of Chef de Cuisine Gabrielle Quiñónez  because there are many many chefs out there who covet their recipes so that no one can duplicate it.
i am quite sure that i, in no way, have duplicated it, but mine DID come out quite spectacular.  it reminded me of these little muffin cakes i made a while back called "Quesadillas" or Sweet Cheese Bread.  did i post about those?...i don't think so.  i should have...they were eaten too fast.  this recipe intrigued me because not only were these little cakes called "quesadillas", but they also had a sweet and savory factor.   these cheesy muffins  are also made with Parmesan AND loads of butter!...a breakfast staple and any-time treat that is very popular in El Salvador.

on with THIS cake...did i mention i LOVE it?!...really a must try.  the recipe is pretty easy and the original with comments can be found here.  i chose to add just a touch of lemon zest for a little zip and acidity. for service?...this is a pound cake!...pound cakes go with just about anything and can be eaten any time.  it's absolutely at it's peak a few hours after baking, but can be kept out covered over night or in the fridge for a few days and brought to room temp for service.  BTW...it sliced very clean with a little chill on it (for presentation purposes)


PARMESAN POUND CAKE
recipe from Metrovino Restaurant in Portland, 

preheat oven to 350 F.  butter and lightly flour two 8 x 8 metal cake pans or one  9 x 12 or 9 x 13 metal baking pan...i used a 9 x 13

2 cups unbleached AP flour (10 oz.)
2 tsp baking powder
1/2 tsp fine sea salt
1 cup freshly grated Parmesan cheese...fine NOT shredded
1 cup butter, room temperature
2 cups sugar
6 large eggs, room temperature
2 cups creme fraiche, room temperature (or substitute 1 cup cream and 1 cup sour cream combined)
1/2 cup cream cheese
zest of 1 lemon...my add in...optional, but delicious

sift flour, baking powder and salt into a large bowl
whisk in Parmesan.  set aside
cream together the butter and sugar in a mixer for about 5 minutes
add eggs one at a time at medium speed, mixing well after each addition
add cream cheese and zest of 1 lemon...mix until smooth
on slowest speed, alternate adding the creme fraiche and flour mixture, ending with the flour mixture...do not over mix
pour the cake batter into prepared pan and spread evenly.  tap the pan down sharp;y on the counter a couple of times to release any air bubbles
bake at 350 F for 45-55 minutes or until toothpick come out clean. i used NON confection at 350F and it was done at 45 minutes.   let cool

invert the completely cool cake onto cutting board...i let it sit there for a while to completely...i say completely cool.  you don't want the cake to sweat if you are storing it in the pan...so then i flipped it right side up onto parchment paper and back into it's cleaned out baking pan...i knew it was not going to be eaten up that day.  my baking pan has a nice cover and i LOVE parchment.

this recipe is pretty large and goes a long way.  what you don't eat will keep very well in the fridge for about a week...just let it come back to room temp because it's quite dense when cold.
serve as-is or with fresh berries, ice cream, creme anglaise, a little sprig of basil was nice...
how ever you serve it, i'm sure this will be a big winner.


Tuesday, August 23, 2011

Lemon Goat Cheese Cake ...Incredibly delicious


LEMON GOAT CHEESE CAKE

this cake is unbelievably delicious !
absolutely my favorite dessert this year...and now one of my all time favorites.


light, fresh, moist and lemony with just a hint of tang from the goat cheese.  not like a regular cheesecake because it's not so dense...not like a cake because it has no crumble...it's just that perfect balance that doesn't fill you up, but doesn't leave you hanging.  a fabulous dessert for a late Summer Sunday brunch or after a heavy BBQ extravaganza.  

i've been making Homemade Goat Cheese lately and was searching around for any and all things "goatie", i came across this recipe from a fellow blogger named Kate at Food Babbles.  she has a fabulous blog and she is one of those much needed foodies that gives incredibly easy instructions with photos as you go...no room for error.  i diligently followed along and the result was this fabulous cheese cakie treat...
AND, i must add, being able to use some of my homemade goat cheese sent it over the top in my book.
by the way...goat cheese is one of the easiest cheeses to make...you just need the right stuff.  i've put in the link.  have a look and give it a try.


GOAT CHEESE CAKE
normally i would to say "adapted from", but in this case i did not change a thing.  i have printed out the ingredients and instructions so you can get a quick overview, BUT i really think you should visit Kate at Food Babbles to get the full photo low-down.  follow her step by step and you will have complete success as i did.  many many thanks to Kate

11 oz. goat cheese (see Homemade Goat Cheese if you want to go the extra mile)
3/4 cup granulated sugar, plus more for dusting pan
finely minced lemon zest from 1 lemon
1 tsp fresh lemon juice
1 tsp vanilla extract
6 egg yolks at room temp.
6 egg whites at room temp.
3 Tbsp flour.

preheat the oven to 350 F degrees.  butter a 9" spring form pan and dust the inside with granulated sugar...don't skip this.
mix together cheese, sugar, lemon zest, lemon juice, and vanilla...beat until smooth.
mix in egg yolks, one at a time at low speed.
next, add the flour.
in another CLEAN bowl beat the egg whites until peaks form.
gently fold whites into goat cheese mixture...make sure you don't over mix.
spread the batter into prepared pan and bake for 25-30 minutes or until tester comes out clean.
cool on a wire rack
once cake is completely cooled, refrigerate until chilled

this cake is fabulous as-is with a few fresh berries...for some i added a little dollop of blueberry preserves and fresh thyme.  Kate dressed hers up with a yummy raspberry sauce.

any way you serve this i guarantee you and your guests will be pleasantly sated


Monday, August 1, 2011

CHEVRE...Real Goat Cheese


CHEVRE...aka Goat Cheese

finally, i have mastered the real deal.

i received the best compliment i could imagine...

"this tastes just like the cheese we had in Paris"


my obsession with cheese and yogurts has not subsided...yet.
there is something sooooo satisfying about making your own dairy products.  i'm asked all the time,
"why don't you just buy it?"...
 i love the whole science of it and the smell of cheese and yogurt hanging in the fridge, but most of all it's the anticipation...
"is it ready yet?...when do i get to eat it !?"


goat cheese is one of my favorites of the cheese family...it's such a versatile product that can be eaten as is or as a star ingredient.
recently i came across what i am now calling my favorite dessert of the season...the year...probably in my all-time top ten.
it's a Lemon Goat Cheese Cake found at Foodbabbles.com  i was able to use some of my homemade goat cheese and, of course, it sent it to the top of the list.
i'll be posting about it soon...it is a MUST TRY !!!  please visit Kate's blog and see for yourself this wonder-treat.  she has great photos and step by step instructions for a no-fail winner.


back to the goat cheese...
there are a few ways to make your own goat cheese and i have tried these easy methods (as seen in this post) using lemon or vinegar...this is  before i knew any better..
but this method and recipe is FAR SUPERIOR !
one very important ingredient you will need is the right culture.  i found mine at a home brewing company out in Mission Viejo, CA.  there are also places to get this over the Internet...buy your rennet at a big health food store.
i've just ran out of my little packets of Mesophilic culture so i might want to try the packets available HERE at the Cheese making Company.com.  their packets contain the culture and the rennet all in one so there is no mixing and no room for error.  the beginner kit looks good, but not really necessary to get all the extras.  i was wondering how different culture will effect the out come...i'll have to get back to you on this.

there are many many many blogs and sites on how to make homemade goat cheese and some of the instructions get too involved...this is a really easy process...even i got it right the first time.


i thought who better to go-to than a woman who owns her own goats...Martha Stewart!...and she probably has some prize winning goats at that.
honestly...does she really make her own goat cheese?...or does she have someone do it for her...

HOMEMADE CHEVRE...GOAT CHEESE
this is for 1/2 the original recipe found at link above

1/2 gallon (2qts) pasteurized goat milk...NOT ultra pasteurized

1/8 tsp powdered Mesophilic DVI culture..1 used 1 packet Mesophilic MW3 from Mad Millie

1-2 drops liquid rennet

1 tsp kosher salt (or to your taste)

1. add goat milk to a large non reactive sauce pan or stock pot.  use low-medium heat until the milk reaches exactly 75 F degrees on an instant read thermometer.
2.  add the powdered culture and the liquid rennet to a small bowl.  add 2 Tbsp of the warm milk and stir until well combined (no lumps of culture).  add this small mixture to the large pot of warm goat milk.  cover and leave at room temperature overnight.  i have left it for 15-20 hours.
3.  cut the set curds across the pot and again the other way.  same as seen here in my Skyr post for Icelandic Yogurt.
set a large colander over a large pot/bowl and line with double layer cheese cloth or i prefer a nice clean square of reusable muslin.  the bowl underneath the colander must be big enough to catch quite a bit of whey that will drain.  carefully transfer the mixture into the colander.  Martha says to cover this with cheesecloth, i just covered it with a lid that fit on top of the colander.
let this set at room temperature overnight...mine sat about 15 hours.
remove from cheesecloth,  discard liquid and transfer cheese to bowl and mix in salt (and, or other flavors)...don't forget to taste test.  it's a lot easier to flavor the cheese before it is chilled and you want it to incorporate if using fresh herbs.
store in refrigerator in airtight container, ramekin or shape into log wrapping in plastic wrap.

i took 1/2 the cheese and shaped it into a log for a more spreadable cheese and the other 1/2 i kept in the muslin and let hang in the fridge for another 8 hours.  this created a more crumbly cheese.


served on crisp seeded baguette with fresh fruit and your favorite preserves makes a tasty snack or a fabulous brunch side.
Related Posts Plugin for WordPress, Blogger...