Showing posts with label cookie. Show all posts

Friday, July 26, 2013

Cookie review-BART & JUDY'S "The Best Chocolate Chip Cookie In the World" ???


are these "THE BEST chocolate chip cookies...
 IN THE WORLD"?

well, i think Bart and Judy have opened a ferocious can of worms with a statement like that.

first let me tell you,  I LOVE THE PACKAGING !  that's what made me buy them, not that it claimed to be the best.  although i must say, curiosity riled the baker in me and i just had to try Bart & Judy's "THE BEST CHOCOLATE CHIP COOKIE IN THE WORLD"
how very very clever those two are.
reeling the buyer in with packaging like that.  i wonder if Bart & Judy are friends with "Dr.Bronner", the soap guy with small print all over his products.  the box has all kinds of quotes, philosophies, information, instructions and warnings....AND it's made of 100% recycled paper with a mention on the side..."MADE IN THE USA: THE BEST COUNTRY IN THE WORLD".  the whole experience in kind of fun, very unlike any mass produced store bought cookie...for that reason i thought it was worth the purchase....

the cookies are secondary.

i felt like the kid that gets an expensive gift for x-mas, tosses the gift aside and plays with the box for hours.


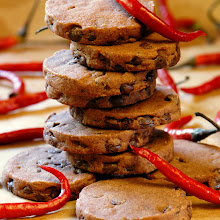
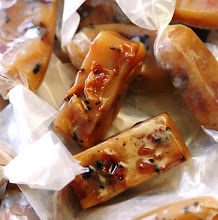
as you can see from the photo above...these are tiny teenie cookies.  some smaller than a quarter.
some don't even contain ONE CHIP !

ARE YOU KIDDING ME?

AND i bought the ones with walnuts and pecans.  i'll bet ya anyone with a nut allergy would have no big anaphylactic shock after eating the whole box...there might be one walnut and one pecan somewhere in the box, but i haven't found it yet.


on the back he makes a pretty obvious reference to "Famous Amos"...
i was around for the Famous Amos craze in the 70's.  were you?  Famous Amos was the first big hit phenomenon of the bakery world that i can remember.  when Famous Amos cookies arrived on the scene they were nothing like the prepackaged lame cookie that those little Kellogg's Keebler elves are hocking now a days...these were a pretty darn good cookie.  especially if you could get some hot out of the oven at the flagship store in Los Angeles.  it was a good cookie...small, BUT NOT THAT SMALL, crisp, homemade tasting and it had at least a few chocolate chips in each cookie.  nuts were a good size.  you could actually see them, but even he didn't claim to be the best in the world.

nutritional facts?...
it claims 6 cookies per serving equaling 30 grams for 83 calories.
now...i know many many people who would jump at the chance to have 6 chcocolate chip cookies for 83 calories.  but do you know how pathetic 30 grams is?
don't sneeze or you'll loose 1/2 your serving !
"ecstatic delirium"?...hasn't hit me yet...personal injury?...maybe a paper cut from playing with the box.

after you finally get the box open you see a gold bag reminiscent of Willy Wonka's golden ticket.  the bag comes with warning instructions to let the cookies "decant" for 10 minutes to enjoy their fullest flavor.
who do you know that will open a bag of cookies and wait for 10 minutes before trying one?  
of course i had to try one right away.  then i waited 10 minutes and tried another.  was there a huge difference?...NO.  same small, smaller than a quarter, cookie.  nice flavor, nice crunch, but yet another fun gimmick that sets these cookies apart from the norm.

oh...and i forgot about the "STOP! READ FIRST!...important instructions...it's another note about the "decanting".
 do i really need to be told twice HOW to eat a chocolate chip cookie?...maybe one so small that could get lost between a tooth?  it goes on...then there's another side that is "optional reading".
i will admit i went for the whole deal and entered my "exclusive serial number" on the web site.  i have no idea what that does except give my email address out there for more people to spam me....whatever...it's all in fun.


in conclusion...
don't get me wrong...i DO like the cookie (i like the box better).  this IS a "good" cookie, but it's just so very very small....and general consensus from friends and chefs?..."a good cookie, crunchy, homemade flavor, better than the elves",  but best in the world?...not so much.
on the back of the box, Bart states that this venture is not about the money (good thing).  he just wants to put a smile on your face and make the world a better place with his "great cookie"

well...that he did....he put a smile on my face.  definitely NOT from the best chocolate chip cookie in the world, but maybe just the shear enjoyment and conversational debates i had when sharing the box and tiny little nondescript cookies inside.

Friday, January 25, 2013

Flourless Chocolate Espresso Pecan Cookies w/Fleur de Sel. Method #2, FAVORITE !


i know you've all seen this cookie before...but
THIS ONE IS A LITTLE DIFFERENT...
i've done them before, BUT i used Franscois Payard's Recipe and method.  they are similar in taste, but i hate to say this recipe received better reviews.  i'm not saying Franscois weren't absolutely delicious...i'm just saying these are DIFFERENT and to each his own.
these are more dense and thicker than the "Payard Cookie"...
and, as usual... i've added a touch of espresso and a little kick of cayenne.

these are more like intense little chewy crunchy lumps of chocolate coal.
they seem to hold up better and will package well for for your chocolate loving friends.


these are too easy to pass up...
the flourless chocolate fudge cookie is a must for that intense chocolate fix.  it's definitely the chocolate lover's cookie.  i know you have some gluten-free friends or there's always a gluten free person in the room and you don't want to leave them out.  more and more people are going gluten free just for health's sake, so you better throw some of these delicious lumps of chocolaty goodness in your repertoire.


FLOURLESS CHOCOLATE ESPRESSO PECAN FUDGE COOKIES W/ fleur de sel

3 cups powdered sugar
1/2 cup plus 2 Tbsp unsweetened cocoa powder
1/2 tsp fluer de sel or smoked salt.....plus more for sprinkles
3 large egg whites
1 Tbsp plus 1 tsp pure vanilla
2 cups toasted pecans
1/2 tsp espresso powder
1/4 tsp cayenne...optional
1/2 cup chopped dark chocolate

preheat oven to 350F degrees.  line two baking sheets with parchment paper.  give the parchment a LIGHT spray of non-stick spray or a quick swipe of the butter stick.
in a bowl of a stand mixer, mix powdered sugar, cocoa powder, espresso powder, cayenne and salt.
mixer on LOW, add egg whites one at a time.  add vanilla.

HERE ARE THE 3 MAIN DIFFERENCES...
#1...mix on medium speed for 10-12 minutes until the mixture becomes slightly thick.
now...stir in the toasted pecans by hand.  i went ahead and threw them in the mixer for a minute, then finished by hand.  let the batter sit in the bowl for about 15-20 minutes...it will thicken.
#2...place on prepared sheet and let sit for another 15-20 minutes.  i wanted to shoot the delicious dough so they sat for 25-30 minutes...this is how i got the "lumps of coal look" as seen in the 2 photos directly below.
#3...you've already done this, but there are only 3 egg whites not 4 like Payard's Recipe.  this makes for a thicker dough.
sprinkle with smoked salt while they sit in waiting.

put sheets in the oven and immediately lower the oven to 320F.  bake for 16-18 minutes, until outside looks cracked and shiny.  cool on cookie sheets on wire racks for 10 minutes then move cookies to wire rack and cool completely.
IMPORTANT NOTE about removing cookies from parchment...as noted in post about the "Payard Cookie", these cookies stick to the parchment even if you give it a light spray.  i do not recommend more spray.
when cookies are completely cool you need to carefully peel the cookie from the sheet.  do not use even a "thin" spatula.  it will mess up the bottom.  just peel the paper slowly from the cookie.

raw dough (above) after sitting out 25-30 minutes.  below is from same batch.

above is an example of the "Franscois Payard Flourless Chocolate Cookie".  as you can see it is a much thinner, but still fabulous, cookie.

Tuesday, May 22, 2012

Double Ginger Chewy Chocolate Chip Molasses Cookies


GINGER ?... MOLASSES ?....summertime?
YES...why not?  there are no holiday flavor police
i love ginger and i love molasses...i love both fabulous flavors all year 'round.
why does molasses only come around during the Christmas holidays?....
it seems everyone forgets how to use it  'til the "holiday spice fest" rolls around.  these delicious flavors pop at specific times of the year, then get stashed in the back of the pantry and we quickly move on.  
what's wrong with...say...
pumpkin pie in the summer...
lemon tart in the dead of winter...
or fruity popsicles when it's pouring rain...?!

i know there are a zillion molasses/ginger cookie recipes out there and you've probably tasted each one during the winter holiday months, but i didn't see too many with chocolate
 i'm on a chocolate kick right now and i always love the zing of ginger so i thought the two would be a good combo with the deep molasses...and that, it is.  something a little different for the normal summer cookie line up.  move over lemon bars and macaroons.

i'll be quick about it and get to the recipe.
NOTE...i made mine a little smaller than usual so i could stretch the recipe, but when you make them large they really are good and chewy in the middle with that slight crunch on the sugar coated edges.
i made 4 1/2 dozen from this batch, but 3 dozen would make a nice large cookie.


CHEWY MOLASSES with CHOCOLATE CHIPS and CRYSTALLIZED GINGER
my apologies to the person i got the base recipe from.  i ALWAYS like to give props to the original.  it's hand written in my file drawer and i don't have any info at all to pass on.  it might have evn been good ol' Betty Crocker.
i changed it up a little by lowering the sugar content with a little splenda,  substituted with 1/2 white whole wheat flour, added some crystalized ginger bits AND added chocolate chips.

INGREDIENTS
1 1/2 cups white sugar...i substituted with 1/2 cup splenda (no one knew)
1 cup unsalted butter, room temp.
1 CUP MOLASSES!
2 eggs, room temperature
4 cups AP flour...i substituted with 2 cups white whole wheat
1 Tbsp baking soda
1 tsp cinnamon
1/2 tsp ground cloves
1/2 tsp ground nutmeg
1/2 tsp ground ginger
1.5 - 2 oz of crystallized ginger, diced or baking pieces
1/2 cup (or more) semi sweet chocolate chips...more would have been better


HOW TO...
preheat to 350 F degrees.
using a paddle attachment on your mixer, cream the butter and sugar until light and fluffy.
add molasses and eggs...mix thoroughly.
in a separate bowl mix all the dry ingredients with a whisk.
add dry to wet 1/3 at a time.  mix until well combined...dough should be soft and smooth
chill at least 30 minutes.
form dough into balls 1' - 1 1/2" in diameter.
roll balls in sugar...i used raw Tubinado sugar for a good extra crunch
bake on parchment (allow room for spreading) at 350 degrees till edges are firm...approximately 13 minutes depending on the size of your cookies

Monday, May 7, 2012

Jamaican Coconut Drops


these chunky little glistening globs are deeeelicious!

three ingredients...fresh coconut, fresh ginger and brown sugar.

they are definitely a labor of love...BUT they are totally worth the effort.

each ingredient shines on it's own, but together they make a fresh almost healthy tropical treat.  
 i have yet to go to Jamaica, but i discovered these are a very traditional treat and found just about everywhere...maybe as common as our chocolate chip cookie...? 


they sound easy enough to make, with only three ingredients...but it's  those three ingredients that are a bit of a bear...the cubed coconut meat, diced fresh ginger and cooked down brown sugar.  still, i say well worth it.

here are some tips i have found very helpful...

#1...THE COCONUT...getting to the meat of the matter
buy the brown dried coconut and shake it to make sure it still has it's coconut water.  poke holes in the eyes of the nut (the three indentations at one end).  drain water and reserve for a cool refreshing drink.  now, whack the coconut on the ground to get a nice crack in it,  place on a sheet pan in a 400 F degree oven for about 10 - 15 minutes.  remove and let cool to the touch.  whack it again on the ground or with a hammer to break open and into large pieces.  the meat should now be easily removed from the shell.  gently pry out the meat with a butter knife or i use the end of a screw driver.  the meat will still have a brown outer layer...use a potato peeler to remove this and you will have beautiful white coconut meat ready for dicing.

#2  THE GINGER...to peel...simply use the edge of a spoon to scrape off the outer skin.  it's much easier than a paring knife and less wasteful.

#3  THE BROWN SUGAR...can't help ya there.  reducing the brown sugar mixture just takes time,  near continuous stirring and a watchful eye.


JAMAICAN COCONUT DROPS

1 lb. coconut meat diced...from 1 1/2 0r 2 brown coconuts
i used almost 4 cups
4.5 ounces (125g) fresh ginger diced...about 1 cup
2 cups packed golden brown brown sugar
3 cups water

spray a large cookie sheet with non stick spray (or i used parchment).  combine all ingredients in a large heavy bottom sauce pan. stir ingredients over medium heat until sugar dissolves and mixture comes to a boil.  attach a candy thermometer to the pan or just stick it in to check where your at. boil until the mixture starts to thicken and the temperature reaches 295 F degrees.  use a large spoon to continuously stir so as not to burn on the bottom or the sides of the pot...stir more towards the thickening stage.  one of the recipes said 15 minutes, but mine took more like 40 minutes.  
NOTE...it is hard to get a proper read on the thermometer when it is almost done.  look for the sugar to caramelize, sugar begins to form at the bottom of the pot and it becomes very hard to stir.
lower the heat to the lowest flame or setting...working quickly, drop about 2 tablespoons of mixture for each coconut drop onto prepared baking sheet.  let sit until cool and firm.  
these are best eaten within a few days.  i noticed the sugar becomes more crystallized the longer they sit, but still yummy.

Wednesday, March 14, 2012

Rose Shortbread Cookies with White Chocolate


Buttery, crisp, smooth and delicious..Shortbread Cookies

i call them SHORTIES

i've been testing out some (lots) of shortbread recipes lately and i will pass them on, but for now i'll start with one of my favorites...

ROSE WHITE CHOCOLATE SHORTIES 

  for this recipe i think you'll find just the right balance of rose, vanilla and, of course, butter.  i really wanted the rose flavor to shine, but not over power. i have tried cooking with rose water, but it just doesn't have enough flavor...besides you can't add water to shortbread dough.  i have tried using just rose petals...they give a good appearance, but again...no flavor.  i finally broke down and bought some good rose extract.

well aware of the possibility of ending up with little soap bar tasting cookies i thought i'd better go with a light touch for the extract.  for this size recipe i am happy to say i was right on with 1/2 tsp.  i'm the type of person that always adds a little extra vanilla when called for, but this time i knew better.

these little gems were a huge hit amongst my foodie friends and i will definitely be putting this in the favorites pile.  they are reeeeely delicious and something unexpected from a simple unassuming shortbread.  oh...and a slight touch of white chocolate?... pushed it over the edge. 


the shortbread base recipe has been my "go-to" for quite a while.  i pulled the essentials from an Espresso Chocolate Chip Cookie recipe from Smitten Kitchen who i think got it from a Dorie Greenspan recipe. some shortbreads are good...i think this one is great...using powdered sugar instead of granulated.
a few of my other flavor combos have been...Haute Chocolate Shorties (spicy double chocolate) , Maple Pecan and Coconut Double Chocolate.  AND, as i mentioned i have a few more winners in my back pocket almost ready to post...stay tuned...i hope.

as you can see in the photos the cookies hold their shape very well...if handled properly.  the dough must be cold and i like to give them a quick chill on the cookie sheet just before going in the oven. 


ROSE with WHITE CHOCOLATE SHORTIES

2 sticks unsalted butter, room temp.
2/3 cup powdered sugar, NOT sifted
1/2 tsp vanilla extract
1/2 tsp rose extract
1 Tbsp crushed edible rose petals, chopped fine...use your judgment.  it's more for the visual effect.
2 cups all purpose flour
white chocolate for drizzle or a slight brush on the bottom

in a mixer with paddle adjustment add butter and powdered sugar.  mix for approx 3 minutes until smooth and creamy...no lumps. add the vanilla and rose extracts along with the rose petals and blend until combined.  add flour to incorporate.  do not over mix.
NOTE...here's a fabulous trick i learned from Smitten Kitchen (love her for passing it on)...
transfer the dough into a 1 gallon Ziploc freezer baggie.  work the dough down into the corners so there are no air pockets.  seal the baggie, but leave an inch or so open for the last of the air to escape as you are rolling the dough.  now roll out the baggie full of dough so it is flat and the dough has completely filled the baggie.  flip the baggie a few times during rolling so as not to get all bunched up on one side.  roll it evenly and it should be about 1/4 inch thick all over.  now refrigerate on FLAT surface for at least 2 hours.  i have left mine for 2-3 days.

preheat your oven now to 325 F degrees
line 2 baking sheets with parchment paper.
try to work quickly and keep the dough chilled
get your Ziploc dough and cut down the sides of the baggie...unzip the top and peel back top layer from dough.
with a long knife cut 6 across and 6 down for 36 nice size cookies.
NOTE...don't use the sharpest knife in the kitchen to cut your squares.  you don't want to cut through the bottom layer of plastic.  remove squares from bottom layer of baggie with a spatula or by carefully peeling off and place on parchment.  they can be fairly close because the don't spread, but do leave a little room for expansion.
place filled cookie sheets (both sheets if they will fit) into the refrigerate for about 10-15 minutes.
NOTE...i cook one sheet at a time to insure even cooking...

bake for 18 - 20 minutes.  keep your eye on them because you can go from a pretty butter color to brown edges if you turn your back too long.  they should be just golden with a slight light brown edge.  pull them from the oven and slide the parchment from the hot cookie sheet onto a flat surface.  let cool to the touch then onto a wire cooling rack.  when completely cooled they can be stored in an airtight container for at least a few days or until you are ready to decorated with the white chocolate if you choose to do so.  don't get heavy handed with the white chocolate.  you don't want to over power the delicate rose flavor.


Saturday, February 11, 2012

Apricot Cardamom Thumbprints with Pistachio and crushed Rose Petals


how thoughtful...some flowers...
always a welcome gift...

BUT, why not get a little creative and make your gift of flowers edible and cute...?

thumbprints are old school.  they look like little flowers, they are so versatile and you can make them fit anyone's flavor favorites.  i chose to go the Middle Eastern route with cardamom, pistachios, apricot and rose petals.  while you can't necessarily taste the rose, it sounds fancy and you know it's there.

there are a ton of thumbprint recipes out there and they are all pretty similar.  this happens to be Martha Stewart's recipe.   it's simple, it works...although a little tedious, it's well worth the effort when you see the smiles.
i say tedious because i think most cookies are time consuming......so many batches in and out of the oven and having a watchful eye to get them just right.
i wish it weren't so, but i definitely fall (fail?) in the ranks of perfectionism so my cookies take longer than the average.
mind you...my cookies don't all come out perfect no matter how hard i try...and try.

BUT THEY ALL TASTE PRETTY DARN GOOD !


MIDDLE EASTERN INSPIRED THUMBPRINT COOKIES
slightly adapted from Martha Stewart...original found HERE

1 /2 cup (1 stick) unsalted butter, softened
1/2 cup plus 2 Tbsp sugar
1 large egg...separated.
1 tsp pure vanilla
1 1/4 cups AP flour
1/4 (a little more) ground cardamom
dash of cinnamon
1/8 tsp salt
1/2 cup pistachios, chopped fine
2Tbsp edible rose petals chopped or crushed into tiny pieces
5 - 6 dried apricots, chopped into small cubes or pieces for thumbprint
apricot preserves or jam...i like Bon Maman

put butter and 1/2 cup sugar in the bowl of an electric mixer with paddle attachment.  mix for 3 - 4 minutes until pale and fluffy.  add egg yolk and vanilla, mix well.  mix the flour, cardamom and salt in a small bowl...lower speed and add flour mixture.  mix until just combined.  refrigerate dough for 2 hours.

preheat the oven to 325 F
stir together pistachios, petals and 2 Tbsp sugar in a small bowl...NOTE...not sure that the sugar is necessary...i think i would have left it out because i like more nuts and petal pieces stuck on the outside.
beat the egg white in a small bowl (slightly beat, but not to a meringue).
roll the dough into 1 inch balls. NOTE...1 inch seems really small, but don't make them bigger.
dip the balls into the egg white then roll in the nut/petal mixture.
press down the center of each ball with your thumb...i tried to use my large thumb, then changed to the end of a wooded spoon for a more uniform hole.
NOTE...you will see cracking around the edges.  some look cute that way and some i pressed back together, closing the cracks.  depending on how thick your jam is you might have seepage.
bake for 10 minutes and remove from oven.  lightly re-press the hole with the end of a wooden spoon.
at this time i put in a piece or a few pieces of dried apricot and a small dollop of apricot jam over the piece...then back into the oven until golden brown...about 8 - 10 minutes.
let cool on wire racks.

NOTE...if you put the jam in before the second baking they seem to hold up and travel better...easier to give away.  you may chose to put the jam in after all baking is done.


Saturday, December 24, 2011

Merry X-mas from me and my Ginger Peeps to you and yours


IT'S JUST NOT CHRISTMAS 'TIL I BITE THE HEAD OFF A GINGERBREAD MAN !


i hope you all have a delicious and wonderful feast where ever you find yourself this holiday.

thanks everybody for following along with all the fabulous comments.  i love it when i get feedback after a tested recipe or new information on something you've done different or even better!.  when i see a new follower or get a new comment on my emal it absolutely makes my day and keeps me going out there to find new and fun recipes to bring to the table.


MY FAVORITE "GO-TO" GINGERBREAD MAN RECIPE...
nothing fancy...classic taste and they hold up very well for days and days.
from good ol' Betty Crocker
if you don't have a tattered old three ring binder of Betty's recipes somewhere in your library of cookbooks...then you can find the recipe  HERE at Betty Crocker's website.

these little guys and gals AND piggies are definitely a labor of love, but well worth the giggles as you are decorating and the huge smiles you'll get giving them away.

i hope you put her recipe in your files for next year's holiday treats.


Friday, December 2, 2011

Francois Payard's Flourless Chocolate Walnut Cookies


few words to say about these cookies except...

WOW...CHOCOLATE WHAM !

the best compliment in the world came from my ever so  fabulous chocoholic mother, who just so happens to be my greatest 'constructive' criticizer...

at first i hear nothing...silence.  then...

"hmmmm...this tastes like one of those $5.00 cookies"


these little, or rather large, gems have been around the block a few times and i have made something similar a while back, BUT i have never used this recipe and exact method...and i made sure i used grade A fabulous Dutch cocoa powder.  well worth the trip to the culinary store (SLT) to get the good stuff.


like i said...few words.  not only do i implore you to add these to your holiday treat list, BUT these are so easy to make, they are a huge chocolate lovers dream AND a big hit for those GLUTEN-FREE peeps that often have to miss out on a good thing.

a few quick notes...
do not over beat.  this should be a little runny, gooey and sticky.
when taking them off the parchment...peel them as though you are peeling an annoying sticky price tag off.  these DO stick to the parchment a bit...so don't be in a rush with the spatula. 
these keep well if completely cooled and stored in an airtight container.  do not stack.  i put a double piece of parchment in between the layers and was very careful not to put one directly over the other.
they get chewier the second day, but still have a crisp to them.


FRANCOIS PAYARD'S FLOURLESS CHOCOLATE- WALNUT COOKIES
recipe found here and copied for your convenience below

2 3/4 cups walnut halves...i only had about 2 cups
3 cups confectioner's sugar (powdered sugar)
1/2 cup plus 3 Tbsp. unsweetened Dutch-process cocoa powder
1/4 tsp salt
4 large egg whites, room temp.
1 Tbsp (TABLESPOON) pure vanilla extract
i also added 1/3 cup chopped dark chocolate...GOOD for extra WHAM factor.

preheat oven to 350 F. to toast your walnuts.
lay your walnuts out on a sheet pan and toast your walnuts, approx. 9 minutes.
(i did them in my Breville Smart Oven on # 2)...watch them closely.
let the walnuts cool and coarsely chop.  set aside.
position racks in the upper and lower thirds of the oven and...
LOWER THE TEMP. to 320 F.
in a large bowl, or on low in a stand mixer,  whisk the powdered sugar, cocoa and salt followed by the chopped walnuts.  while whisking, turn your speed to medium and add the egg whites and vanilla extract.  beat until just combined.  DO NOT OVER BEAT OR THE BATTER WILL STIFFEN.  
spoon the batter onto parchment lined cookie sheets.  Francois says 12 evenly spaced mounds...i got 8 per tray (2 trays) and did a second baking with 4, making 20 total.  as you can see mine were fairly large.  
bake them for 14 - 16 minutes until the tops are glossy and lightly cracked.  shift the pans bottom to top and front to back halfway through to ensure even baking.
slide the parchment paper with the cookies onto 2 wire racks and cool cookies completely before attempting to remove. 
as stated above...don't rush to use a spatula.  these will be semi stuck to the parchment.  peel the parchment slowly from the bottom of the cookie.
store in airtight container.  do not stack without parchment or something in between.
i know they will disappear quickly, but i kept a couple aside and the 3rd day they were still outstanding.


Thursday, March 17, 2011

"Clean out the drawers" Granola Bars


"Spring has sprung"
well...at least the clocks have changed...this also means Spring cleaning is on the way.

i decided to start out with something easy and just clean out one of the over flowing baking drawers.  what do you do with bits and bobs of chips, nuts, seeds, banana chips, dried fruits and various smidgens of left over goodies...?
throw as much of it as you can into a Healthy Granola Bar


you might even call these...
Everything but the Kitchen Sink Granola Bars


i must admit, this one batch didn't really make a dent in the messy drawer of baking goodies i have, but it DID help...and i know every baker out there has one or two of these drawers i'm talking about...right?...for these yummy, crunchy bars i like to use the base recipe i found a few years ago by Alton Brown.  i have radically made changes to the original recipe, but you might want to check the link.  as a matter of fact i pretty much make these from memory and just throw things in until it looks right.  thank goodness granola bars are very forgiving.  they all turn out delicious.

i make granola bars at least twice a month.  the most requested, and my favorite, is the ELVIS GRANOLA BAR (found here)
this one has peanuts, banana chips and BACON...sometimes dipped in melted peanut butter chips.
this combo is a must try!


the recipe for these bars might be a little hard to write, but i'll try to give an idea of what goes in.
like i mentioned, the base recipe is found HERE from Alton Brown.

start with a 9 x 13 baking pan, buttered or sprayed and lined with parchment.
pre heat oven to 350 F.
spread oats, seeds, nuts (if not already roasted) wheat germ, wheat bran on a cookie sheet and bake in oven for 15 minutes...stirring occasionally.
remove from oven and turn oven down to 300 F


in the meantime...
on the stove in a smallish pot melt together

1/4 cup packed brown sugar
1 oz butter
3 Tbsp peanut butter or almond butter
1 tsp vanilla extract
1/3 cup honey
1/4 cup maple syrup
1/2 tsp kosher salt...(if your nuts are not salted)
stir until completely incorporated and dissolved.  set this aside and rewarm if necessary when ready to add to large bowl of dry goodies.

dry ingredients...put in a large bowl
this is where it's your choice, just try to equal the basic amount in each category...such as oats/cereal, seeds and nuts, dried fruits, healthy stuff and extras like chips of any kind.  for the spices...you can always taste test.
my Granola Bar ingredients usually go something like this...

1 1/2 cup old fashioned rolled oats
1/2 - 1 cup brown rice cereal or rice krispies
1/2 cup fiber one cereal
1/2 cup seeds...pumpkin and or sunflower
1 cup roasted, lightly salted nuts...virginia peanuts, almonds, walnuts, pecans whatever
1/4 cup wheat germ
1/4 cup wheat bran
2 Tbsp flax
1/4 cup crystallized ginger
1/3 - 1/2 cup dried cranberries or other dried fruit
throw in some banana chips or choc. chips or peanut butter chips if you have them...and or BACON
spices...equaling 1 1/2 teaspoon-ish
1/2 tsp cinnamon
1/4 tsp fresh grated nutmeg
1/4 tsp ground ginger
sometimes a dash of cardamon
sometimes a little cayenne for a kick in the pants


pour the melted ingredients over the dry in about 3 batches stirring in between...you want a nice even coating.  put everything into prepared pan and spread out evenly.  press down...i say,  PRESS DOWN!  this is key to the bars holding together.
put in 300 F oven for 25-30 minutes until golden brown.  after your first batch you will see that less time makes a softer bar and more time makes a crunchy bar...i prefer CRUNCHY.
remove from oven and let cool completely.
TO GET NICE CUT SQUARES...cut them while they are still in the pan with a very sharp knife.  these will keep for at least a week if you keep them air tight.  i like to wrap them individually in wax paper or parchment and a tight baggie.

my mother always says try the original recipe first then you can play with it however you see fit...
so...if you're into some good granola bars you could go ahead and try Alton's recipe first, but i thought it needed more goodies.  don't be afraid to throw whatever you have in that drawer into the mix.  like i said...
GRANOLA BARS ARE VERY FORGIVING
and always delicious!


Monday, February 21, 2011

Cheerie-Oats Chocolate Chip Cookies


crunchy, filling, healthy and fun...these cookies will start your day right or keep you going when you need a lift.  they're filled with "good-for-ya" fiber and oats and just the right amount of that yummy peanut butter-chocolate combo to let your taste buds know it's still a treat.

CHEERIE-OATS CHOCOLATE CHIP COOKIES
adapted from a recipe found at Suite101.com by Stephanie Gallagher

3/4 cups granulated sugar
1/4 cup apple sauce
3/4 cup peanut butter
1/4 cup water
1 tsp vanilla extract
1/4 cup egg substitute
1 1/2 cups white whole wheat flour
1/2 tsp baking soda
1/2 tsp salt
1/2 tsp cinnamon
a dash of powdered ginger and nutmeg is a great addition...optional
1 1/2 cups old fashioned oats
3 oz mini chocolate chips
3 cups cheerio's...i used Trader Joe's Fiber O's
2 Tbsp flax...optional good omegas


preheat oven to 375 F
beat sugar, apple sauce, peanut butter, water, vanilla and egg substitute together with an electric mixer until well combined.  add flour, baking soda, cinnamon and spice if adding, salt, oats, flax and chocolate chips.  gently hand stir in cheerie o's cereal of choice.
drop the dough (it will be sticky) by rounded 1/4 cupfuls  onto parchment lined cookie sheet.  flatten dough slightly.  they don't spread much at all.
bake for 13-15 minutes until lightly browned around the edges.
should make about 20 large cookies.


Friday, February 18, 2011

Hazelnut Sugar Cookies


don't ya just hate it when something comes out of the oven you think it's all gone wrong?
well, that was the case with these...BUT...

THEY TURNED OUT FABULOUS!

my intention was a cookie with the look and texture of a snickerdoodle and the yummy taste of roasted hazelnuts. (i needed to use up some of the boatload of roasted hazelnuts i had from some other recipe i was working on.)  as you can see in the photos, the snickerdoodle effect did not take place.  they did not rise and fall with that fabulous earthquake looking crack on the top.  

i thought they were all wrong!  until first bite...YUM!
so this one turned out great...BUT all cookies are great right when they come out of the oven... 

will they stand the test of time?...YES...they were still delicious even a few days later.
sometimes, most of the time, i don't get to hand out my goodies until a day or two later.  they have to cool...get some sort of icing or decor...then off to the photo shoot...then they get packaged up and passed out.  quite often this does not all happen in a day.  i get side-tracked with something savory...things are flyin' all over my kitchen sometimes...you know how it is...


the photo below is from the first  tray that went in.  i did not flatten the cookie.  like a snickerdoodle i thought it would flatten and spread during cooking...when it didn't, i thought i had a failure on my hands.    this one was actually the funnest one to eat. 
 i dubbed it "THE HAZELNUT BOMB"
the very top photo is from the second tray that i flattened with the bottom of a glass.  this made for a larger looking cookie with a little more crunch.  both were fabulous and loved by all.  i think i still have some hazelnuts to use up so maybe anther batch will be in store for this weekend.

something is always a winner in this house when it gets made more than once.


ok...on with the recipe...

HAZELNUT SUGAR COOKIES...

1/2 cup butter, softened
1/2 cup shortening
1 1/2 cup sugar
2 eggs
2 tsp vanilla extract
2 3/4 cups white whole wheat flour
2 tsp cream of tartar
1 tsp baking soda
1/4 tsp salt
optional...1/4-1/2 tsp cinnamon and 1/4 tsp fresh grated nutmeg
(i like to put a sprinkle of spice into most everything)
3/4 cup roasted lightly salted hazelnuts, chopped fine
2 Tbsp white sugar
3-4 Tbsp raw sugar (or something like in photo)

preheat oven to 400 F
cream together butter, shortening and 1 1/2 cup sugar.  then add the eggs one at a time and the vanilla.  mix well.
in a separate bowl mix the flour, salt, baking soda and cream of tartar
add dry ingredients to wet.  mix until just combined
add hazelnuts 'til just combined

in a small bowl mix the white sugar and the raw...set aside
shape dough by rounded spoonfuls into rounded walnut size balls
roll in sugar mixture and place on parchment lined cookie sheet
NOTE...you can choose to flatten them or not.  i suggest trying both.  i have photos of flattened and not flattened.  they are both fabulous
bake for 8-10 minutes depending on how large you make them.  bake until set, but not hard.  remove from baking sheet immediately.  i like to slide the parchment right onto my counter top, but that's me.

FOR THE ICING
mix this all together well in a small bowl.  a spoon works fine.  put it in a thick baggie and cut off the tip for an easy quick piping bag.  PS...don't cut your tip too big.

1 cup powdered sugar
1 Tbsp milk
2 tsp corn syrup
1/4-1/2 tsp vanilla extract
a sprinkle of cinnamon
a few grates of fresh nutmeg


Related Posts Plugin for WordPress, Blogger...