Tuesday, June 28, 2011

Spicy Mexican Glazed Nuts


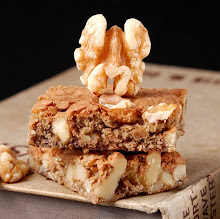
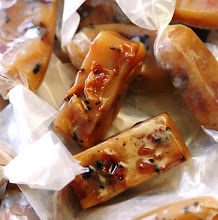
Oooh...these unassuming little nuggets are...whew!...spicy 
and oh so addicting.


if you want a quick spicy sweet nut recipe, this is a great one.  they turn out really crunchy, slightly glazed and you don't have to do anything on the stove with molten sugar or syrups...a simple egg white along with your spices and a little sugar... in the oven, and the magic spicy glazed coating happens without fail.  these were such a hit with my spice lovin' friends.  i tend to make things a bit spicier than most can handle, and these were just right.  i must say...i used REAL MEXICAN CHILI POWDER.  not the wimpy stuff you buy at a regular market so mine came out extra spicy...AND i used the cayenne.  i suggest you use your judgement on the spices, but if you have a Mexican market near you do yourself a favor and buy the real stuff.  it's cheap and always adds a nice blend of spicy chilies to what ever you're making.


SPICY MEXICAN GLAZED NUTS
adapted from Big World-Small Kitchen and Epicurious

3 cups raw mixed nuts
(i used almonds, pecans, macadamia and walnut)
1/3 cup sugar
1 egg white beaten until white and fluffy
1 Tbsp chili powder
(i used REAL Mexican chili powder...whew!...spicy!)
1 tsp cinnamon
1/2 - 3/4 tsp salt
1/4 tsp ground cumin
1/4 tsp cayenne pepper

preheat oven to 350 F...place rack in the middle

spray baking sheet with non stick spray.  in a small bowl combine sugar and spices.  in a large bowl whisk egg until white and frothy.  add nuts into egg white then add the sugar/spice mixture and stir until everything looks evenly coated

spread nuts evenly onto prepared baking sheet and bake until golden, about 20 minutes.

TIP... i took them out after 15-20 minutes and stirred and separated the nuts...then returned to the oven for approx. 10-15 more minutes.  keep your eye on them.  i think this second baking time helps to keep them crunchy.

TIP... do not store them until they are completely cooled, but do not wait over night to store them.  if they get a little sticky (they shouldn't because of the second bake) you can stick them back in the oven for a few minutes, let them cool, then store again.

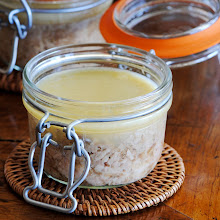
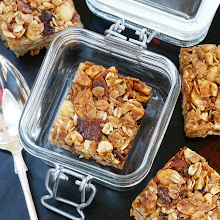
TIP... store in a clip top glass jar with a rubber seal


TIP... also i saved some of those little stay-fresh packets you find at the bottom of other snack foods....you know that annoying little plastic pouch that says DO NOT EAT...DO NOT OPEN.  they look like sugar packets...i put one of those in the bottom of the jar if i have one available.  don't know if it does anything, but i made some nuts 2 weeks ago that are still good and crunchy.

trust me these won't last that long...you'll eat them all up, but i made a sweet glazed version for Dad and he doesn't eat them as quickly as i do


Tuesday, June 21, 2011

Tri-Color Vegetable Terrine


forgive me followers for i have sinned...

it has been 2 weeks since my last post...

i hope the next few goodies will make up for my "writers block".

i've been cooking, shooting and eating loads of good stuff, but i just can't get enough time on the computer to write about it all.  i have about 9 drafts waiting to be finished....you know how it is...just to much selfish playin' around with FOOD.  now i have to get down to business and share what i have found delicious fabulous and fun.


this is a fabulous Tri-Colored Terrine i came across while on one of my terrine hunts.  i'm way in to terrines lately.  i'll be posting about a Collard Green Terrine, along with a Trotter Terrine and hopefully a Vanilla Cherry Chai Jello Terrine if i can ever keep one around long enough to get a photo.


this particular terrine looks fairly simple, but it has some interesting flavors that hit your palate with every bite.  the carrot has a hint of nutmeg and ginger...the cauliflower a hint of lemon zest and the broccoli a touch of scallion and coriander.  it all works together beautifully.
serve alongside your cheese platter for an appetizer...as a first course on top of some fresh greens...or as a lovely side to your main course.  it works well at room temp or slightly warmed before serving.

note...if served right out of the oven you will find this to be more of a dense souffle.  although the flavors will be there, i doubt it will slice very well...and i didn't go through all that layering to present a spoonful of delicious vegetables.  let it set in the fridge.  to get it out of the loaf pan i suggest using the parchment sling method if you are going to invert it for presentation.  OR it's much easier if you just slice it straight out of the dish...CAREFULLY.


TRI-COLORED VEGETABLE TERRINE
adapted from recipe at Cookeatshare by Global Cookbook

3 cups broccoli Florettes
2 cups diced carrots
4 cups cauliflower florets
3 large eggs separated
6 Tbsp fat free cream cheese
3 tsp lemon juice
1-2 tsp lemon zest
1 Tbsp minced fresh chives
1 tsp fresh grated nutmeg
dash of ground ginger
dash of coriander.
salt and fresh ground pepper

preheat oven to 375 F degrees.  lightly oil and line the bottom of a medium glass loaf pan with wax paper or parchment.
blanch the vegetables separately in lightly salted water and shock immediately in cold ice water.  dry vegetables on paper towels or use a salad spinner.
puree the broccoli with 1 egg yolk, 2 tbsp cream cheese and 1 tsp lemon juice.  repeat with the carrots and then the cauliflower. keep your processor clean in between vegetables.
stir the chives into the broccoli with a dash of coriander...salt and pepper to taste
stir the grated nutmeg and ginger into the carrots
stir the lemon zest into the cauliflower

whisk the egg whites until stiff, then carefully fold 1/3 into each vegetable mixture until just combined.
check seasoning in each one.
spoon the broccoli mixture into prepared pan, carefully smoothing the surface.
carefully top with the carrot mixture as not to disturb the broccoli and do the same with the cauliflower, smoothing each layer....this can be a little difficult...have patience.
cover with a piece of lightly oiled wax paper.
place loaf pan in a roasting pan and pour almost boiling water to come 2/3 of the way up the sides of the loaf pan.  transfer to the oven and bake for approx. 40 minutes.  remove wax paper and cook for 10 - 15 minutes longer, till the top feels hard to the touch.  remove from oven and let cool in the pan.

NOTES...this came out much more souffle-like than i had anticipated, BUT DELICIOUS.  really great warm as a side dish or served room temperature as an appetizer with some lovely ripe Brie, Camembert or as shown with a little Maytag Blue.


Tuesday, June 7, 2011

Creme Brulee...Guilt-free version


yup...another "guilt-free" dessert...

sorry, but i live in Southern California and i know at some point in the next few months i AM going to to be in public wearing  a bikini...scary thought...so i'm dishing up all these sweet treats that won't kill the waistline.
not to worry...i'll still throw a few REAL GOODIES in the mix.   one can only go so far with splenda and egg substitute.  chocolate is calling my name...
and bacon hasn't left the game


these are pictures of the custards straight out of the oven...
i must say they DO resemble an egg custard rather than a "true creme" that would naturally be rich and creamy, but this will surely trick the eyes and the palate with a crunchy crispy brulee'd topping.

quick note...i just had one of these that was left in the fridge.  plain with no sugar topping, no brulee treatment...it was fabulous.  better than an egg custard.  it DID actually have that creme brulee taste.  i made the custards 2 nights ago and it was even better tonight than the first night i served them.  i bet the vanilla bean had something to do with it.  so don't leave the fresh bean out...AND might i suggest making them the day before.  let them sit in the fridge over night...yummm!
definite winner...i'll make these again and again.  i think these would make a fabulous ending to a savory Sunday brunch.   if i had time in the morning i'd torch one up for breakfast.


HEALTHY CREME BRULEE
 original with nutrition values linked above.

2 cups non fat milk
2 Tbsp n on fat powdered milk
1/2 cup egg substitute
1 whole large egg, slightly beaten
1/3 cup baking splenda or sugar substitute...not quite 1/3 cup is sweet enough
1 tsp vanilla extract
1/2 real vanilla bean, scraped
sugar for brulee

preheat oven to 325 F degrees
NOTE...i did mine in a convection oven at 310 F... i think the forced air affected the surface.  i will use a regular oven next time to get a smoother more uniform looking top.

lightly whisk milk powder into milk.  lightly whisk egg and egg substitute until combined.  add eggs to milk mixture with the splenda and vanilla extract and bean scrapings....TIP---in a little bowl, mix the vanilla bean scrapings with a couple of tablespoons of the mixture so that it will not clump together.  when the bean specks look like they have separated pour this back into the whole mixture.  (i learned this after i had to deal with vanilla bean clumps.)  
whisk until combined, but do not whisk hard...you don't want a lot of foam or bubbles.
pour mixture into custard cups
NOTE...this made a little more than 4  7oz. custard cups...do not over fill.  i did not use it all.
bake the custards in a bain marie...make sure you fill your bain marie with very hot hot water...but not boiling water.
bake for 35 minutes or until knife inserted comes out clean and they look set...might appear slightly jiggly in the center
let them cool then move to the fridge...uncovered for a couple hours...
or as i mentioned above, leave them in over night.  after they have fully chilled (an hour of so) cover them with plastic wrap.  press the plastic wrap right down onto the custard (like you would a pudding).

when ready to serve remove from fridge and dab off any moisture that might have collected on the top. let them come to room temp....if you can wait.
sprinkle with at least 1 - 2 tsp of sugar...i did not skimp on this part.  you want a good hard top to crack through
FLAME ON !!!   torch your sugar
if you do not have a torch i suggest you purchase one...it's much more FUN and satisfying than trying to get the "brulee effect"  in the broiler.
don't forget to let cool off a little before handling.


Saturday, June 4, 2011

Healthy Faux Cheesecake ...


always on the hunt for a healthy treat...?

this Creamy Lime Pie seems just right for both the health conscious crowd...

AND...

for those, such as myself, who prefer filling their calorie quota with PORK BELLY and other various savory indulgences.


this creamy cheesecake looking pie is just right for a light dessert...breakfast even.  all sweet and smooth with a little tang and that graham cracker-ish crust, but it's all good for ya.  made with Fiber One Yogurt, a little lite cream cheese and Fiber One Cereal.
it might look like cheesecake, act like a cheesecake, but you'll know it's yogurt so don't try to pass it off as "cheesecake". 
BUT, i must say...you WILL have yourself a fabulous guilt-free dessert with plenty of room for that late night snack of baby back ribs slathered in extra BBQ sauce.


Creamy Vanilla Lime Yogurt Cheesecake pie
slightly adapted from Fiber One

Crust
2 cups Fiber One original bran cereal
1/4 cup melted butter
1 Tbsp corn syrup
1 tsp vanilla

Filling
1 Tbsp cold water
1 Tbsp fresh lime juice
1 1/2 tsp powder unflavored gelatin
4 oz. fat free cream cheese
1/2 tsp lemon extract
4 containers Yoplait Fiber One vanilla yogurt
1/2 cup frozen (thawed) reduced fat whipped topping
1 Tbsp grated lime zest

preheat oven to 350 F.

finely crush the bran cereal in a food processor until it resembles graham cracker crumbs.
in a medium bowl, mix crust ingredients until blended.  press mixture evenly and firmly in bottom and up sides of a 9" pie plate.  bake for 10 - 12 minutes or until firm.  cool completely, about an hour

in a 1 qt. sauce pan, mix water and lime juice.  sprinkle gelatin on lime/water mixture and let stand for 1 -2 minutes.  heat over low heat until gelatin is dissolved.  cool slightly about 2 minutes
NOTE...i did this step in a small glass bowl and then the microwave

in a medium bowl, beat cream cheese with an electric mixer on medium speed until smooth.  add yogurt, extract and lime juice/gelatin mixture and beat until smooth and well blended.  fold in whipped topping and lime zest.  spoon onto crust.  refrigerate until set...about 2-3 hours

serve with a dollop of whipped topping


Related Posts Plugin for WordPress, Blogger...