shortbread is just about the easiest most versatile cookie dough there is.
i found this basic shortbread recipe and "method" a few years ago from Smitten Kitchen and have been using it ever since. Deb posted a recipe called Espresso Chocolate Shortbread Cookies created by Dorie Greenspan, chef extraordinaire ! it's a simple, easy, must try recipe to get you started.
once you get the basics you can run with all kinds of interesting flavor combos. i've created a few...Rose Shortbread with White Chocolate, Chocolate Bacon Shorties (to be posted soon), Chocolate Coconut, Haute Chocolate Chili shortbread, Maple Pecan Shortbread Bars and i started with good ol' Chocolate Chip Shortbread Tiles back in 2009 when i fell in love with this recipe.
the best part of this shortbread is the method...
THE ZIPLOC BAGGIE TRICK.
you can get a visual over at Smitten Kitchen's blog or check out Use Real Butter's blog "step by step".
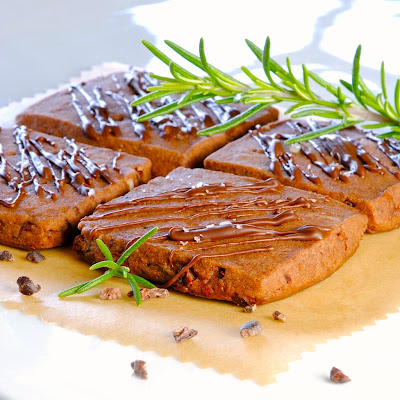
another bonus... as you can see, the dough produces a cookie with sharp crisp edges that will retain the shape you choose, be it square, round or your favorite cut-out-do-dahs.
TRIPLE CHOCOLATE ROSEMARY SHORTBREAD
adapted from Deb at Smitten Kitchen (fabulous blog!) who in turn was sharing a recipe from Dorie Greenspan's "Baking From My Home to Yours"
INGREDIENTS
1/2 tsp instant espresso powder
2 Tbsp good cocoa powder
2 sticks unsalted butter, room temp.
2/3 cup powdered sugar
1/2 tsp vanilla extract
2 cups AP flour
22 grams cocoa nibs
1 large tsp home dried rosemary, fine mince/chop
dark chocolate for drizzle, optional for "triple chocolate"
and coarse sea salt for a sprinkle
dark chocolate for drizzle, optional for "triple chocolate"
and coarse sea salt for a sprinkle
in a stand mixer with paddle attachment, beat the butter and powdered sugar until very smooth. beat in the vanilla and rosemary. turn to low and add the espresso powder and flour in approx. 3 batches until everything is incorporated. do not over mix. gently mix in the cocoa nibs in the machine or by hand. again, not to over mix.
the best part...THE ZIPLOC BAGGIE TRICK.
i learned this from Smitten Kitchens post about these Dorie Greenspan cookies. please check the link and go to her fabulous blog to see some photo instructions.
but in a nut shell this is what you'll do...transfer the dough into a gallon size Ziploc plastic bag. flatten the dough out in the bag, first with your hand then with the rolling pin. flatten until it is solid to the edges of the baggie. as you are rolling...flip the bag a few times to ensure it's even and there are no wrinkles. press the air out and seal the zipper. you will have one big flat baggie of dough about 1/4 inch thick. refrigerate on a flat surface for at least 2 hours or up to 2 days.
when ready to bake...remove from fridge and simply slice the baggie on 3 sides and peal it open. cut the dough with a sharp knife and a straight edge, peel squares off of the plastic and set on parchment lined cookie sheet. prick each cookie with a fork 2 times. i like to stick the whole sheet back in the fridge for about 10 minutes to ensure the nice crisp sharp edges after baking.
bake for 18-20 minutes. don't wait until they darken around the edges...they should just be firm to the touch. transfer to a wire rack to cool.
melt chocolate of choice, i prefer dark chocolate, and do a little drizzle. sprinkle sea salt on before chocolate sets.
they are pretty durable so if you are making cookies ahead of time this is a good one to start with...just drizzle chocolate later in case your chocolate might soften or bloom. they package great if you put parchment in between drizzled cookies.


2 comments:
These cookies are gorgeous! I adore herbs in cookies. And that ziploc bag trick? Genius! I can't wait to try it.
hey Kate...thanks so much. i know you'll love the ziploc trick
Post a Comment