Monday, October 29, 2012

Chipotle Bacon Pecan Caramel Apples...


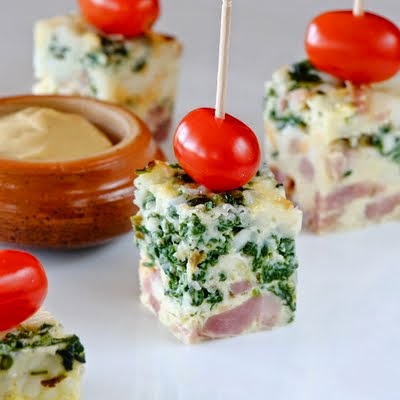
there are no words to describe...

"A PICTURE IS WORTH A THOUSAND WORDS"
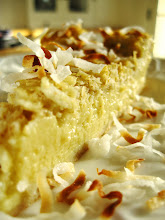

and YES...

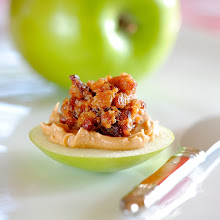
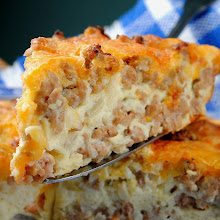
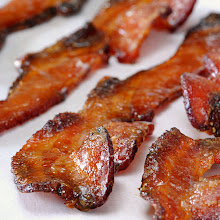
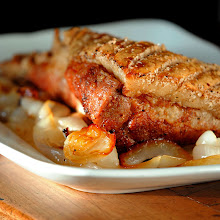
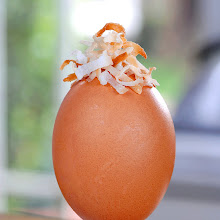
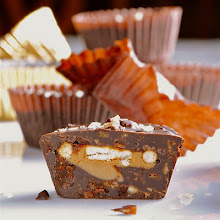
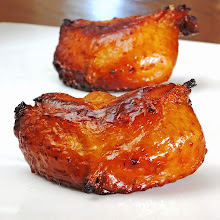
BACON DOES MAKE EVERYTHING BETTER
especially when it's got a little kick of chipotle.


better late than never...i've been dreaming about this for weeks.
now it's crunch time and i found myself scrambling for these simple ingredients.
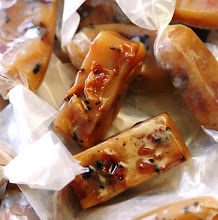
i would normally have gone with the old classic...individual wrapped Kraft Caramels.  i was willing to unwrap as many of those little suckers as possible...man, they are a pain.  i could not find them anywhere today...and i needed them TODAY.  i had a bee in my bonnet.  2 days 'til Halloween and i had to get this done.  i finally found some Werther's Chewy Caramels...a little bit more pricey...and individually wrapped of course, but like i said...i had to get it done...that bee was a buzzin' .

i thought the chews were the right texture, but i did find confirmation that they were right for the job at their website with helpful simple apple dipping instructions....found HERE.

here's what you need to go buy...NOW

4-5 granny smith apples
11-12 oz chewy caramels...Werther's or Kraft
lollipop sticks...wood popsicle sticks would have been better.
2 Tbsp cream.
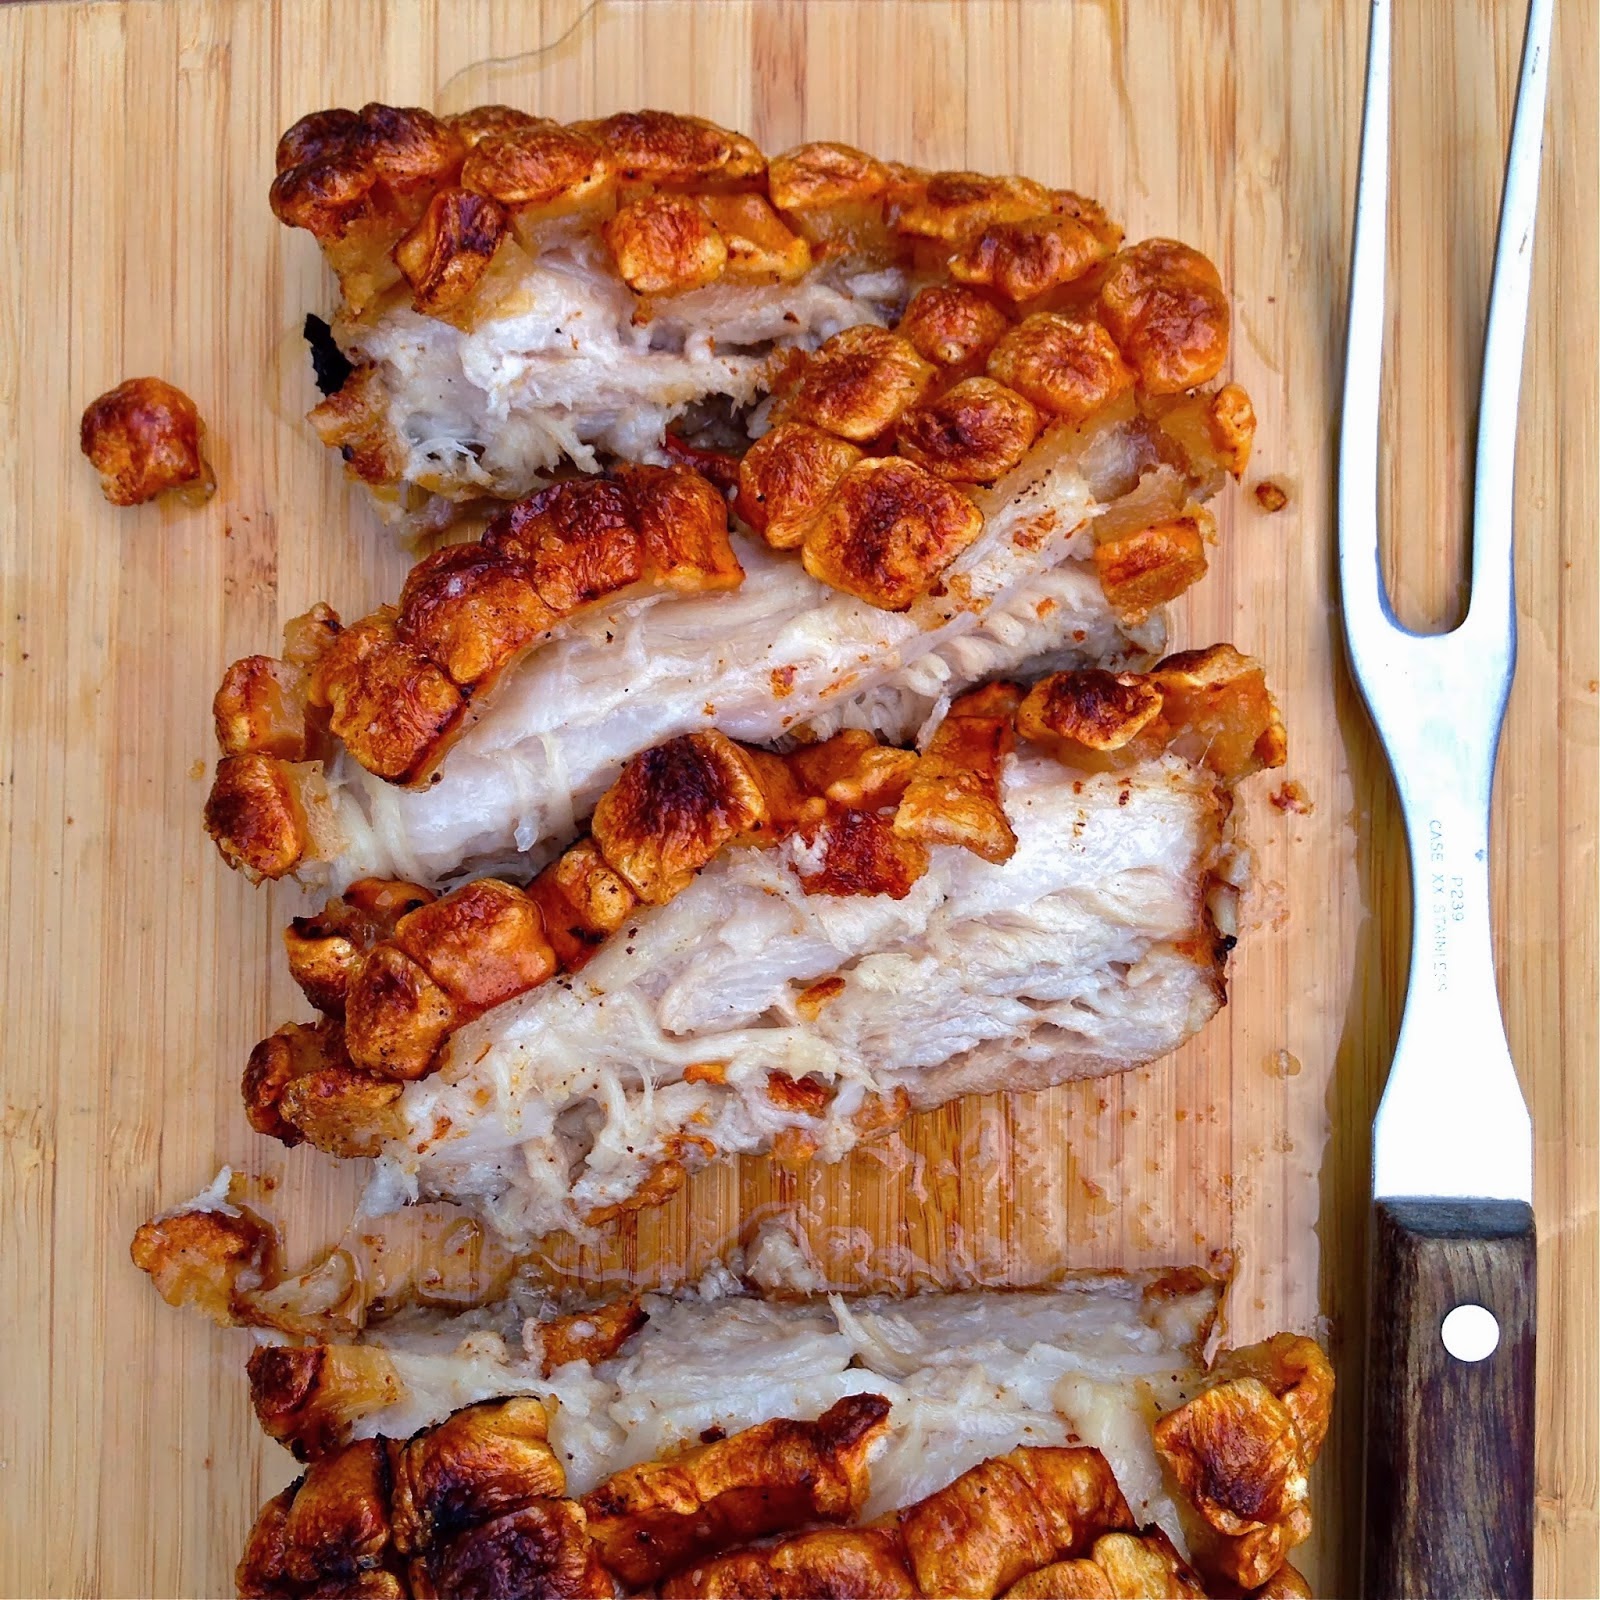
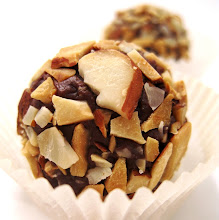
1 lb. bacon...cooked extra crispy, chopped into small pieces.
i cooked a 12oz package and ran out after 4 apples....so sad.
ground chipotle powder and cinnamon...optional.
i sprinkled ground chipotle pepper and cinnamon on bacon 3/4 way through cooking in the oven
a handful of pecans, chopped...sweet & spicy pecans found at Trader Joes.
dark chocolate  for a nice drizzle?  or double dip ???...
DARN...i ran out of time...again......so sad


for clear cut easy caramel dipping instructions go to WERTHER'S CARAMELS or the KRAFT WEBSITE...

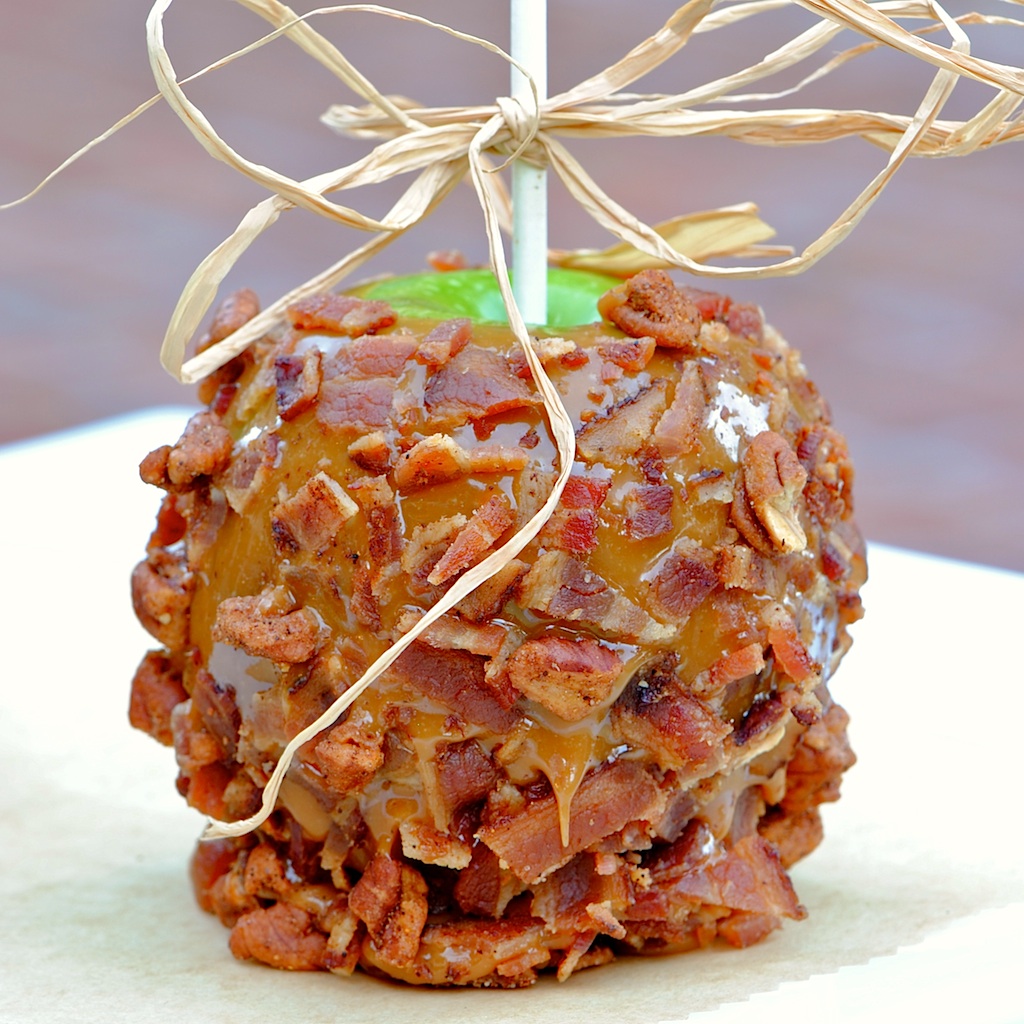
here is what i did...
wash apples...you might need to scrub them or wipe dry very well to remove any waxy coating.
pop clean apples in the fridge for about 15 minutes.
remove stem and push in stick.
prepare a flat surface with parchment that can fit in the fridge.
melt caramel and cream in the microwave on high, stirring frequently, for about 2-3 minutes (depending on microwave).
dip apple and let excess drip from the bottom.
roll in bacon and pecans.
WORK QUICKLY...the caramel sets fast and the bacon won't stick.  you might need to apply bacon and pecans in some missing areas.
quickly put the beautiful bacon pecan apples in the fridge on the parchment.  let set for at least 15 minutes.

NOTE...they should stay chilled until presenting them....
they will begin to sag from the weight of the POUND of BACON you have applied.


Friday, October 26, 2012

Forbidden Rice Pudding


in  few words ?...

unique, exotic, satiating, DELICIOUS... and HEALTHY ?!!!

forbidden rice...

often served in south east Asia for breakfast this unique pudding can just as easily cover you for a surprisingly fabulous interesting dessert.
once upon a time this exotic looking grain was reserved for the emperors of Asia...also known as "The Emperor's Rice" it was forbidden to anyone else.  there are records of black rice being grown around 150 BC, and it is considered lucky as well as nutritious.

if you believe in the gods they say... seeing black rice is an indication that your day will be successful.

i'm all for that.  i'll be eating "Lucky Rice"  every day from here on out ! 


it's even being touted as one of the new super-foods

"this rice provides the richest nutritional value, providing a higher level of vitamins, minerals and fiber of any bran rice, as well as a comprehensive range of amino acids, proteins, vegetable fats and essential trace elements needed by the body." (more info like this found HERE and HERE)


FORBIDDEN RICE PUDDING

1 cup black rice
3 cups water
1/2 tsp salt (will be divided for rice and for pudding)
1/2 cup sugar...i used sug. substitute, Zsweet
1 (15oz.) can unsweetened coconut milk...i used "lite"
3-4 star anise
1 stick cinnamon

bring rice, 3 cups water and 1/4 teaspoon salt to a boil in a 3-4 quart heavy sauce pan.  then reduce heat to low and simmer, covered with a tight lid for 45 minutes...rice will be cooked but still a bit wet.
meanwhile, while that's cooking...heat the coconut milk in a small pot with 3 star anise and a small cinnamon stick.  bring it to almost boil, then turn it off and let the flavors steep.  lid on.
when rice is done, stir in the sugar, a scant 1/4 tsp of salt and the can (or 1 1/2 cups) coconut milk.  bring to a boil over high heat, then reduce heat to low and simmer, uncovered, stirring occasionally until mixture thickens and rice is tender, but still slightly chewy...about 30 minutes.
NOTE...this rice will not get as tender and mooshy as regular rice, but that's part of it's charm.
ALSO...i left in the star anise and cinnamon stick until it was all the way done then fished them out before serving.  do a taste test...you might want to remove them before making the pudding if it's strong enough for you...i like star anise.
serve as is or pour a little coconut milk over the top, as shown, for people to mix in as they choose.


Sunday, October 21, 2012

Butterscotch Buttermilk Scones


there's nothin' like a big pile of scones right out of the oven.  not too sweet...not too heavy...they're portable for on-the-go and just right to keep you going for a few hours 'til lunch.


this recipe is pretty basic, nothing too out of the ordinary as far as scones go.  i just wanted to get it posted because this one produces a tasty proper scone.  some scones can be rock hard...some can be too cakey and some resemble a hunk of heavy bread.  this one turned out just right...great texture, not crumbly, holds up well to spreads and isn't too dense.
you could even consider this a healthy breakfast because it's low in sugar, there's only 3 Tbsp. of butter  and made with 1/2 whole wheat flour.  keep your chips or other add-ins to a minimum and you're good to go...of course i did mention at the end of the ingredients that they are really delicious warmed up and dipped in maple syrup...oh well...


BUTTERSCOTCH BUTTERMILK SCONES
slightly adapted form Gina @ skinnytaste.com
(i highly recommend you visit her site for tasty healthier versions of sweets and savories)

3/4 cup cold buttermilk
1/8 cup sugar
1/8 cup sugar, a touch more if you like scones a bit sweeter.  i used Zsweet substitute
1 1/2 tsp vanilla
1/2 tsp maple extract
1 large egg
1 cup AP flour
1 cup white whole wheat flour
1 Tbsp baking powder
1/2 tsp salt
3 Tbsp chilled butter cut into small pieces
3/4 cup butterscotch chips
for the top...1 large egg white, slightly beaten and approx. 1 Tbsp raw sugar
have on hand some maple syrup for dipping and dunking
OR homemade jams

preheat oven to 375 F.
spray baking sheet with cooking spray ( i think i'll use parchment next time...i love parchment)
combine first 4 ingredients in a medium bowl.  stir with a whisk

combine flour, baking powder, salt in a large bowl, stirring with a whisk.  cut the chilled butter pieces into the flour mixture with a pastry cutter or 2 knives...until the mixture resembles coarse meal.
gently fold in the chips.
add the milk mixture, stirring just until moist and combined.

place dough on a well floured surface and knead lightly 4 times with floured hands
NOTE...this is a sticky-sticky dough.  use flour, but try not to over-use.
form dough into a 9 inch round (about 3/4 to 1 inch thick) and place on baking sheet.  using a floured knife, cut dough into 8 wedges.  Gina at Skinnytaste cuts them into 12, but i like a bigger scone.  cut all the way through.  seperate them a little if you want...i did.

brush the tops with the egg white and sprinkle with the sugar.

bake until golden, about 18-20 minutes.


Friday, October 12, 2012

Pamplemousse...aka Grapefruit Jam


GRAPEFRUIT...PUCKER UP...THEY'RE IN SEASON

they're big, sour, have tough membranes, big seeds and bitter white flesh that is hard to avoid.  most people need to douse them in sugar and pry the meat out with a special knife or spoon just to get one little morsel...even then it's not all that rewarding.

the poor grapefruit gets a bad rap.  
so many think it's just plain diet food...

NOT SO!


they make for some delicious homemade marmalade.
a little unknow fact is that originally marmalade was made from Quince, but then evolved to oranges.   some say the word marmalade is reserved for Seville oranges and only Seville oranges, but now just about anything with a citrus rind in jam form would be considered marmalade...

oh...and by the way...i called it "Pamplemousse" because i couldn't really label it Grapefruit Lemongrass...the flavor just doesn't scream lemongrass as i had hoped...but it IS in there.  besides...the French word makes it sound more intriguing...right ?


i've been wanting to make some grapefruit jam since my whole JAMMAPALOOZA thing started...i finally got around to it.

since i have the need to color outside the lines, i decided to make Grapefruit Lemongrass Marmalade.  i have cooked with lemongrass quite a few times and know it is usually a strong flavor...i thought it would hold up well to the tart sweet-sourness of the grapefruit.  NOT SO MUCH !  i steeped four pieces (shown in photo) and i even added very thin-thin slivers into the jam as it cooked.  the end result did not show the lemongrass flavor i was looking for.  maybe it was masked by the acid or the sugar?...maybe the lemongrass was a dud ?...i'm not sure, but i'm thinking it added to the overall flavor profile in some sort of way.

in any case...not that i have ever bought any grapefruit jam in my life, but...

i know this is better than any old store bought marmalade.


PAMPLEMOUSSE aka GRAPEFRUIT MARMALADE
(technically...GRAPEFRUIT LEMONGRASS MARMALADE)
makes 6 half pints plus a little extra.

3 ruby red grapefruit, see notes
1 navel orange, thin sliced
1 lemon juice
1 lemon peel, thin sliced
1 clove roasted garlic...optional.  see note
6 1/2 cups sugar
1 Tbsp fresh ginger finely minced
1/2 vanilla bean scraped
6 cups water

NOTE...optional.  i added four(4) 2 inch pieces of LEMONGRASS, as shown in photo...and some small thin slivers.  the lemongrass flavor did not really come through in the end product, but i hope and imagine it added to the over all flavor layers.
(above is example of lemongrass and pectin pouch after removal from finished product.)

slice the ends off the grapefruits.  run a sharp knife down the sides to remove the peel while leaving the white skin on the grapefruit.  a little white on the peel is ok.  slice the peel pieces to about 1/8 - 1/4 inch thick.  set aside.  now take that sharp knife and remove the white skin from the fruit...discard.  over a big bowl do your best to segment the grapefruit meat, leaving the seeds and membrane while catching the dripping juices.  squeeze the juice out of the membrane.  save seeds and 1 - 2 membrane clumps for your cheesecloth pectin pouch.  you should end up with about 4 cups of grapefruit meat and juice.

in a large pot, one that you will be cooking the jam in, add sugar, grapefruit meat, juice and peels and the ginger and bring to a boil.  turn off and let this sit over night or for at least 5-6 hours.  this is supposed to help tone down the bitterness.  don't worry, it will still have that slight grapefruit bitter...cuz that's what a grapefruit is...it's bitter.  as mentioned...i added the lemongrass at this point so that it would steep overnight in the mixture.
the next day or when you're ready don't forget to get everything set to go...plates in the freezer for plate test, sterilized jars and lids, start your huge water bath pot and get your work space cleared for take off.
now bring the mixture up to a medium boil.  stir every now and then.  this stage might take a while.  like an hour?  it needs to reduce a bit......don't walk far away, it might boil up on you and that's not a good thing.  add your scraped vanilla bean (and garlic paste if using).  when the jam starts to thicken and reaches 220-222 F degrees try a plate test...if it passes you are ready to proceed with water bath canning.

NOTE about garlic...if you are adding the roasted clove of garlic.   in a small heat resistant cup, take a small amount of the liquid jam out and dissolve the clove into a paste before adding to the jam.  this should be a sight unseen flavor.


Saturday, October 6, 2012

OATMEAL CUSTARD


GREAT START TO A GREAT DAY...

warm creamy custardy 4 grain oats with vanilla greek yogurt and fresh berries.
my idea of dessert for breakfast.


i'm up at the crack of dawn...
mornings are getting cold and i want comfort food.
well...that's a big fat lie.
we're having an unexplained heat wave here in California, but i still want something delicious, healthy and satisfying for breakfast.  i don't want a protein bar.  i don't want a bowl of granola.  i don't have time for eggs Benedict.  i surely can't get through the day on my Mexican pastries alone.  i need something with a little substance that will keep me going and i need something i can put together and get out the door.

this is a great recipe for those no-brainer, i'm too tired weekday mornings when you need some good healthy fuel to get going. make it for a Sunday breakfast and have the leftovers warmed up throughout the week.  dress it up with greek yogurt, syrups, berries, brown sugar and cinnamon, candied pecans...i'm sure everyone has there own ideas for oatmeal extras.

it's not a throw together recipe because you need cooked oatmeal, but it IS an easy recipe if you have that ready.  the cottage cheese might seem a bit odd, but trust me...it really adds to the creaminess and you don't even know it there.  spice it up as you wish.  i always like to add a touch of cardamom, fresh ground nutmeg, cinnamon and vanilla with a touch of almond extract.
i've tried a chocolate version, but haven't perfected it yet.  it was good, but not great, so i'll wait on posting about that.  meanwhile i'll continue on with this one and some different spice combinations.  since i'm so hot about rosemary lately, maybe i'l try that in there some how...hmmmmm.  i think rosemary and maple syrup might work well together...hmmm 


OATMEAL CUSTARD
adapted from Inn Cuisine

2 cups COOKED oatmeal...i use 4 grain hot cereal by Arrowhead Mills
1 1/2 cups low fat cottage cheese
2 large eggs-real eggs work better than substitute
1 cup low fat or skim milk
6 tbsp sugar or sugar substitute...i use 1/2 cup Z Sweet
1/2 tsp cinnamon
1/8 tsp cardamom
1/2 tsp vanilla extract
1/2 tsp almond extract
1 scoop vanilla whey protein powder...optional

preheat oven to 325 F degrees
coat 2 Qt baking dish with non stick spray
in a large mixing bowl, blend oatmeal, cottage cheese, eggs, milk, sugar, cinnamon, cardamom, and extracts in an electric mixer until smooth.
pour batter into prepared dish and bake for approx.1 hour...mine takes about 1 hr 5-10 minutes in a square glass pyrex in a regular oven.

serve warm, room temp or even cold for on the go...

NOTE...ovens are different and so are baking dishes, so i suggest you check it after 45 minutes and keep an eye on the first one.

nutritional info (approx.)
9 servings made with protein powder and Zsweet

cal...95
protein...6
carbs...16
fiber...5
fat...1

Tuesday, October 2, 2012

Greek Yogurt Souffle


quite impressive straight out of the gate...

light fluffy, delicate...perfect for a lovely Sunday brunch.

serve right away for the warm sky high souffle effect...

or  "fallen" as a light, airy healthy and guilt-free cheesecake souffle.  


sometimes, most of the time, you just can't get the darn things to the table in time.  not to worry if they fall.  these are still quite impressive.  i know your crazy head is saying "fallen=failure"... but just take a bite and you will see it is still light as air and "souffle-like".  the first two photos are just minutes out of the oven.  the photos below are about 1/2 an hour out.  if you fill the ramekin to the first rim it should not sink any further than shown.
get creative with your accessories... fresh berries, a blueberry coulis,  ginger syrup, or warm and syrupy homemade jam?

it's like eating a little vanilla cloud.  
a perfect individual fancy treat, but i could eat three so make a few extra.


GREEK YOGURT SOUFFLE

1 cup plain greek yogurt...i use 0% Fage
3 large egg yolks
3 large egg whites
3 Tbsp AP flour
1/8 tsp salt
1 tsp vanilla extract...(per Grandma...i always spill a little extra in the mix) or a 1/2 vanilla pod would look nice with the black specks.
1/8 tsp cream of tarter
1/4 cup sugar, or i used Z Sweet, a sugar substitute
butter and "real" sugar for ramekins

preheat oven to 375 F degrees, non convection...bottom heating element only if possible.  i read this somewhere and it seems to work well with any souffle.
butter six 6oz ramekins.  coat inside ramekin with sugar and knock out excess.  set on baking sheet.
in a large mixing bowl whisk together yogurt, egg yolks, flour, salt and vanilla.  in a medium bowl or in your stand mixture, beat the egg whites and cream of tartar until foamy...then gradually pour in the sugar and whisk until firm, but soft peaks form...just don't whip so hard you break the whites.
add 1/3 of egg white mixture to the yogurt mixture and incorporate well.  then carefully fold in another 1/3...then the remaining.  you want to keep as much volume as possible, of course.
divide evenly into ramekins...i think i filled mine to the line just below the rim because when they fall you still want to have volume in the ramekin.
bake on tray for about 15 minutes, until evenly risen and lightly browned around the edges.
DO NOT OPEN THE DOOR TO PEEK.

serve IMMEDIATELY for the full effect.

BUT...these are still fabulous after they fall  as you can see in some of the photos.
they are also delicious the next day.  they retain their fluff and they taste like a very delicate cheesecake.  i'd have this for breakfast every morning if i could...full of protein, calcium and quite a healthy start for the day. 


approx. nutrition info
6 servings

80 calories
6.6 carbs
2.5 fat
2.3 sugar
7.4 protein


Monday, October 1, 2012

Rosemary Vanilla Bean Soda Bread


SODA BREAD...
why is it called "soda" bread when it only has 1 teaspoon of baking soda and a whole tablespoon of baking powder...hmmmm, never mind...

this has to be the easiest bread to make.  i never thought i could make a descent loaf of bread until i tried soda bread.  with a few staple ingredients and a regular loaf pan, you'll have your own moist delicious homemade bread for the week...
OR forget the loaf pan and make it in a big blob on a sheet pan...

VOILA...call it ARTISAN BREAD


i made one a while back titled Sweet Savory Soda Bread, shown above.  it was fabulous...smoked Gouda, sultana raisins and oatmeal made a delicious combo of flavors.  i did the blob on the sheet pan and was amazed for my first time bread experience.  with the crusty outside and a moist soft healthy inside, i knew soda bread was a new favorite.


a perfect surface to slather homemade jams.  the savory rosemary herb pairs well with a dollop of sweet tart plum jam or blackberry vanilla bean.


great for "tea sandwiches" with a little cream cheese, fresh crisp cucumber and some Hawaiian black salt....should have slipped in a nice slice of smoked salmon ?...yummmm


ROSEMARY VANILLA BEAN SODA BREAD

2 cups AP flour
1 cup white whole wheat flour
1 Tbsp baking powder
1/3 cup sugar...i used Z sweet
1 tsp salt
1 tsp baking soda
1 egg, lightly beaten
2 cups buttermilk
i didn't have buttermilk so i did the lemon and whole milk mixture
1/4 cup melted butter
1 big tsp dried rosemary, chopped or minced
NOTE...i like to use fresh rosemary from the garden and dry it in the oven on a low temp...much better than the stuff in the jars.
1 tsp vanilla bean paste.

preheat oven to 325 F.  grease a 9x5 loaf tin

combine flour, baking powder, sugar, salt, dried rosemary and baking soda.  blend egg, vanilla bean paste and buttermilk and add all at once to the flour mixture.  mix until just moistened.  stir in melted butter..  pour into prepared pan.
NOTE...i like to sprinkle a little coarse salt and or some raw sugar on the top before baking.
bake for 65-70 minutes or until toothpick comes out clean.  cool on wire rack,  wrap in tin foil for several hours or overnight for best flavor.

NOTE...i kept mine wrapped in the fridge and sliced as needed.  i find baked goods slice better when chilled.


last little note...i used this for a veal burger and it was fabulous.  the bread is just a little more crumbly than store bought, but the taste far out weighed the use of your typical hamburger bun.

you might try a panini with brie and sliced pear ?...

fagetaboutit


Related Posts Plugin for WordPress, Blogger...