Saturday, December 24, 2011

Merry X-mas from me and my Ginger Peeps to you and yours


IT'S JUST NOT CHRISTMAS 'TIL I BITE THE HEAD OFF A GINGERBREAD MAN !


i hope you all have a delicious and wonderful feast where ever you find yourself this holiday.

thanks everybody for following along with all the fabulous comments.  i love it when i get feedback after a tested recipe or new information on something you've done different or even better!.  when i see a new follower or get a new comment on my emal it absolutely makes my day and keeps me going out there to find new and fun recipes to bring to the table.


MY FAVORITE "GO-TO" GINGERBREAD MAN RECIPE...
nothing fancy...classic taste and they hold up very well for days and days.
from good ol' Betty Crocker
if you don't have a tattered old three ring binder of Betty's recipes somewhere in your library of cookbooks...then you can find the recipe  HERE at Betty Crocker's website.

these little guys and gals AND piggies are definitely a labor of love, but well worth the giggles as you are decorating and the huge smiles you'll get giving them away.

i hope you put her recipe in your files for next year's holiday treats.


Wednesday, December 21, 2011

Tamale Fusion...A savory and sweet success.


TAMALES  TAMALES   TAMALES...

'tis the season for TAMALES

fist time out of the gates with the tamales and i think i did alright..
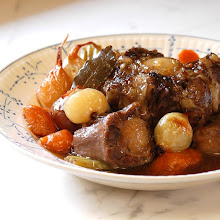
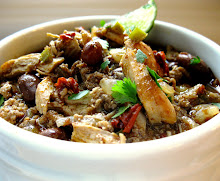
maybe i bit off more than i could chew, but i made 3 different tamales... shredded Asian duck with lightly sauteed Comice pears in tarragon...then i made some with pulled pork smothered in Mexican Red Sauce 
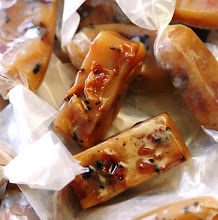
(Red Sauce Recipe found here), Hatch Chilis and queso fresco...then to round out the trio i made sweet tamales with apples and sultana raisins sauteed in butter, brown sugar and cinnamon and topped with toasted pecans...WHEW that's a mouth full.  i'm tired just thinking about it.  they were all fabulous.


there really is nothing like a fresh tamale right out of the steamer.  i can't remember the last time i had one, but it was probably packaged or frozen or brought home and reheated.

once a year at this time our good long time friend, Lupe,  brings us "REAL" authentic Mexican Tamales...and i say real because she was born in Mexico and her mother taught her how her mother taught her and so on and so on...
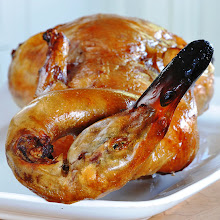
below is a quick photo of the loot that Lupe brought to us on Saturday night...
i must state that Lupe's Tamales ROCK !...experience definitely shows in flavors and texture.
  
making them yourself is so rewarding and like i said...fresh from the steamer these tight little packages are unbelievably delicious.  it really isn't rocket science (when you take a few short cuts like i did) and they ARE a little labor intensive and tedious....BUT well worth the effort.


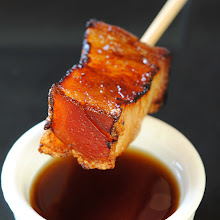
above is the shredded Asian Duck.
if you would like to know how i prepared the duck meat please refer to an earlier post i did on Asian style Duck Rillettes...just go as far as shredding the duck to bite size pieces.  i sauteed the Comice pear with a little butter, brown sugar and dried tarragon...then added fresh tarragon before wrapping.  this needed a little sauce to go with it.  my first thought was Sriracha (Asian HOT sauce)...but i think i could have been more creative.


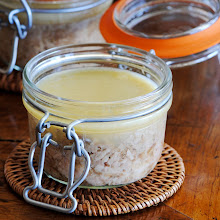
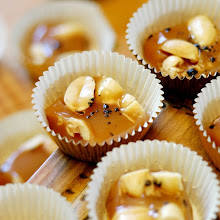
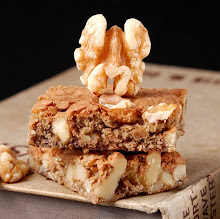
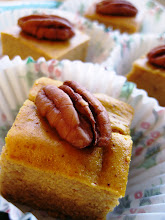
above is the sweet tamale filled with 2 kinds of apples (Granny Smith and Yellow Delicious) sauteed in butter, brown sugar, cinnamon and nutmeg...with a few chopped toasted pecans.  i mixed a bit of sugar into the masa.  serve with whipped cream, ice cream or as i did with a little maple syrup for breakfast...YUMMM !

i have no real written recipe, BUT i do have...
A FEW GOOD HELPFUL HINTS AND SHORT CUTS...
from a first time tamale maker.

1.  buy prepared masa made for tamales.  find a real Mexican market or tortillaria near you.  i found mine at El Matate.  go in the morning, it's still warm in the bag.  now that's fresh.  try not to fall for anything pre-packaged.  the fresh will come in a big plastic bag and hopefully still warm, but definitely moist and mooshy.
2.  make your stuffing/filling the day before...or pull from your freezer like i did with the pulled pork and Mexican Red Sauce.  you don't want to do all this in one day...trust me, the tortilla assembly and cooking will be enough for one day.  i did, however, make the sweet tamale stuffing that day...quick and easy.  like making your favorite apple pie filling.
3.  if you can't deal with the corn husks, try wrapping them in parchment squares.  they aren't as cute and authentic, but it does the trick.  i think you can also purchase pre-cut tamale wrapping paper.  i would have bought a package had i known, but i'm glad i went with the husks on the first time out.
4.  when wrapping, make sure they are totally covered and your husks haven't split.  the filling WILL squish out during cooking.
5.  you can use string instead of corn husk strips to tie them up...this is not an easy task using the husk strips.

6.  if you don't have a proper tamale steamer, use your pasta strainer or vegetable steamer at the bottom of your stock pot.  i used a large vegetable steamer insert, as shown above, and had to lay my tamales flat instead of the traditional upright cooking method.
7.  you need to have them sit a coup[e inches from the bottom and not touch the water.
also...you need enough water to be able to steam for 1 hour.

8.  these can be wrapped ahead of time and cooked before serving.  they will take approximately 1 hour to steam.
9.  they keep well in the fridge for a quick meal and i suppose they can be frozen as well.
10.  reheat in the microwave wrapped in a damp paper or cloth towel to keep moist.


Friday, December 16, 2011

Old Fashioned Ginger Bread


this deep dark moist ginger molasses cake screams...

HELLO HOLIDAYS...

I'M EATIN' SWEETS AND I DON'T CARE !!!


yes, there are many ginger bread recipes out there...i think i looked at them all.  i had intended to bake good ol' Betty Crockers' ginger bread because i think it's always a classic when found in the tattered old 3 ring binder recipe book that i use as my tried and true recipes....
BUT then i fell on this recipe by a fellow blogger from London.  well, anything from "across the pond" goes over well in this house full of Anglophiles.

you must visit Marie Rayner's post about this wonderful cake...The English Kitchen
she explains how she came about this recipe and calling it "THE WORLD'S BEST"...
she came up with the recipe after years of trying many many ginger breads and finally through trial and error she tweaked this one to perfection.  it's a "no-fail" recipe if followed to the "T".  i did as suggested and the cake turned out absolutely delicious,

i know everybody probably has their favorite ginger bread cake recipe that their Grandmother used to make at X-mas, BUT you really should try this one just for kicks

YOU CAN NEVER HAVE TOO MANY WORLD'S BEST CAKE RECIPES IN YOUR ARSENAL...


WORLD'S BEST GINGER BREAD CAKE
copied for your convenience below

1 1/2 tsp ground ginger
1 1 /2 tsp cinnamon
1/4 tsp ground cloves
8 1/2 ounces of plain flour (2 cups)
2 1/4 tsp baking powder
1/4 tsp salt
10 fluid ounces of boiling water (1 1/4 cups)
2 fluid ounces of dark treacle
4 fluid ounces of Golden Syrup
(you may use 6 ounces of mild molasses instead (3/4 cup)...I USED MOLASSES
3/4 tsp baking soda
6 Tbsp butter, softened
5.6 ounces of dark brown sugar (3/4 cup, packed)
1 large egg at room temp.

preheat oven to 350 F.  butter and flour a 9 inch square baking tin...set aside
I USED AN 8 INCH SQUARE AND FILLED 1 SILICON MUFFIN CUP

add the treacle and syrup, OR molasses to the boiling water along with the baking soda.  set aside and let cool to room temperature.

cream together the butter and brown sugar until light and fluffy with an electric whisk (i used the paddle attachment).  beat the egg with a fork and then beat it into the butter mixture a little at a time.  whisk together the flour, spices, baking powder and salt...set aside.  On low speed add the cooled water syrup (or molasses) mixture to the creamed mixture.  stir (low speed mixer w/paddle attachment)in the dry ingredients only to blend.  pour into the prepared baking tin.

bake for 30 to 40 minutes, until well risen and the tops springs back when lightly touched, or a toothpick inserted into the center comes out clean.  i always do the toothpick test.

this cake is fabulous on it's own, but Marie suggests serving with a Spiced Lemon Sauce (found here with the original)...sound divine, BUT i was lazy and didn't have a lemon in the house so i simply went to the cupboard and whipped out some caramel sauce.  oh boy...that worked !


Sunday, December 11, 2011

Giada's Parma Carrot Cake


this unassuming simple looking cake is...

SIMPLY DELICIOUS !

a new favorite carrot cake is on your horizon...trust me


this is a carrot cake like i have never tasted...not too too sweet like a lot of carrot cakes.  you can actually taste the sweetness from the carrots.  the pine nuts give it a buttery texture, you get a hint of fennel and the lemon just wakes everything up.  all those flavors combined create this very unique dessert.


i caught this on the Food Network show, "the Perfect 3".  Ina Garten and her perfect Classic Chocolate Cake, Paula Dean with her Red Velvet Cake and then there was Giada De Laurentiis with this interesting Parma Carrot Cake that caught my attention.


i DO love carrot cakes but sometimes they can just be over powered by spices, stringy carrots and cloyingly sweet with cream cheese frosting.  when i saw her adding fennel seeds and pine nuts i immediately pushed the record button and googled the recipe.

this is a definite winner and a "must-try" recipe.  the cake is versatile...can be baked in different vessels and served any way you choose.  serve as a star quality dessert or a simple tea cake...enjoy for breakfast brunch or snack...a warm frothy cappuccino or just a spot of tea...
IT'S DELICIOUS ON IT"S OWN !


PARMA-STYLE CARROT CAKE
recipe courtesy Giada De Laurentiis
i have copied it for you below with my slight changes in italics

2 1/2 cups all purpose flour...i substituted 1 1/4 white whole wheat flour
1 Tablespoon baking powder
1/2 tsp ground cinnamon
1/2 tsp salt
1 cup pine nuts (about 6 oz.)
1/2 cups sugar, plus 1/2 cup sugar...
NOTE...i mixed 1/2 cup splenda with 1/2 cup sugar and separated that.
also...on the show Giada did not separate the sugar.  she creamed the butter and the 1 cup sugar.  i did as the written recipe, so either way will work.  no need to separate...
1 tsp fennel seeds
1 lemon zested and juiced
2 cups peeled, shredded carrots (about 6 carrots)
1/2 cup mascarpone cheese
1/2 cup (1 stick) butter, softened
5 eggs
powdered sugar for garnish

preheat oven to 375 F
in a medium bowl stir together the flour, baking powder, cinnamon and salt.  set aside

place the pine nuts, 1/2 cup sugar and fennel seeds in a food processor and pulse to mince the nuts.  add lemon zest, lemon juice and the shredded carrots.  pulse to mince the carrots.  add the mascarpone cheese and pulse until cheese is incorporated

in a large bowl, using a stand mixer, cream together the butter and remaining 1/2 cup sugar.  add the eggs one at a time, until well combined.

add the carrot mixture to the butter mixture and stir until combined.  add the reserved DRY ingredients in 3 intervals and stir until just incorporated.

place the mixture in a slightly greased and floured 8 x 10 by 2 dish
NOTE...i used a 9" springform pan.  2 loaf pans might work well for serving as a sliced tea cake.  on the show Giada used some star shaped baking paper molds.

bake for 55 - 60 minutes...golden brown on top and toothpick comes out with a slight crumb.
let the cake cool for 1 hour, then lightly dust with powdered sugar.

i let the remaining cake sit out over night, then refrigerated it.  this cake keeps well for at least a few days.  bring to room temp before serving.  (great treat for breakfast).


Friday, December 2, 2011

Francois Payard's Flourless Chocolate Walnut Cookies


few words to say about these cookies except...

WOW...CHOCOLATE WHAM !

the best compliment in the world came from my ever so  fabulous chocoholic mother, who just so happens to be my greatest 'constructive' criticizer...

at first i hear nothing...silence.  then...

"hmmmm...this tastes like one of those $5.00 cookies"


these little, or rather large, gems have been around the block a few times and i have made something similar a while back, BUT i have never used this recipe and exact method...and i made sure i used grade A fabulous Dutch cocoa powder.  well worth the trip to the culinary store (SLT) to get the good stuff.


like i said...few words.  not only do i implore you to add these to your holiday treat list, BUT these are so easy to make, they are a huge chocolate lovers dream AND a big hit for those GLUTEN-FREE peeps that often have to miss out on a good thing.

a few quick notes...
do not over beat.  this should be a little runny, gooey and sticky.
when taking them off the parchment...peel them as though you are peeling an annoying sticky price tag off.  these DO stick to the parchment a bit...so don't be in a rush with the spatula. 
these keep well if completely cooled and stored in an airtight container.  do not stack.  i put a double piece of parchment in between the layers and was very careful not to put one directly over the other.
they get chewier the second day, but still have a crisp to them.


FRANCOIS PAYARD'S FLOURLESS CHOCOLATE- WALNUT COOKIES
recipe found here and copied for your convenience below

2 3/4 cups walnut halves...i only had about 2 cups
3 cups confectioner's sugar (powdered sugar)
1/2 cup plus 3 Tbsp. unsweetened Dutch-process cocoa powder
1/4 tsp salt
4 large egg whites, room temp.
1 Tbsp (TABLESPOON) pure vanilla extract
i also added 1/3 cup chopped dark chocolate...GOOD for extra WHAM factor.

preheat oven to 350 F. to toast your walnuts.
lay your walnuts out on a sheet pan and toast your walnuts, approx. 9 minutes.
(i did them in my Breville Smart Oven on # 2)...watch them closely.
let the walnuts cool and coarsely chop.  set aside.
position racks in the upper and lower thirds of the oven and...
LOWER THE TEMP. to 320 F.
in a large bowl, or on low in a stand mixer,  whisk the powdered sugar, cocoa and salt followed by the chopped walnuts.  while whisking, turn your speed to medium and add the egg whites and vanilla extract.  beat until just combined.  DO NOT OVER BEAT OR THE BATTER WILL STIFFEN.  
spoon the batter onto parchment lined cookie sheets.  Francois says 12 evenly spaced mounds...i got 8 per tray (2 trays) and did a second baking with 4, making 20 total.  as you can see mine were fairly large.  
bake them for 14 - 16 minutes until the tops are glossy and lightly cracked.  shift the pans bottom to top and front to back halfway through to ensure even baking.
slide the parchment paper with the cookies onto 2 wire racks and cool cookies completely before attempting to remove. 
as stated above...don't rush to use a spatula.  these will be semi stuck to the parchment.  peel the parchment slowly from the bottom of the cookie.
store in airtight container.  do not stack without parchment or something in between.
i know they will disappear quickly, but i kept a couple aside and the 3rd day they were still outstanding.


Related Posts Plugin for WordPress, Blogger...